

Analyzing KSL0T (Turla’s Keylogger), Part 1 – Reupload
(This post is a reupload from my old site which is no longer available – you may have seen it before)
Whilst I’m working through the Hancitor write up and the Flare On challenges, I decided to take a short break and focus on a smaller piece of malware – such as a keylogger, which in this case is on a much larger scale than $32 keylog-as-a-service, as it has been attributed to a Russian Advanced Persistent Threat group known as Turla, or Waterbug. This APT group has been in the news quite frequently over the past month, after compromising European government foreign offices and creating an extremely stealthy backdoor that utilizes PDF files to exfiltrate data, via emails. I noticed a sample of malware uploaded to VirusBay, tagged with Turla and Venomous Bear (yet another moniker given to the group), and decided to analyze it. As I statically analyzed a lot of the Flare On challenges that I have completed, I decided I wanted to approach this sample primarily using static analysis, unless it became too difficult to do so. So, let’s begin cracking this sample open!
MD5: 59b57bdabee2ce1fb566de51dd92ec94
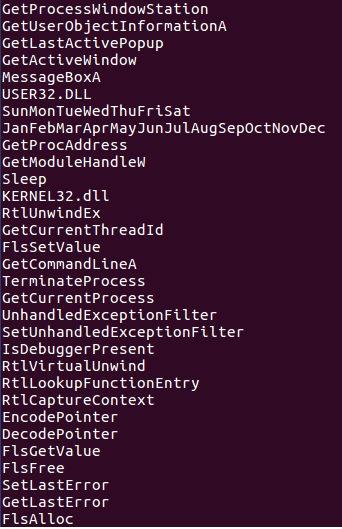
As per usual, I ran the file and strings command on the binary to see the format and if there was anything interesting that was visible. The binary is in fact a DLL, and a 64 bit one. The output of strings displayed a lot of junk, although we are able to see a few error messages and several Windows API calls, such as IsDebuggerPresent, WriteFile, and dynamic loading calls; GetModuleHandle, LoadLibrary and GetProcAddress.
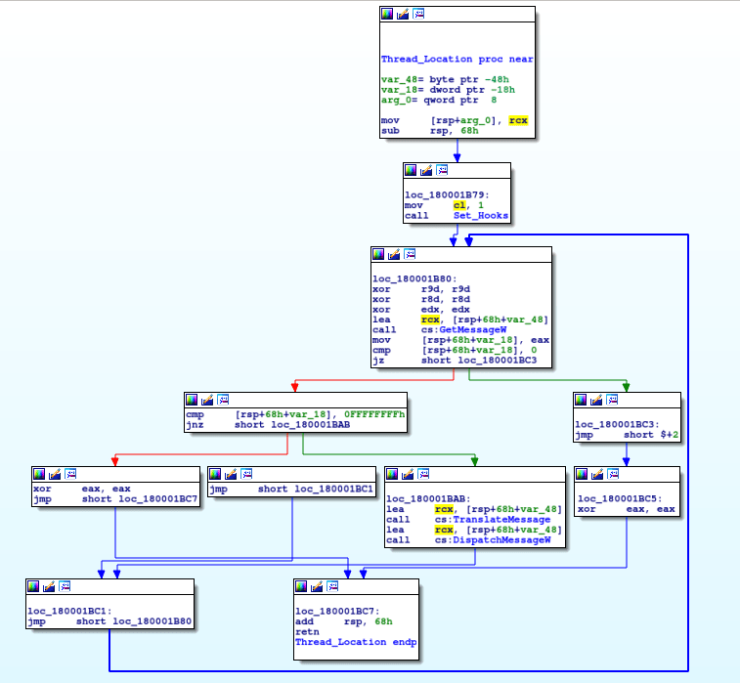
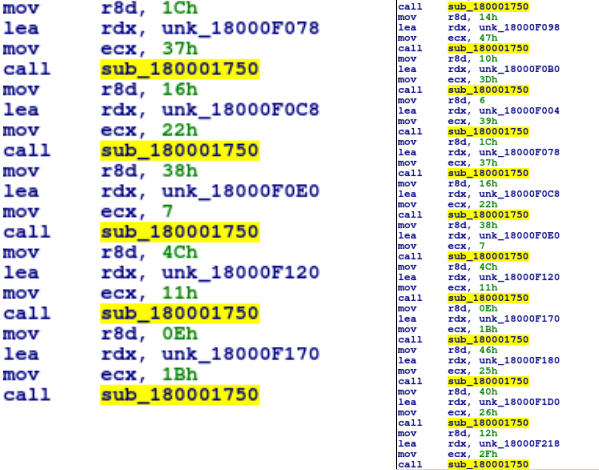
After opening the file in IDA, we are able to view the entry point of the user code, DLLMain. After a cmp operation, the program jumps to 0x1800019BD, where an extremely important function at 0x1800017D0 is called. It might not look like much at a first glance, just multiple calls with 3 arguments passed to them – until you realize it is calling the same function each time, with the second argument being what seems to be pointing to some encrypted text …
As you may have guessed, this is in fact a decryption function. When we view the function called at 0x180001750, we can determine that it is a decryption function based on both the arguments, and on the xor edx, eax. Also take note of the for loop, which compares the value in eax (value stored in arg_10) and the value in var_18.
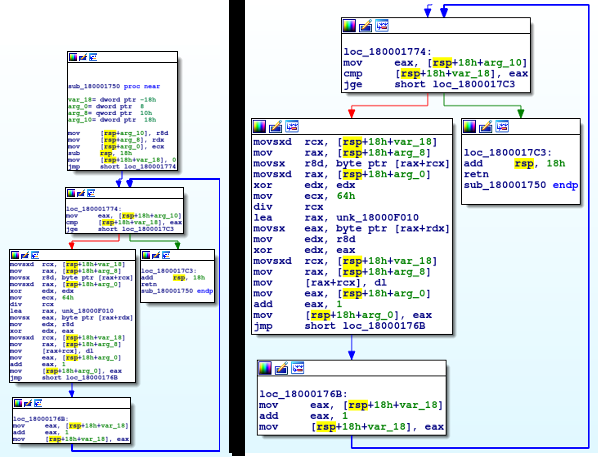
We can further deduce that var_18 is in fact the counter, based off of this section of code:
mov      eax, [var_18]
add      eax, 1
mov      [var_18], eax
As we now know this, we can rename var_18 to Counter. Click on var_18 and push ‘n‘, and a prompt will appear, allowing you to rename the variable. We now need to figure out what the counter value is being compared to, meaning we need to analyze arg_10. As it is arg_* and not var_*, we have to look at the arguments passed to this specific function. In this case, the arguments are not passed using the push mnemonic and are instead mov’d into the arguments. As the value in the r8d register is being moved into arg_10, let’s jump back the the calling function to view what was in r8d before executing the decryption function.
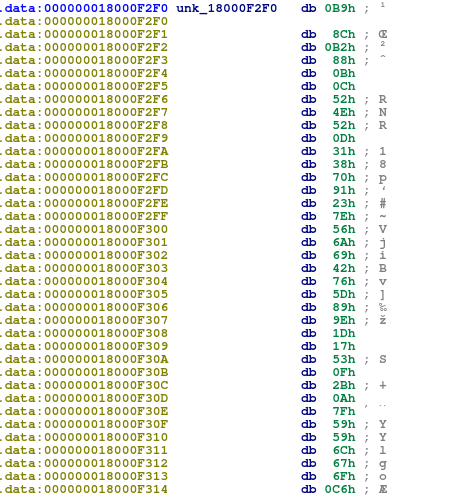
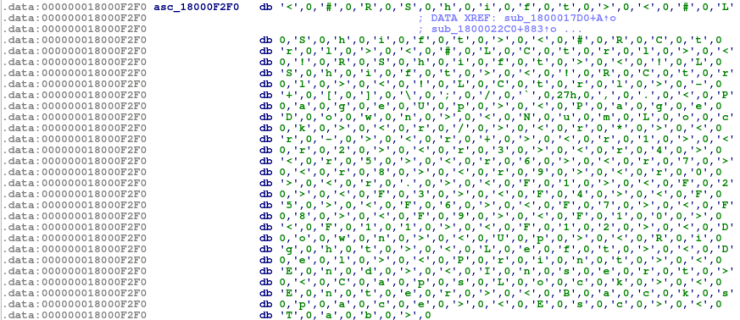
mov   r8d, 25Eh
lea   rdx, unk_18000F2F0
mov   ecx, 47h
call  sub_180001750
We can convert the hexadecimal number to decimal by pressing ‘H‘ while selecting it, resulting in the decimal value 606. So for this particular call, the XOR algorithm loops 606 times, XORing each character. Now we have identified arg_10, we can go ahead and rename it. Next, let’s try and figure out the values that are being XOR’ed together, to see if we can locate the key used and the data being decrypted. The xor mnemonic performs the XOR operation on the value in edx, with the value in eax. The result of the operation is always stored in the first argument, in this case the result is stored in edx. We can assume that edx contains the data to be decrypted, and eax contains the key. In order to find these values out, we have to see what was moved (mov) or loaded (lea) into the edx and eax register.
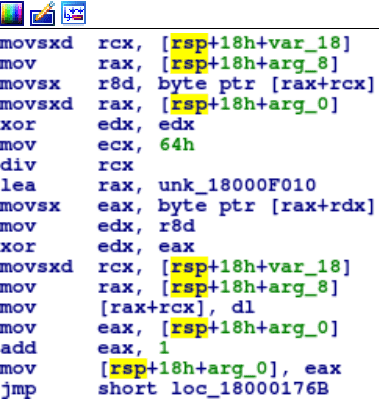
As you can see, r8d is moved into edx before the XOR occurs, so we have to then see what was moved into r8d beforehand – which is seen in the third instruction of this segment: movsx r8d, byte ptr [rax+rcx]. Just above this, [rsp+18h+counter] is moved into rcx, and whatever is stored in arg_8 is moved into rax. As we know counter is incremented by 1 each loop, we can determine that the byte ptr [rax+rcx] is iterating over something 606 times, with that something being encrypted characters. We can double check this by finding out what is stored in arg_8, the same way we discovered what was in arg_10: unk_18000F2F0, which contains a lot of encrypted data (specifically, 606 bytes of it).
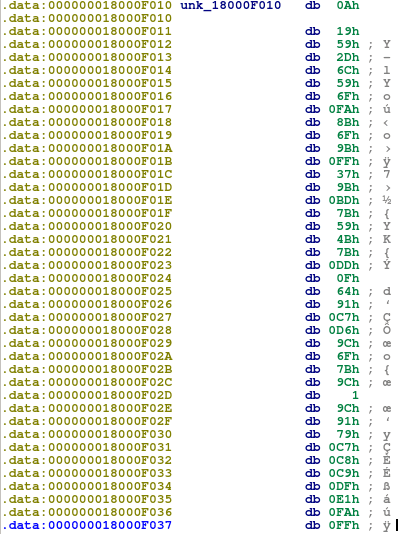
Next, let’s find out what is being stored in eax. In this instance, one byte of data at [rax+rdx] is being movsx into eax. Therefore, we need to locate the data stored in rax and rdx. The data in rax is quite easy to find out, as there is a mov rax, unk_18000F010 before the movsx. When viewing the data at 0x18000F010, we can see what seems to be more encrypted text – the key used to decrypt the data at 18000F2F0. However, it is not that simple. Remember the rdx register that is used? Well we can assume that the value in rdx changes on each iteration. In order to figure this value, we need to look at the div instruction.
Key Array:
mov  rax, arg_0
xor  edx, edx
mov  ecx, 100
div  ecx
The div instruction takes one operand – this contains the value to divide rax by. A division of 0x8003 by 0x100 in x64 Assembly would look something like this:
xor rdx, rdx      ; clear dividend
mov rax, 0x8003   ; dividend
mov rcx, 0x100    ; divisor
div rcx           ; rcx = 0x80, rdx = 0x3
It is basically a division, however the remainder value is stored in rdx, meaning rdx is equal to 0x3. In the case of the keylogger, the XOR key is decided based on the value of rdx, and therefore we need to figure out what rax is, so we can divide it by 0x64 in order to get the first value of rdx. We know that arg_0 contains the value of ecx before the function is executed, which is 0x47. When we convert it to decimal format, it is 71 / 100, leaving us with 0.71. The value stored in rdx is 71. Simply perform the modulo operation (%) on these two values and you will get 71. This means that the 71st byte in the key array is the first byte to be used in the XOR: 0x85. For each loop, the value inside of arg_0 is incremented by 1, meaning the key byte is always changing – although now that we know how the algorithm works, we can automate the decryption statically, rather than relying on a debugger.
mov eax, [rsp+18h+arg_0]
add eax, 1
mov [rsp+18h+arg_0], eax
So how do we go about the static decryption? Well the answer is IDC, which is a scripting language incorporated inside of IDA. Another option is IDAPython, however that isn’t available inside the IDA 7 Pro Free version, so we’ll stick with IDC. So far, we know that the decryption part is all contained inside of a loop that loops a pre-determined amount of times, using a specific key array and a determined data array. In addition, the value that is used for the div operation is also passed as an argument. Therefore, we will require 3 arguments for our function: base_data, div, and loop. We will also need 6 variables: index, x1, x2, data, i, and base_xor. index will contain the result of the modulo operation, x1 will contain a byte of data from the encrypted text, x2 will contain a byte of data from the key, data will contain the result of the XOR, i will be the counter and base_xor will hold the address to the key array. To store an address, simply add an 0x to the beginning of said address. The rest of the script will contain the necessary incrementations and XOR’s.
static decrypt_data(base_data, div, loop) {
auto index, x1, x2, data, i, base_xor;
base_xor = 0x18000F010;

for (i = 0; i < loop; i++) {

    index = div % 100; // Get value from div % 100
    x1 = Byte(base_data); // Get byte from encrypted data
    x2 = Byte(base_xor + index); // Get XOR key using value from div / 100
    data = x1 ^ x2; // XOR data
    PatchByte(base_data, data); // Replace enc. byte with dec. byte
    base_data = base_data + 1; // Increment Encrypted Data
    div = div + 1; // Increment Divider
}

}
In order to *install* this script into IDA, click File -> Script Command, and then paste it into the dialog box.To call the function, simply type (in the command line at the bottom) decrypt_data(0x18000F2F0, 71, 606) to decrypt the first section of data, which should look like the image below.
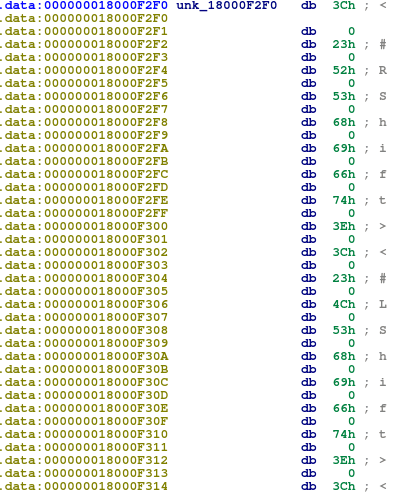
Select all of the data and press A, which should arrange it into more legible data, although every second byte is a 0, so we will need to remove them.
After removing the 0’s, we are left with this:
<#RShift> <#LShift> <#RCtrl> <#LCtrl> <!RShift> <!LShift> <!RCtrl> <!LCtrl> - + [] \ ; / ` ' , . <PageUp> <PageDown> <NumLock> <r/> <r*> <r-> <r+> <r1> <r2> <r3> <r4> <r5> <r6> <r7> <r8> <r9> <r0> <r.> <F1> <F2> <F3> <F4> <F5> <F6> <F7> <F8> <F9> <F10> <F11> <F12> <Down> <Up> <Right> <Left> <Del> <Print> <End> <Insert> <CapsLock> <Enter> <Backspace> <Esc> <Tab>
We can assume that this data is used to log keystrokes when pushing certain buttons such as Left Shift and NumLock, rather than regular characters. To double check that the decryption worked, we can run it in a debugger and check the output. Now that we have successfully decrypted the first part, we can do the same to each of the 19 sections of data that are encrypted. If you want to view each decrypted string, you can check them out here. One particularly interesting string in the data is msimm.dat, which could be the log file. In addition to msimm, one of the strings seemed to indicate the version of said keylogger, as well as a possible name for it: KSL0T Ver = 21.0, although I haven’t found anything interesting linked to the name KSL0T – yet.
As this post is longer than what I planned it to be, I decided to split them into sections, as there is quite a lot of decryption and functions to analyze – especially since it is static analysis. I am focusing on this approach mainly to demonstrate and teach people that you can still get a lot done through static analysis methods, even if you can’t afford the full version of IDA Pro (which I certainly can’t!), as well as how to use IDC to automate time consuming tasks. In the next part we will be decrypting some more stuff, and then actually locating the loop that performs the keylogging – this should be out soon!
IOC (MD5):
- Keylogger: 59b57bdabee2ce1fb566de51dd92ec94