(This post is a reupload from my old site which is no longer available – you may have seen it before)
If you haven’t read the first post, go check it out here. You can download this keylogger off of VirusBay. So far we have decrypted a whole lot of text using a simple XOR method, which revealed information on how different keys could be logged, file names in which the data could be logged to, and a possible name for the keylogger: KSL0T. If you’ve got no clue what I’m talking about, you should most definitely check out the last post. Anyway, let’s go further down the rabbit hole.
MD5: 59b57bdabee2ce1fb566de51dd92ec94
If you’re following along with this analysis, make sure you rename the decryption function, so it confuses things less. After the return of the decryption function, GetModuleHandleW and GetProcAddress are called, using the recently decrypted values, which are the last two strings to be decrypted. These values are kernel32.dll and GetProcAddress.
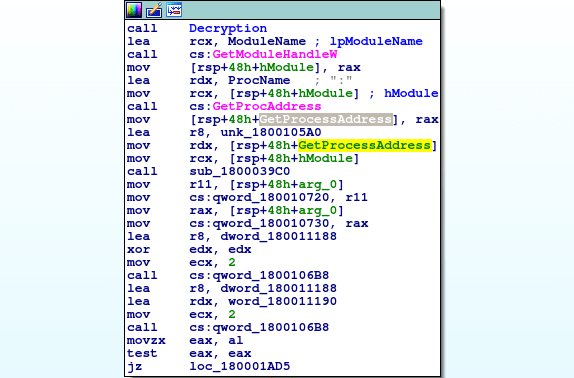
The return value of GetProcAddress will be stored in the rax register, which is then moved into the location [rsp+48h+var_28], so to simplify matters, we can rename var_28 to GetProcessAddress, so whenever it is moved into another register (as long as it hasn’t been changed), we can identify what is happening if that register is called by the program. Sure enough, it is moved into the rdx register, just before a handle to kernel32.dll gets moved into the rcx register – and then a function at 0x1800039C0 is called.
We can easily identify the arguments passed to this function, as it is using the mov operation again. We already know rcx contains a handle to kernel32.dll, and rdx contains the GetProcAddress function, and it seems r8 contains an address to an empty region of memory: 0x1800105A0, which is filled with zeroes.
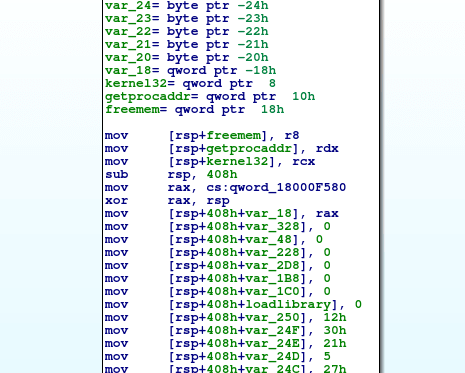
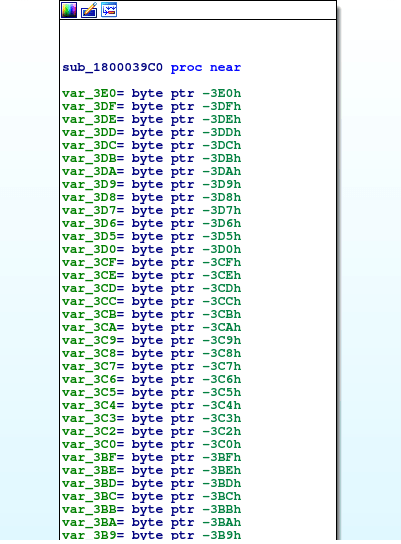
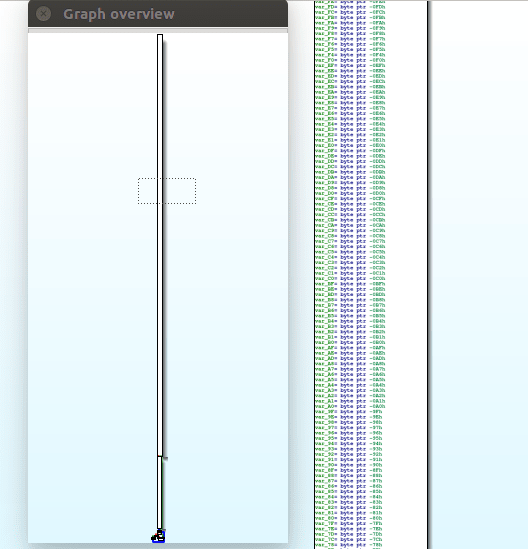
If you are viewing the function in graph mode, you’ll be able to see that the flow is simply one long “line”, with no if’s or for statements until the end. You can also see that there are a lot of variables that are declared before the arguments are filled – as we are analyzing this binary using static analysis, this function alone will require a lot of work to understand (because it is a possible anti-static analysis method used by Turla to prevent easy analysis). Hint: It’s more data decryption, except this time, the encrypted data is loaded during runtime – hence why there are so many mov operations in a row. Due to this, we will have to manually extract those bytes, figure out how they are decrypted, and find a way to decrypt them, through automation or writing a script. Let’s get stuck into it!
There is most definitely a better way to decrypt the data, although I am unaware of it, so I took the long route. Highlight the mov instructions and copy it to a file. We will be stripping this down so it only contains the second argument to the instruction – the encrypted data.
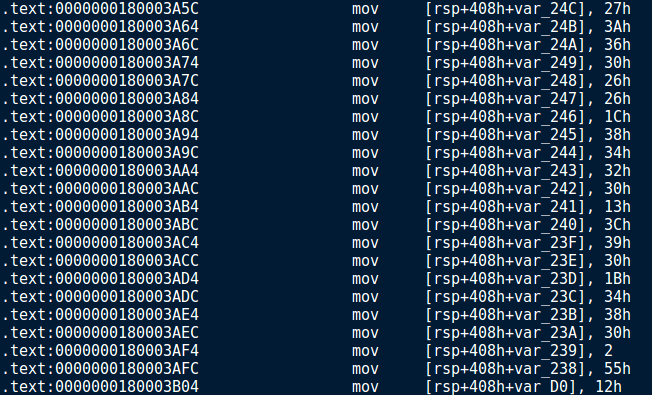
Now we need to parse the data and format it correctly, so that we only have the value being moved into the destination. Below is a script that removes everything but the digit, including the h specifying the hexadecimal format. For singular digits, a zero is prepended onto the value, to make an understandable hex value.
def main():f = open("data.txt", "r") data = f.readlines() f.close() f = open("data_2.txt", "w") for lines in data: lines = lines.split("], ")[1] if "h" in lines: lines = lines.split("h")[0] lines = lines + " " else: lines = "0" + lines lines = lines.split("\n")[0] lines = lines + " " f.write(lines) f.close()if name == “main”:
main()
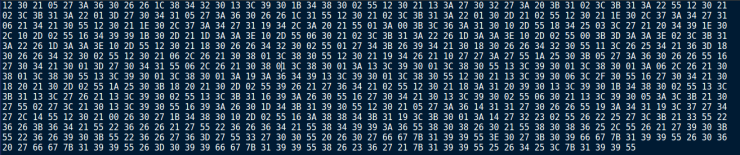
After executing the script, we get this output in data_2.txt. This is the extracted encrypted data, so we need to identify the decryption method used, to understand what it is encrypted with.
Back to the assembly, after the individual bytes have been moved into the correct locations, a function at 0x180001000 is called repeatedly in a similar fashion to the first decryption function, except this time with 2 arguments.
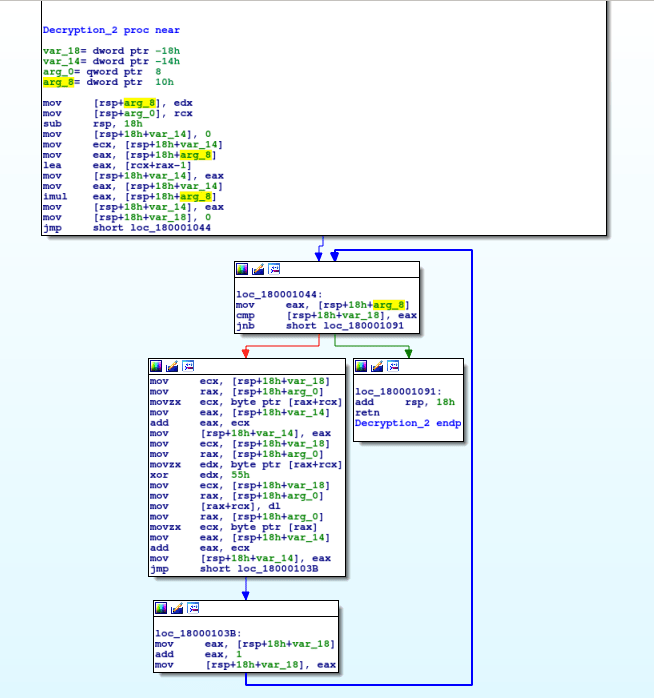
As you’ve probably guessed, this is another algorithm, although it is a lot less complex than the last one – this is due to the fact that each section of data is XORed using 0x55, meaning we don’t need to write some sort of decryption script, and we can simply put it into CyberChef and perform a basic XOR decryption, and then convert it from hexadecimal format. If you haven’t used CyberChef before, you should check it out, as it is extremely useful in situations like these.
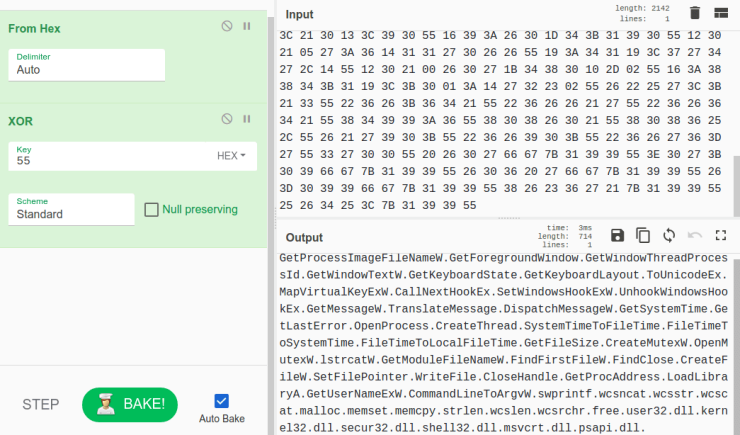
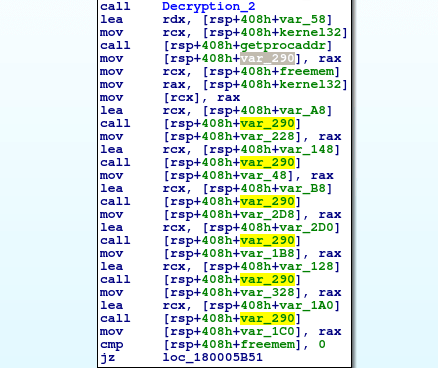
As you can see, the data contains multiple API calls and DLL’s that are loaded during runtime – in this function. As we scroll down the graph, there are several calls to GetProcAddress, as well as calls to variables, such as var_290. There are two ways we can approach this to figure out what is being stored in variable 290 – using a debugger, or in this case through static analysis (the more complex method). To do so, we need to trace backwards. We can see that the value in rax is stored in var_290, just after a GetProcAddress call, and as one of the arguments is kernel32.dll, the other must be the function that is called – this is stored in var_58.
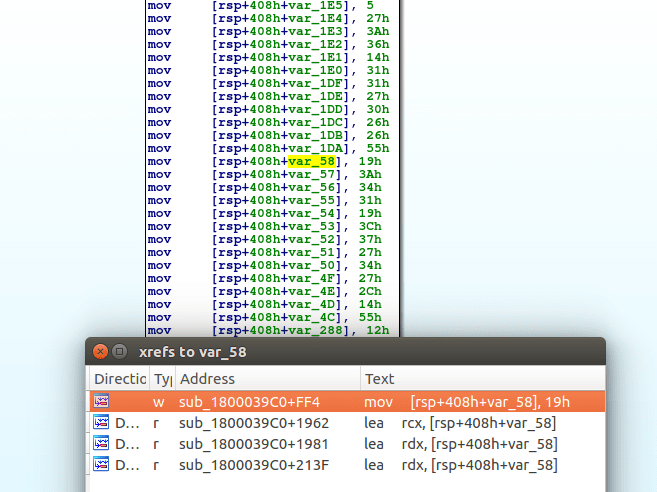
Just above the GetProcAddress, the decryption function is used to decrypt 13 bytes of data at var_58, so lets go to the x-ref of var_58 in this function, and count out 13 bytes of data: var_58 -> var_4C.
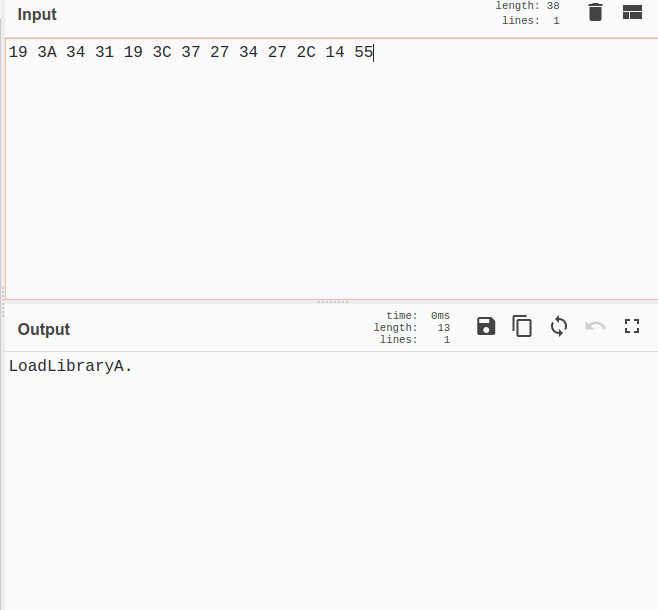
Copy those bytes and put them into CyberChef, and XOR with 0x55. You should get LoadLibraryA.
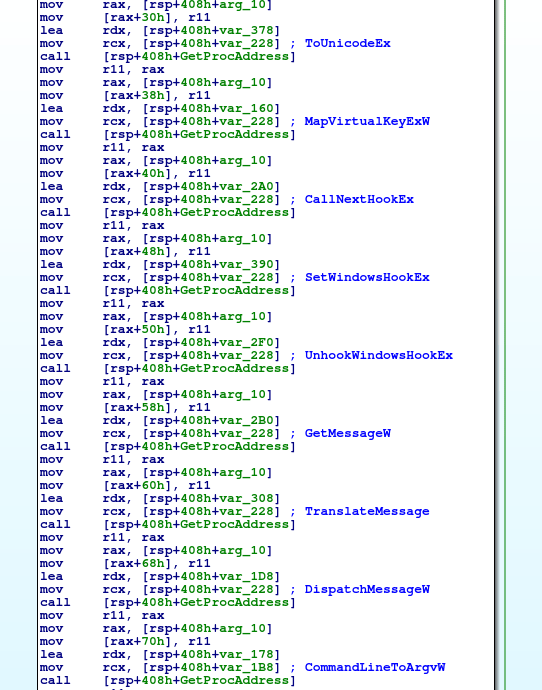
From then on, only GetProcAddress and LoadLibraryA are called by this function – and we can assume that each of the API functions in the decrypted text are imported. Obviously we could do that all manually, but if you have access to a debugger it would be much quicker.
As all of the imports have been resolved, we can move on, out of the function, where the program calls GetUserNameExW twice. In my case, the call will return Reversing\RE – the domain name and username. The malware then moves it to a different location using wcscat, and checks to see if there is a backslash in the returned value, using wcsstr. If there is, a pointer to it will be returned. The backslash is then replaced with a full stop, leaving us with Reversing.RE. The formatted string is used to create a mutex. The program first checks to see if a mutex has been created under that value by calling OpenMutexW, and if it hasn’t been created, CreateMutexW is called. We are able to double check that this mutex is created by using a tool called SysAnalyzer, which is useful for analyzing malicious programs whilst performing dynamic analysis.
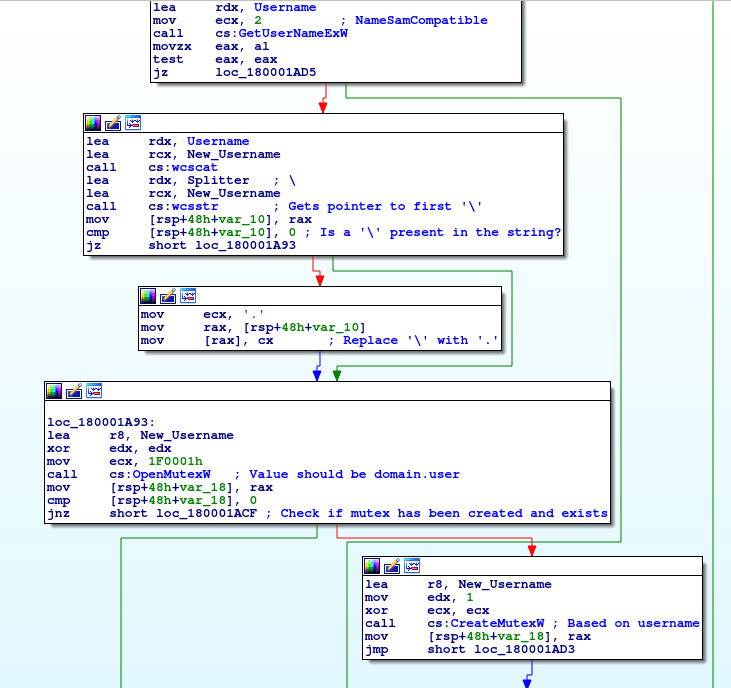
Once a mutex has been created, a function at 0x180003960 is called, which creates a new thread pointing to 0x180001B70. When the created thread exits, the malware exits as well.
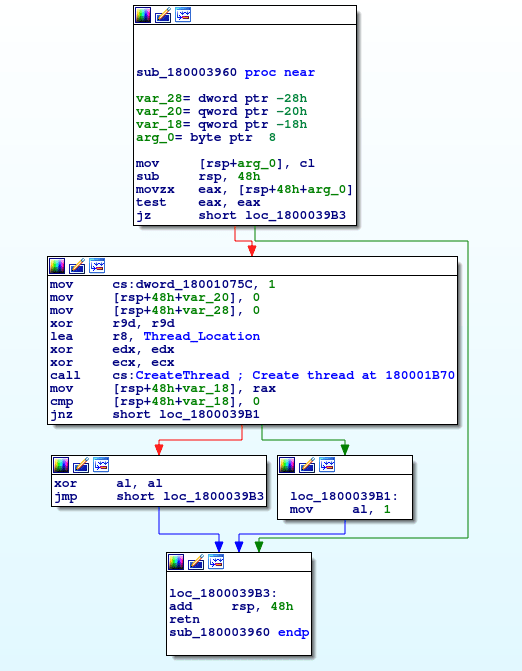
So, let’s take a look at the newly created thread. It seems that immediately after the thread executes, a function located at 0x180001B00 is called, containing the ‘meat’ of the keylogger. I have labelled this as Set_Hooks, based off of the method used by the keylogger.
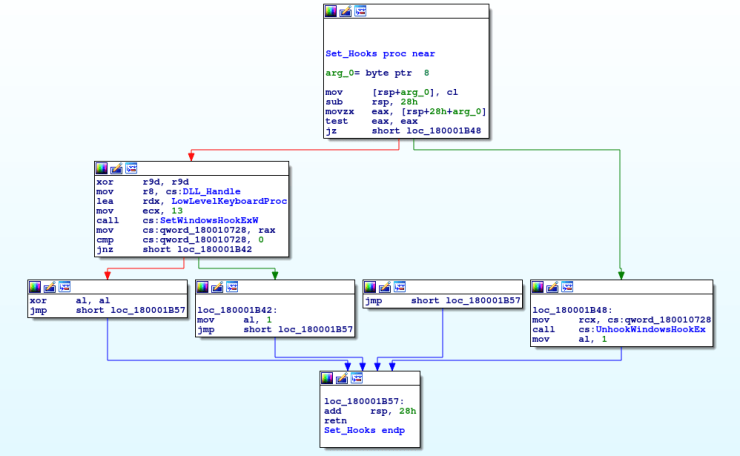
The two most common Windows API calls used in malware and ‘legitimate’ software to perform keylogging is GetAsyncKeyState or SetWindowsHookEx. Due to the number of issues with using GetAsyncKeyState, most keyloggers utilize SetWindowsHookEx nowadays. In this case, SetWindowsHookEx is used to capture keystrokes. Whilst we are unable to use the pseudo code function in IDA, we can use MSDN to understand what is being called and how.
HHOOK SetWindowsHookExA(int idHook, HOOKPROC lpfn, HINSTANCE hmod, DWORD dwThreadId);
When we input all of the arguments into the function, we get:
HHOOK SetWindowsHookExA(13, 0x1800022C0 , 0x180010720, 0);
HHOOK SetWindowsHookExA(WH_KEYBOARD_LL, LowLevelKeyboardProc, DLL_Handle, NULL);
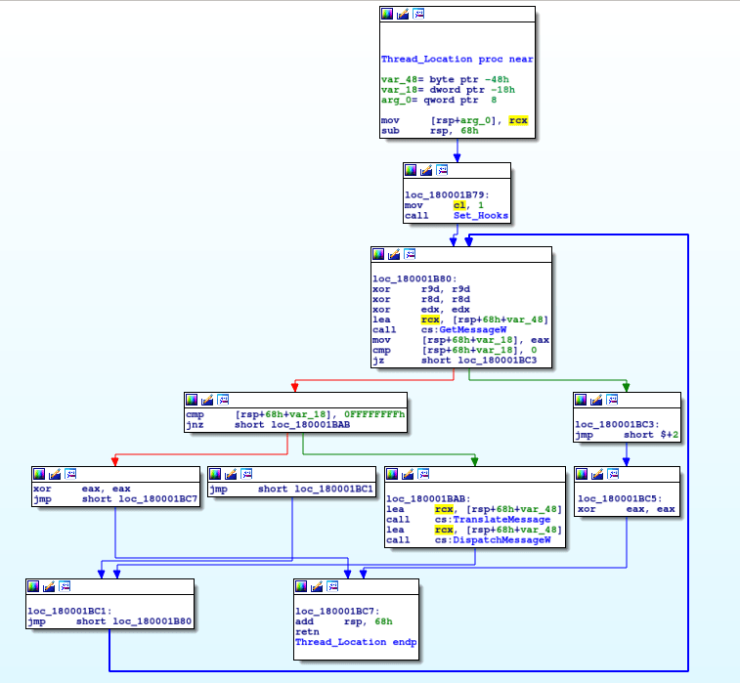
So a hook is installed that ‘monitors low level keyboard input events‘, allowing the malware to gather each keystroke. After, the function returns back to the previous function, where a Get, Translateand DispatchMessage loop is created. While the program is keylogging, GetMessage will gather each key press and pass it to TranslateMessage, which translates virtual key messages into character messages. This is then passed to DispatchMessage, and this redirects it to another window procedure. If you want to learn more about the inner workings of keylogging, check out this site here, it goes into the very low levels of keystroke logging.
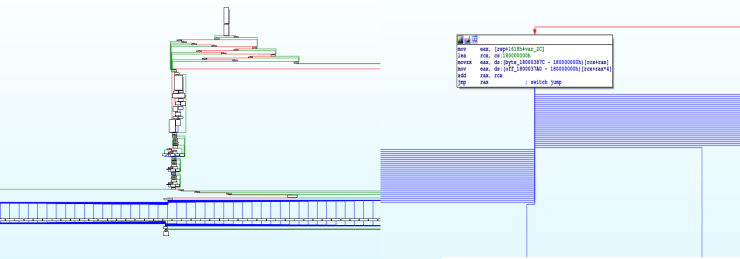
Now lets take a look at the function called by SetWindowsHookExA, located at 0x1800022C0. As you can see from the graph overview, this function is a huge mess. The section at the bottom of the graph is in fact a switch statement – we can see there are multiple case values, and a default value as well. Furthermore, IDA also tells us this is a switch statement. Here is an overview of switch statements in C. To sum it up, it is another method of comparing one variable to several different variables, instead of using multiple if statements.
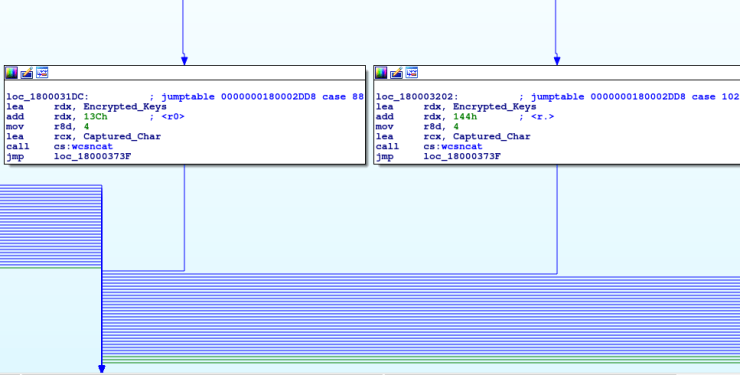
In order to find the values of the case variables, we need to perform some simple addition. Looking at each box, there is a lea rdx, Encrypted_Keys and then add rdx, …h, where the … indicates a certain hexadecimal value. In one particular case, the value 13C is being added to the memory address of the Encrypted Keys, which is 0x18000F2F0. After adding them together, we get 0x18000F42C, which points to ‘<‘. The next instruction after the add, a value is moved into r8d. This indicates the size of the string, which is 4. Therefore, the 3 bytes after 0x18000F42C are also included, meaning the full value is <r0>.
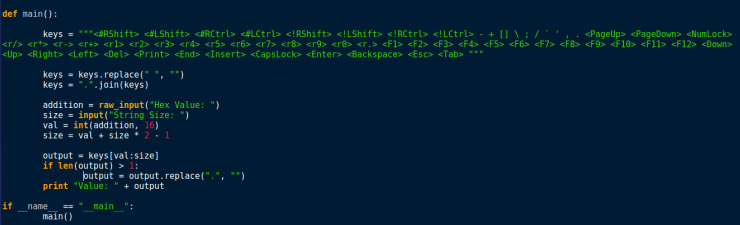
To speed up the process, I wrote a simple script to *automate* the process, so all you have to do is input the addition value and the string length, and the corresponding key is output to the terminal. I have uploaded it to pastebin and you can view it here.
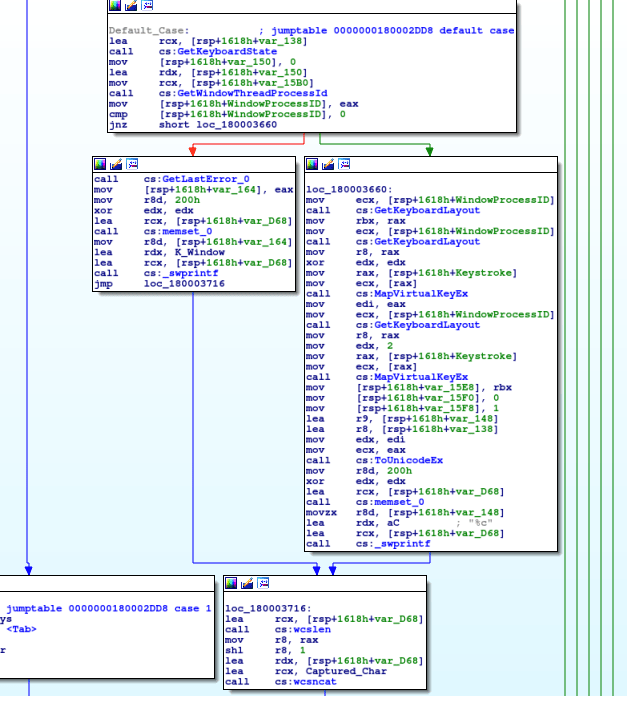
This value is concatenated, using wcsncat, into the address 0x1800115B0. We can rename this to Captured_Char, as that is what it is. If the captured keystroke does not equal any of the hardcoded values, the default case is used, however they all lead to the same logging function. Before examining the rest of this function, lets take a look at how the data is logged.
So this function is quite long, although we just need to see the WriteFile part, to see if the data is encrypted or not when being stored – which is right at the bottom of the function.

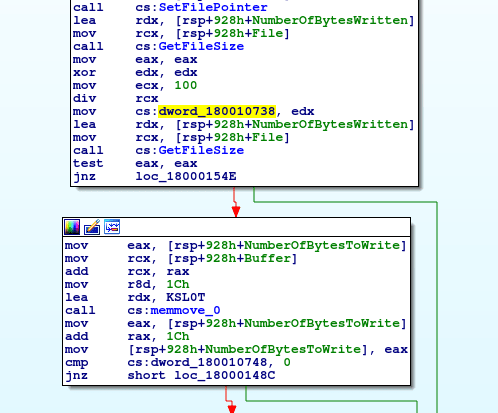
As assumed, the data is encrypted before being written to the file. As you can see, there is a for loop, where on one side data is being written using WriteFile, and on the other side data is being XORed using the original XOR keys. First, it seems that the value in var_34 is being compared to the value in var_20. We can deduce that var_34 is the length of the data to be XORed, due to it being the third argument in the WriteFile call:
WriteFile(hFile, lpBuffer, nNumberOfBytesToWrite, lpNumberOfBytesWritten, lpOverlapped)
Therefore, we can rename that to NumberOfBytesToWrite. While doing so, we can also rename the other variables used in the call, so it is easier to understand the function. You might also have noticed that var_20 is being incremented each loop as well, so we can simply rename that as i. So, lets take a look at the actual XOR part.

So the value in i is moved into rcx, and the value in the Buffer (highly likely the captured keystrokes plus any additional data) is moved into rax. Once again – similar to both decryption routines – the first character that will be encrypted is found by adding the value in i to the address of the Buffer. This is moved into edi, and then div is called. If you remember the first post on the keylogger, div divides the value in rax with the passed operand, which is rcx. The value in rcx is 100 (0x64), and therefore rax will be divided by 100. The question is, what is the value in rax? We can see dword_180010738 is being moved into the register – but it is empty. We have to locate the section where a value is moved into the dword.
Searching for xrefs, there is only one mention of this variable before the encryption routine, which is at 0x1800013F1. It seems that the malware gets the file size of the file which the keystrokes will be logged to, and then performs another div operation, with the remainder being stored in the dword. Let’s imagine that the file size is 0, as the logger has just started up. 0 is then divided by 100, which is obviously 0. This means that the value in edx is 0, and therefore the value in the dword is, you guessed it, also 0. So we can jump back to the encryption routine and work through the rest.
In order to get a byte from the key to XOR the data with, rdx and rax are used. The value in rdx on the first loop is zero – this is the result of the div using the value in dword_180010738. The address of the original XOR key is moved into rax, and a byte is stored in eax using the same byte ptr [rax+rdx] used throughout. edi (the keystroke data) is moved into edx, which is XORedby eax (the key). The encrypted character is used to overwrite the character in the keystroke data, based off of the value in i. Next, the value of dword_180010738 is incremented by 1, meaning the key used to XOR the first character of the buffer is different to the key used to XOR the second character of the buffer. Finally, i is also incremented by 1, and the loop continues until the buffer is completely overwritten.
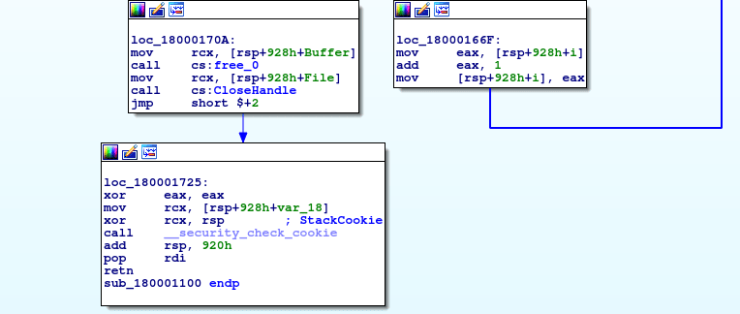
The data is then written to the file, the buffer is freed, the file handle is closed, and the function returns.
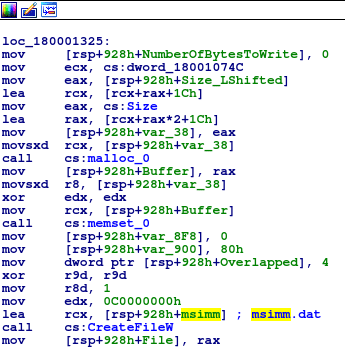
Now we have cracked the algorithm, we need to find where the data is being logged. We already know which variable contains the handle to the file, so lets find the first instance of it being used. Sure enough, there is a mov [rsp+928h+File], rax just after a call to CreateFileW. When looking at the arguments CreateFile takes, we can see that the very first argument is the file name:
HANDLE CreateFileA(lpFileName, dwDesiredAccess, dwShareMode, lpSecurityAttributes, dwCreationDisposition, dwFlagsAndAttributes, hTemplateFile);
In this case, the first argument is a variable containing msimm.dat – one of the original strings we decrypted. As there is no file path connected to it, it seems that this file is written in the current directory, so wherever the keylogger is run.
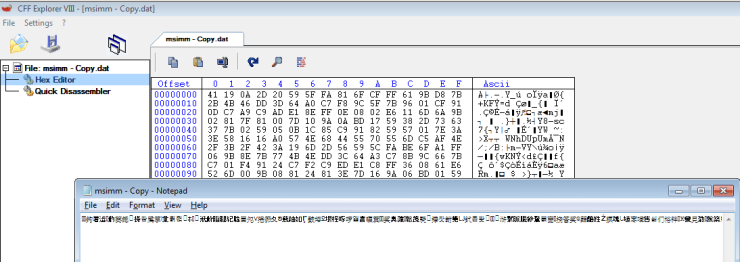
We know almost everything about how the file is logged and how the data is stored, so let’s see if we can get a sample of the encrypted data in order to analyze it. Open up a VM and run the DLL. In order to run it, I am using x64Dbg, as I couldn’t seem to get rundll32.exe to run it – maybe due to the lack of exports. Eventually, the file I wanted was created on the Desktop, msimm.dat. Upon opening it, there is a lot of what seems to be text in a different language, although this is just the encrypted text being displayed by Notepad. Open the file in something like CFF Explorer in order to view the hex data of the file, so that we can XOR it back to plain text. Copy this into a text file on your host machine, and get your favourite text formatting tool up.
The reason for this is because the script I have written is quite ‘hacky’. I tried several different things in order for python to read hex bytes as hex bytes into an array – all failed. If you guys have any ideas on how to improve it, let me know! Anyway, the text needs to be formatted in this way:
0x..., 0x..., 0x...
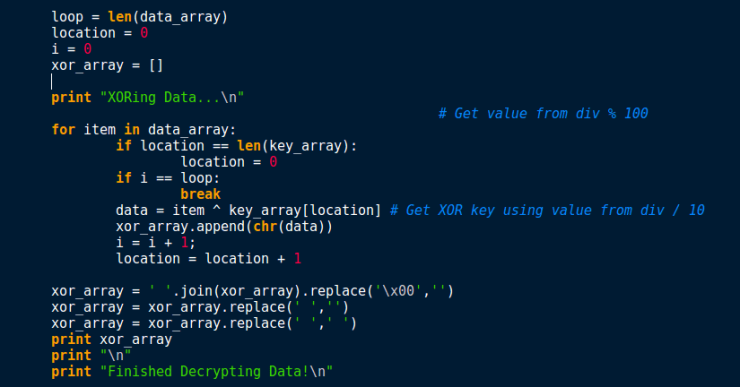
And as CFF explorer copies the hex in one long string, we need to split it every second character and convert spaces to , 0x. I personally used this to do so. Now my script doesn’t work 100% of the time – I’m mainly using it as an example here to show you how to replicate the algorithm in Python. It only seems to work on one section of the text, but I’m sure those of you with a higher level of Pythonic knowledge and malware analysis knowledge will be able to re purpose it so it works flawlessly. Anyway, here it is. When we run the script, it will decrypt the section of hex data using the keys and output the plaintext. There is also a legend that shows you which part means what. As I mentioned, there are so many better ways to do this so that it works for different logs, however I didn’t have much time to work on it and make it pristine.
That pretty much wraps up this analysis, as there isn’t much else to analyze. There is no method of extracting the log files in the keylogger, so I believe Turla only use it when they have remote access to the machine, and extract the logs through a remote access tool or a backdoor. So I hope you enjoyed the two part analysis, and I should hopefully have the Hancitor part two write up soon. Thanks!
IOCs:
- Keylogger: 59b57bdabee2ce1fb566de51dd92ec94