SQUIRRELWAFFLE – Analysing the Custom Packer
In the last month, I have heard and seen a lot about SQUIRRELWAFFLE on Twitter, a new loader that has been used in email-based campaigns to download Cobalt Strike or Qakbot to the victim’s machine, so I figure it will be fun to take a look at this new actor!
In the initial stage of each campaign, a malicious Word document or Excel file containing malicious macros is delivered to the victim through phishing malspam. The obfuscated macros drop a VBS file, which downloads the SQUIRRELWAFFLE loader on the victim’s machine and executes it.
The first stage of this loader comes in the form of a DLL packer. Despite being fairly simple, the packer utilizes some interesting anti-analysis tricks, which makes it entertaining to patch and analyze statically!
To follow along, you can grab the sample on MalwareBazaar!
Sha256: 4545b601c6d8a636dce6597da6443dce45d11b48fcf668336bcdf12ffdc3e97e
Step 1: Rebasing
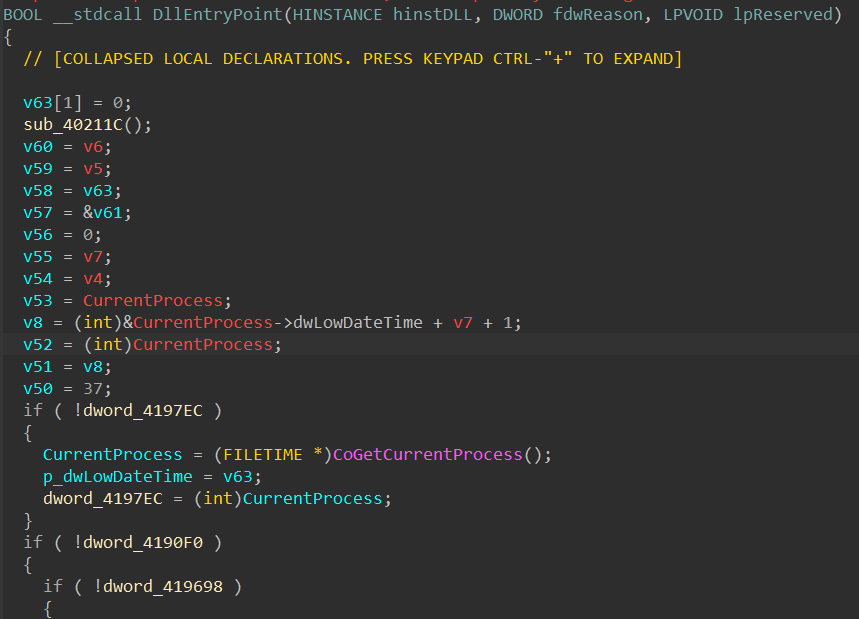
Upon opening the packer file in IDA Pro, I immediately spot an anti-analysis method used to hide WinAPI calls as well as global variables’ access. Across the code, the malware accesses what seems to be addresses (e.g. 0x4197EC and 0x41BA34) at an offset stored in ebx.
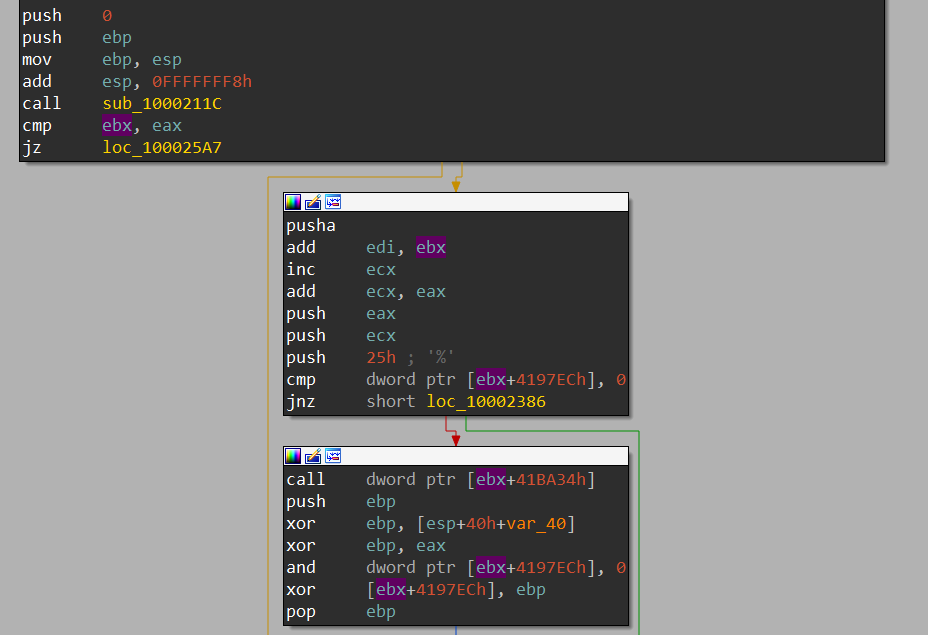
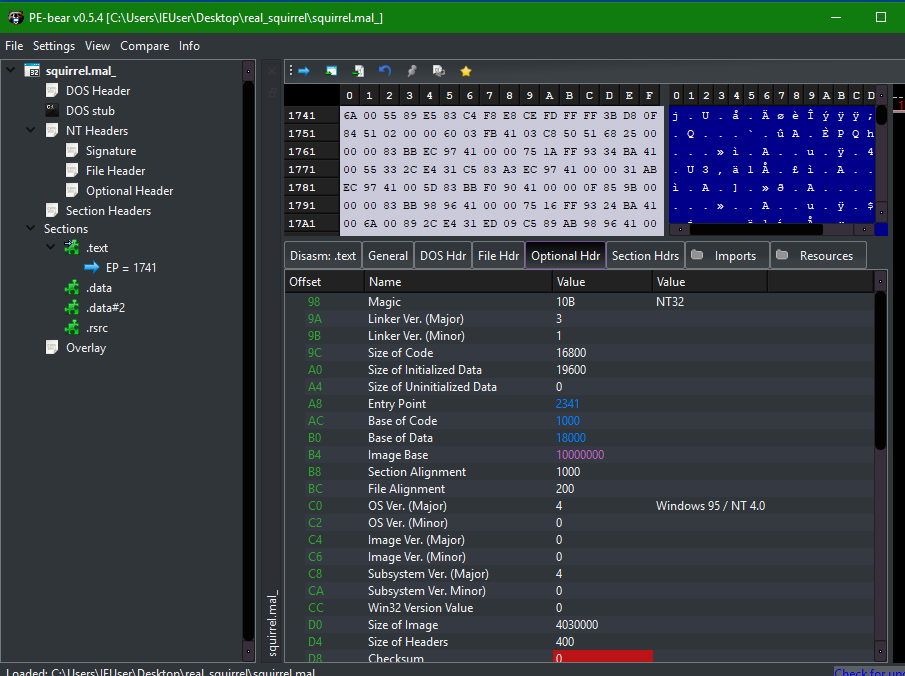
Typically, these addresses should get resolved by IDA if the executable’s image base is the standard address 0x400000, but we can quickly check with PEBear to see that this is not the case. The image base is set to 0x10000000 in the executable’s optional header, forcing IDA to load it at this particular address. To have it properly loaded in IDA, we can try to map the base back to 0x400000 and see if those addresses actually make sense disregarding the value of ebx.
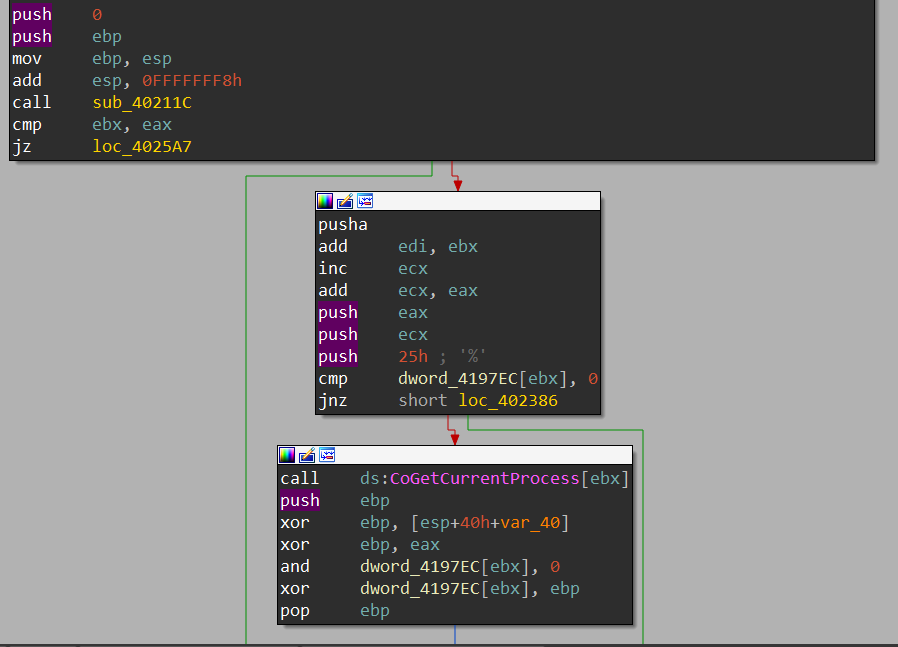
After patching the optional header’s image base value, the same part of code is resolved to meaningful API and variable addresses.
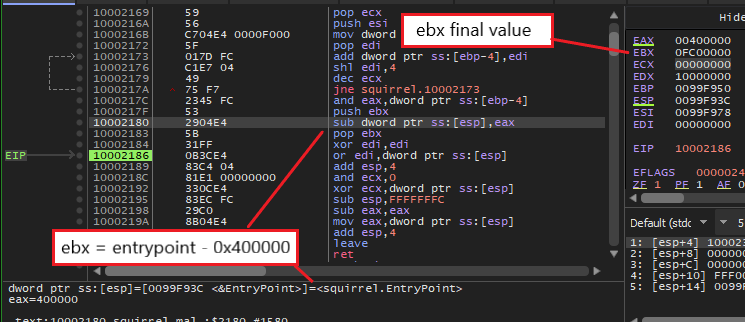
At this point, it’s safe to assume that sub_40211C writes the value of 0x10000000 – 0x400000 (or 0xfc00000) into ebx and uses this value to rebase every address manually upon accessing them. This can quickly be checked using dynamic analysis as the function code is fairly simple.
After we have manually patched the image base to the correct value, this ebx offset is not needed to rebase the addresses in our IDB anymore. Therefore, we can simply insert the instruction “xor ebx, ebx” somewhere in the beginning of every function to fully clean it up. After doing so, the IDB is turned back into looking like a normal executable for us to examine!
Step 2: Anti-Analysis Through Binary Padding
The core of this executable is relatively short and simple to understand. However, the author of this packer has utilized binary padding to include junk functions and global variables to make static analysis a bit more complex. As you can see from the images of the code base so far, there are some strange functions getting called such as CoGetCurrentProcess. If we examine the xrefs of the global variables that the result of these functions is being set to, we can see that these variables are not used anywhere else.
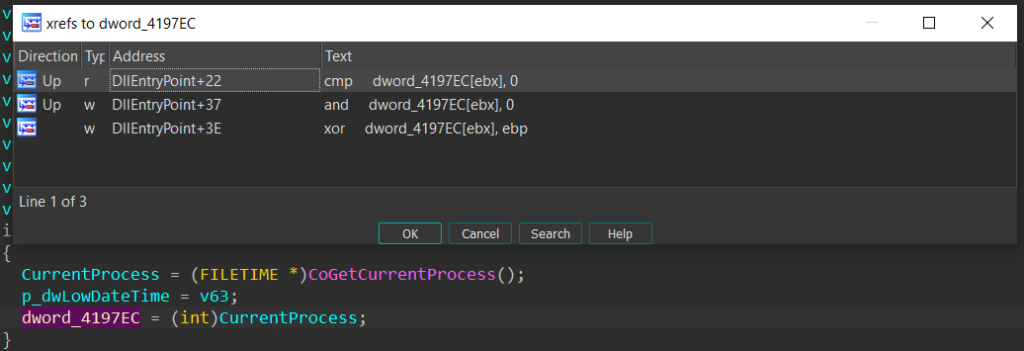
The list of junk functions used for padding is ImageList_DrawEx, OleInitialize, CoFreeUnusedLibraries, CoFileTimeNow, CoGetCurrentLogicalThreadId, OleUninitialize, CoGetCurrentProcess, CoCreateGuid, CoGetContextToken, CheckDlgButton, GetCaretBlinkTime, CheckRadioButton, GetCursorInfo, GetCapture, CheckMenuItem, CheckMenuRadioItem. The padding usually follows the form of checking if a global variable is initialized or not, and if it is not, the malware calls the padding function and writes its result to this variable. The best way to get over this during static analysis is using the Collapse item functionality in IDA to hide away these if blocks.
Step 3: Static Analysis
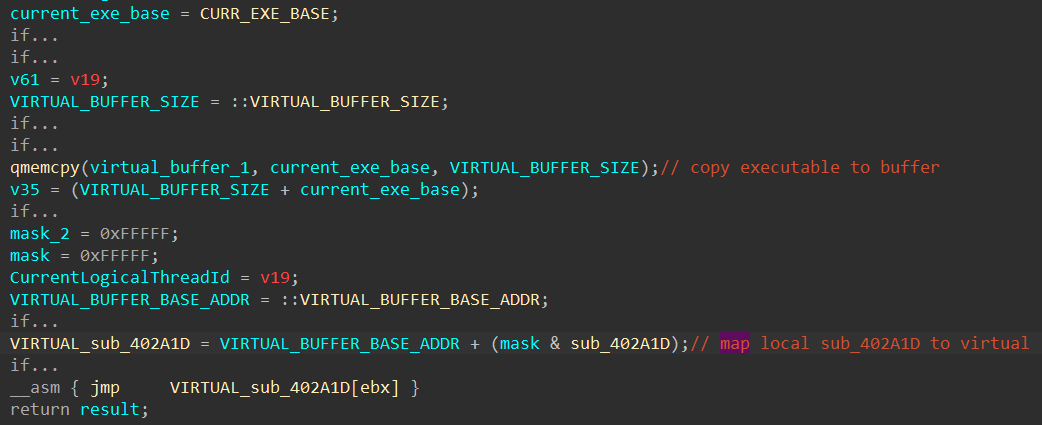
The first valuable WinAPI function that the packer calls is VirtualAlloc, which allocates a virtual buffer of 0x401A000 bytes with read, write, and execute rights.

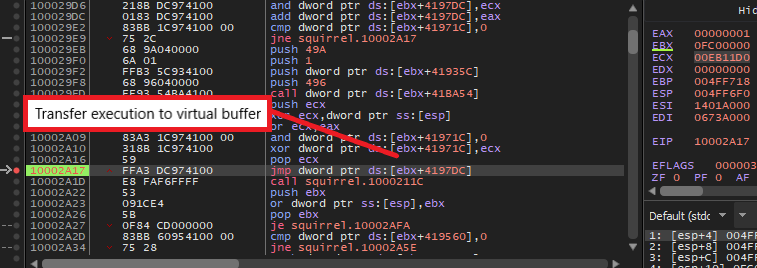
Next, it uses the instructions “rep movsb” to copy the entire packer executable from the image base to this newly allocated buffer. The malware then manually calculates the offset of the function sub_402A1D to resolve its virtual address in the allocated buffer. Finally, it transfers execution to that virtual address through a “jmp” instruction.
NOTE: Because of this execution flow, you should not put breakpoints in sub_402A1D in the main executable while analyzing dynamically in your debugger. The “int3” instruction (trap to debugger) will get copied into the virtual buffer and break your execution with this interrupt since x32dbg or similar debuggers stops upon encountering any “int3” instruction that is not set by it. To smoothly use breakpoints, you should set it directly in the memory addresses in the virtual buffer.
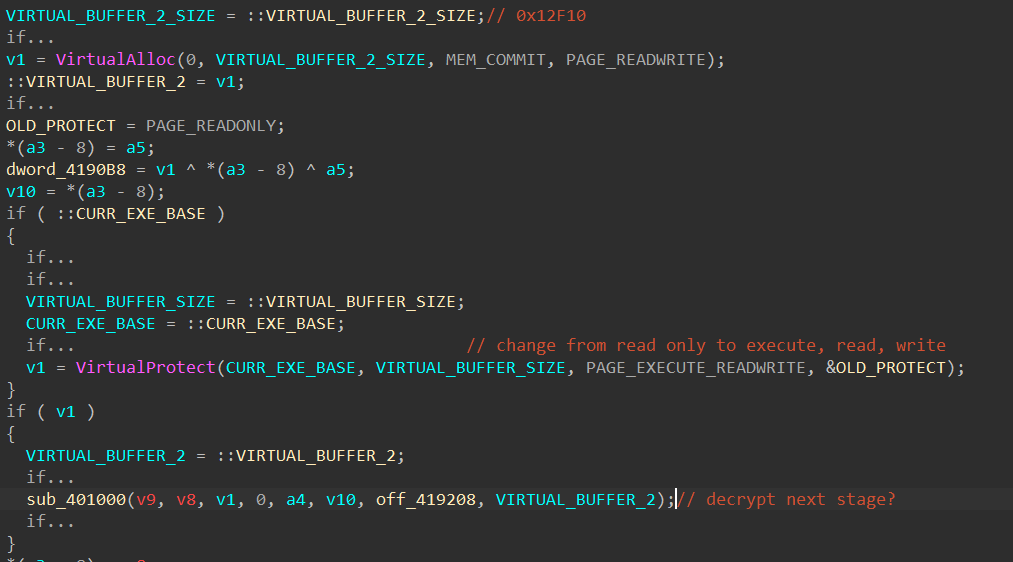
In the function sub_402A1D, the packer calls VirtualAlloc again to allocate for a buffer of size 0x12F10 bytes with read and write access. Next, it calls VirtualProtect to change the current executable’s protection from read only to execute, read, and write. At this point, we can make the assumption that the malware needs the execute and write accesses to write the next stage executable into memory and execute it. Finally, we see the virtual buffer and the pointer off_419208 being passed into the function sub_401000 as parameters.
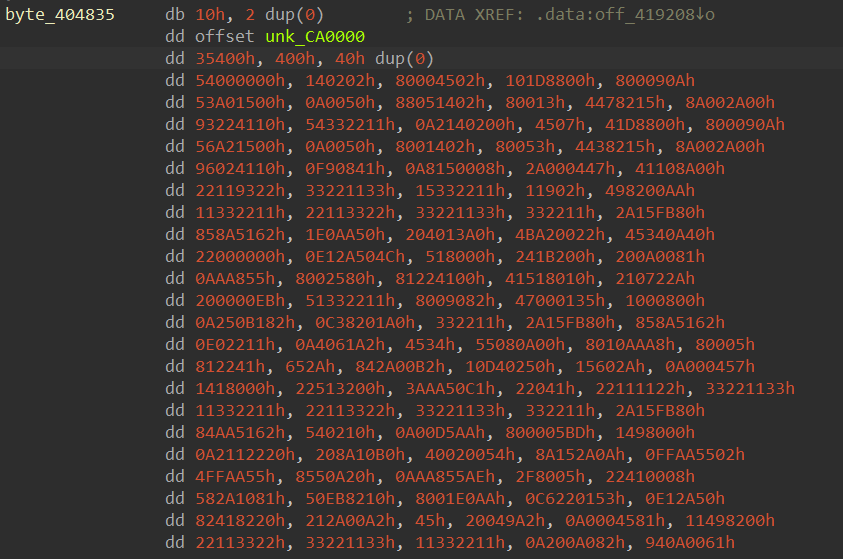
Below is a part of the buffer pointed to by off_419208, which seems to be some encrypted bytes. Here, another assumption can be made that the function sub_401000 might decrypt this buffer and write the content, which might possibly be the executable for the next stage, into the allocated virtual buffer. With that assumption, let’s save analyzing this function for dynamic analysis and moving on to see how the packer uses the virtual buffer afterward.
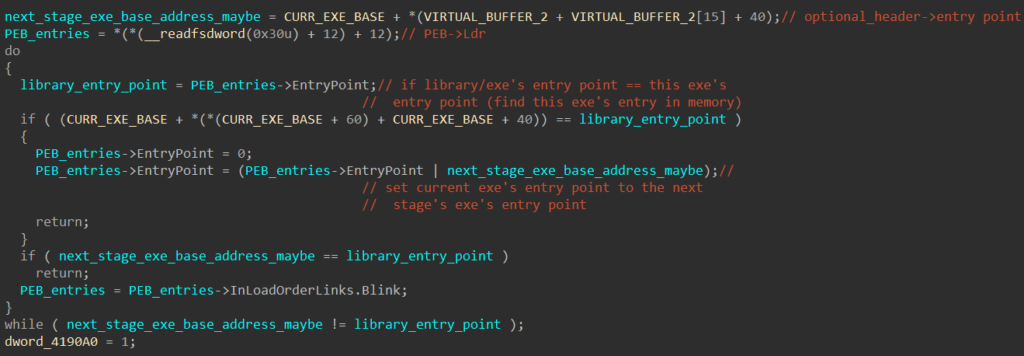
Afterward, the packer calls the function sub_4021A2 below. Assuming the decrypted stage 2 executable is written into the virtual buffer, the malware extracts its entry point by querying the AddressOfEntryPoint field in its optional header structure. Next, it iterates through the LDR_DATA_TABLE_ENTRY structures from the PEB and compares each loaded library’s/executable’s entry point with its own entry point. This is to manually find the LDR_DATA_TABLE_ENTRY structures corresponding to its own executable. Once found, the EntryPoint field in this structure is set to the entry point of the stage 2 executable. This further confirms our previous assumption that the decryption happens during the call to sub_401000.
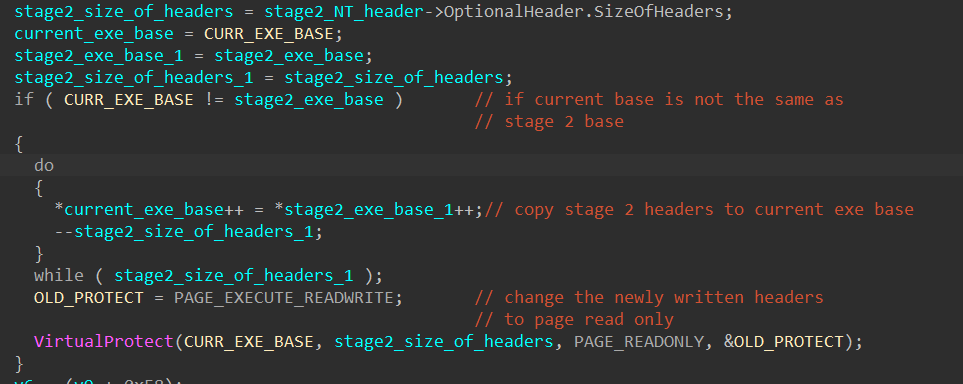
The packer then calls the sub_402E14, which takes in the address of the virtual buffer as a parameter. This function extracts the stage 2 executable’s size of the headers and copies the headers to the current executable’s base. It sets the newly written headers to have read only access using VirtualProtect.
At this point, it’s safe to say that our previous assumption is correct, and we can quickly extract the stage 2 executable using dynamic analysis. The rest of this function iterates the stage 2 executable’s section table to map the raw section to its virtual address in the current executable’s address space and transfer executions to it. Since we already know where the next stage is decrypted already, static analysis can end here, and we can move to dynamic analysis to quickly unpack the next executable.
Step 4: Unpacking Through Dynamic Analysis
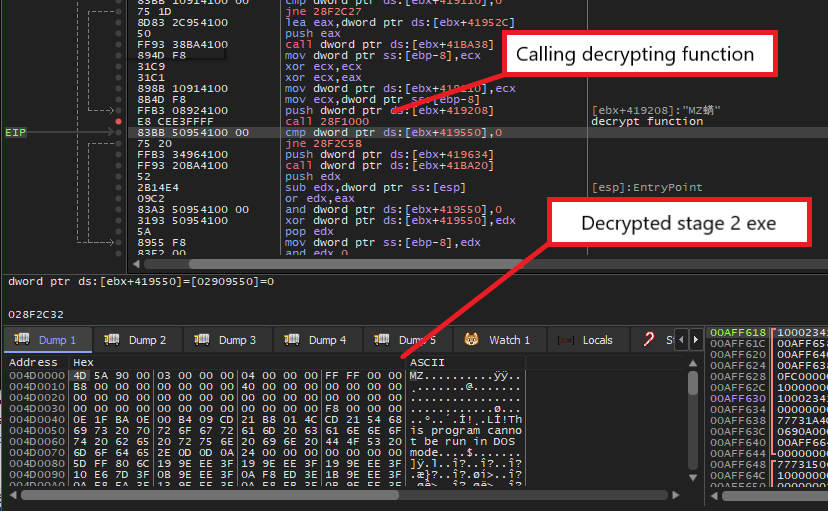
Because we know that sub_401000 is the decrypting function, we can halt the execution right after this function gets called to unpack the next stage.
First, we need to set a breakpoint at the “jmp” instruction at the end of DllEntryPoint to properly transfer execution to the first virtual buffer and execute until we hit it.
Next, to capture the address of the second virtual buffer that will eventually store the next stage, there are a few ways. We can either set a breakpoint at the VirtualAlloc call and examine the result value or a breakpoint at the instruction “call sub_401000” instruction and retrieve it from the stack. After we execute the decrypting function, we see that a valid PE header is written at the beginning of the virtual buffer, so we can dump it directly from memory to retrieve the executable for the second stage.
NOTE: Since we are setting breakpoints in the virtual buffer, we have to manually map the executable’s address to a virtual address based on the virtual buffer’s base. For example, the address 0x10002C2D of the instruction “call sub_401000” would become 0x3152C2D if the base is 0x3150000.
Finally, we can check in PEBear to see that the executable is ready to be analyzed. Since all of the imports are resolved properly, we do not need to do further mapping of raw address to virtual address!
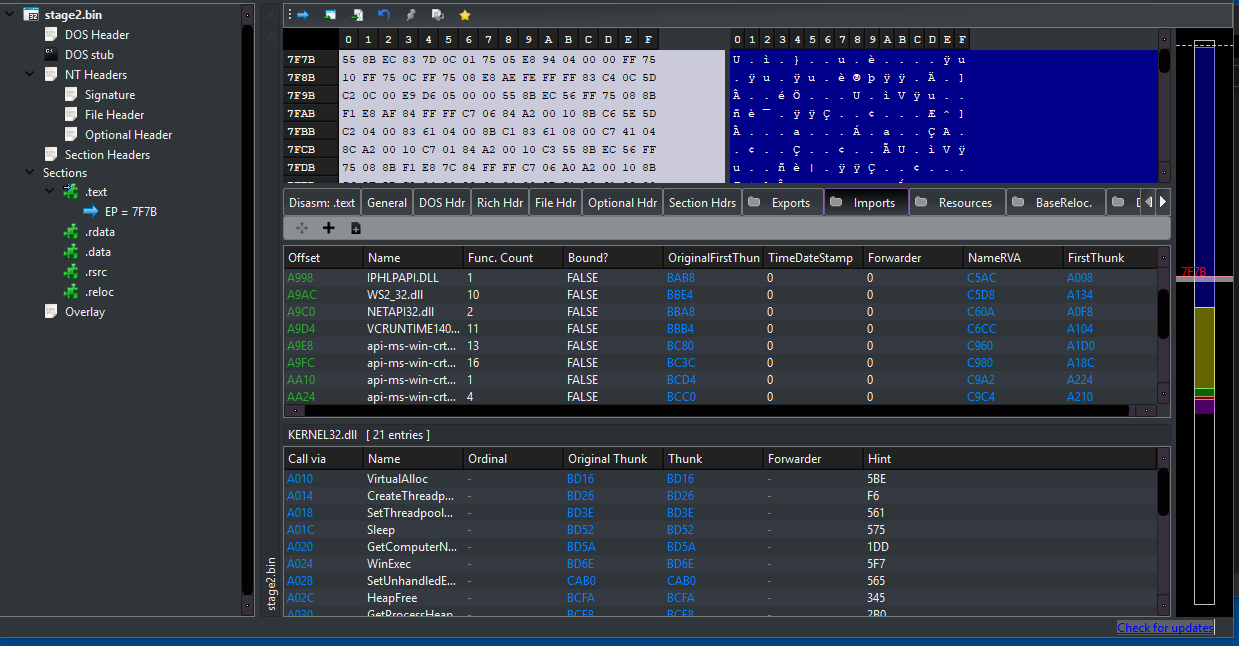
At this point, we have fully unpacked the next stage from this custom packer and can now analyze the main SQUIRRELWAFFLE executable! If you have any questions or issues while analyzing this sample, feel free to reach out via Twitter.

